In EDUvision Season 3 Episode 6 we demonstrated a project that utilizes the Arduino Nano 33 BLE Sense’s gesture sensor to control an LED circuit.
Materials needed
- Arduino Nano 33 BLE Sense https://store.arduino.cc/arduino-nano-33-ble-sense
- 3 LEDs + 220 ohm resistors
- Breadboard
- Jumper wires
Arduino Nano 33 BLE Sense
The Nano 33 BLE Sense is Arduino’s 3.3 V AI enabled board in the smallest available form factor: 45x18 mm! It comes with a series of embedded sensors:
- 9 axis inertial sensor: what makes this board ideal for wearable devices
- humidity, and temperature sensor: to get highly accurate measurements of the environmental conditions
- barometric sensor: you could make a simple weather station
- microphone: to capture and analyse sound in real time
- gesture, proximity, light color and light intensity sensor : estimate the room’s luminosity, but also whether someone is moving close to the board
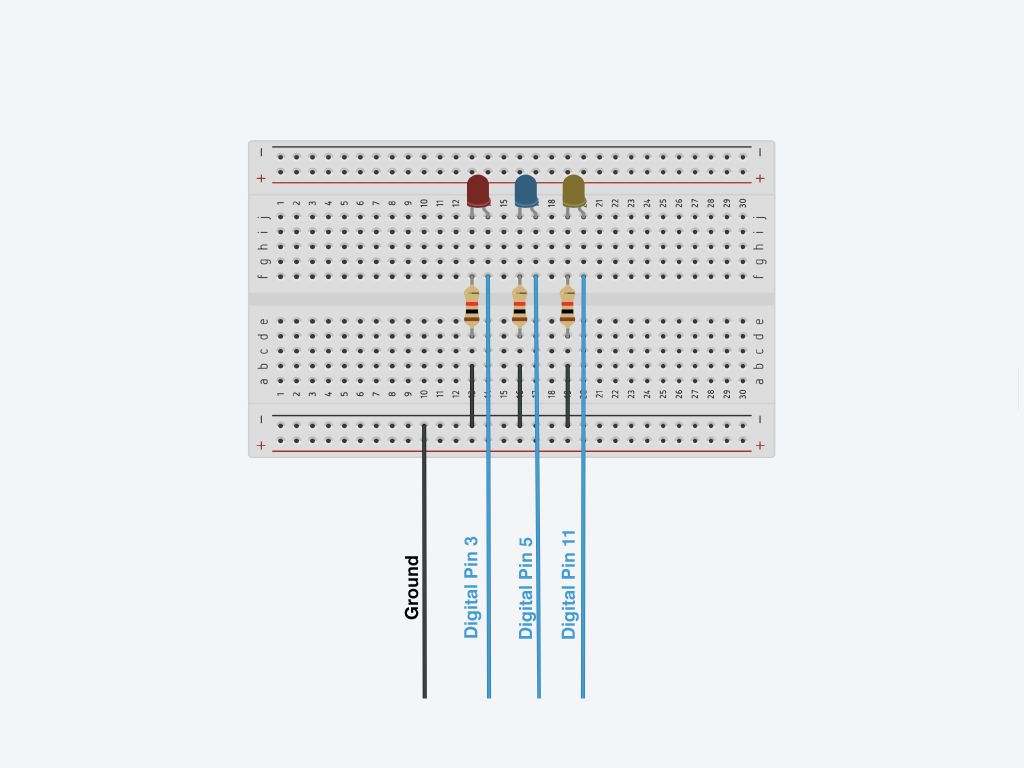
Wiring
Code
This project utilizes the Arduino_APDS9960 library which enables the use of gestures. In the Arduino IDE, navigate to tools, manage libraries and proceed to install the library. In the Arduino Editor, go to libraries and make sure to include it in your code. The code used in this project is based upon the sensor’s example code included with the installation of the library.
The library on GitHub: https://github.com/arduino-libraries/Arduino_APDS9960
Example sketch
/*
  APDS9960 - Gesture Sensor

  This example reads gesture data from the on-board APDS9960 sensor of the
  Nano 33 BLE Sense and prints any detected gestures to the Serial Monitor.

  This example code is in the public domain.

  Edited by Anton Sjöö 2021
*/

#include <Arduino_APDS9960.h>
int led1 = 5;
int led2 = 3;
int led3 = 11;

void setup() {
   pinMode(led1, OUTPUT);
   pinMode(led2, OUTPUT);
    pinMode(led3, OUTPUT);
     pinMode(led4, OUTPUT);
  Serial.begin(9600);

  if (!APDS.begin()) {
    Serial.println("Error initializing APDS9960 sensor!");
  }

  // for setGestureSensitivity(..) a value between 1 and 100 is required.
  // Higher values makes the gesture recognition more sensible but less accurate
  // (a wrong gesture may be detected). Lower values makes the gesture recognition
  // more accurate but less sensible (some gestures may be missed).
  // Default is 80
  //APDS.setGestureSensitivity(80);

  Serial.println("Detecting gestures ...");
}
void loop() {
  if (APDS.gestureAvailable()) {
    // a gesture was detected, read and print to serial monitor
    int gesture = APDS.readGesture();


    switch (gesture) {
      case GESTURE_UP: //
        Serial.println("Detected UP gesture");
        for (int i = 0; i <= 255; i++) {
    analogWrite(led1, i);
    delay(10); //Set the rate of the fade
  } // For loop that fade in the LED

        break;

      case GESTURE_DOWN:
        Serial.println("Detected DOWN gesture");
       for (int i = 0; i <= 255; i++) {
    analogWrite(led2, i);
    delay(10);
  }
        break;

      case GESTURE_LEFT:
        Serial.println("Detected LEFT gesture");
        break;
            for (int i = 0; i <= 255; i++) {
    analogWrite(led3, i);
    delay(10);
  }

      case GESTURE_RIGHT:
        Serial.println("Detected RIGHT gesture");
            for (int i = 255; i >= 0; i--) {
    analogWrite(led1, i);
    analogWrite(led2, i);
    analogWrite(led3, i);
    delay(10);
    // By gesturing right you can turn off all the LEDs, to fade the LEDs out we apply the same logic as the fade-in loop but reversed.
  }
        break;

      default:
        // ignore
        break;
    }
  }
}
Test your project
Upload the code to your board. You should now be able to use different gestures to turn on and off the LEDs in your circuit.
Gesture directions are as follows:
- UP: from USB connector towards antenna - this one will turn on the LED connected to digital pin 5
- DOWN: from antenna towards USB connector - this one will turn on the LED connected to digital pin 3
- LEFT: from analog pins side towards digital pins side - this one will turn on the LED connected to digital pin 11
- RIGHT: from digital pins side towards analog pins side - this one will turn off all the lights
Try to play around with the example code and see what else you can do with gestures as they work as inputs.
One use case would be to craft a box with red, yellow and green LEDs and with a title Status. With this you can show in an easy way to your colleagues at the office if you are available to talk, busy so only urgent things or no interruptions because you are in a call/middle of something that needs your full attention.
Where would you use this kind of project? Or what would you do with the gesture sensor? Let us know and share your project for EDUvision or using #ArduinoEDUvision