Greenhouse
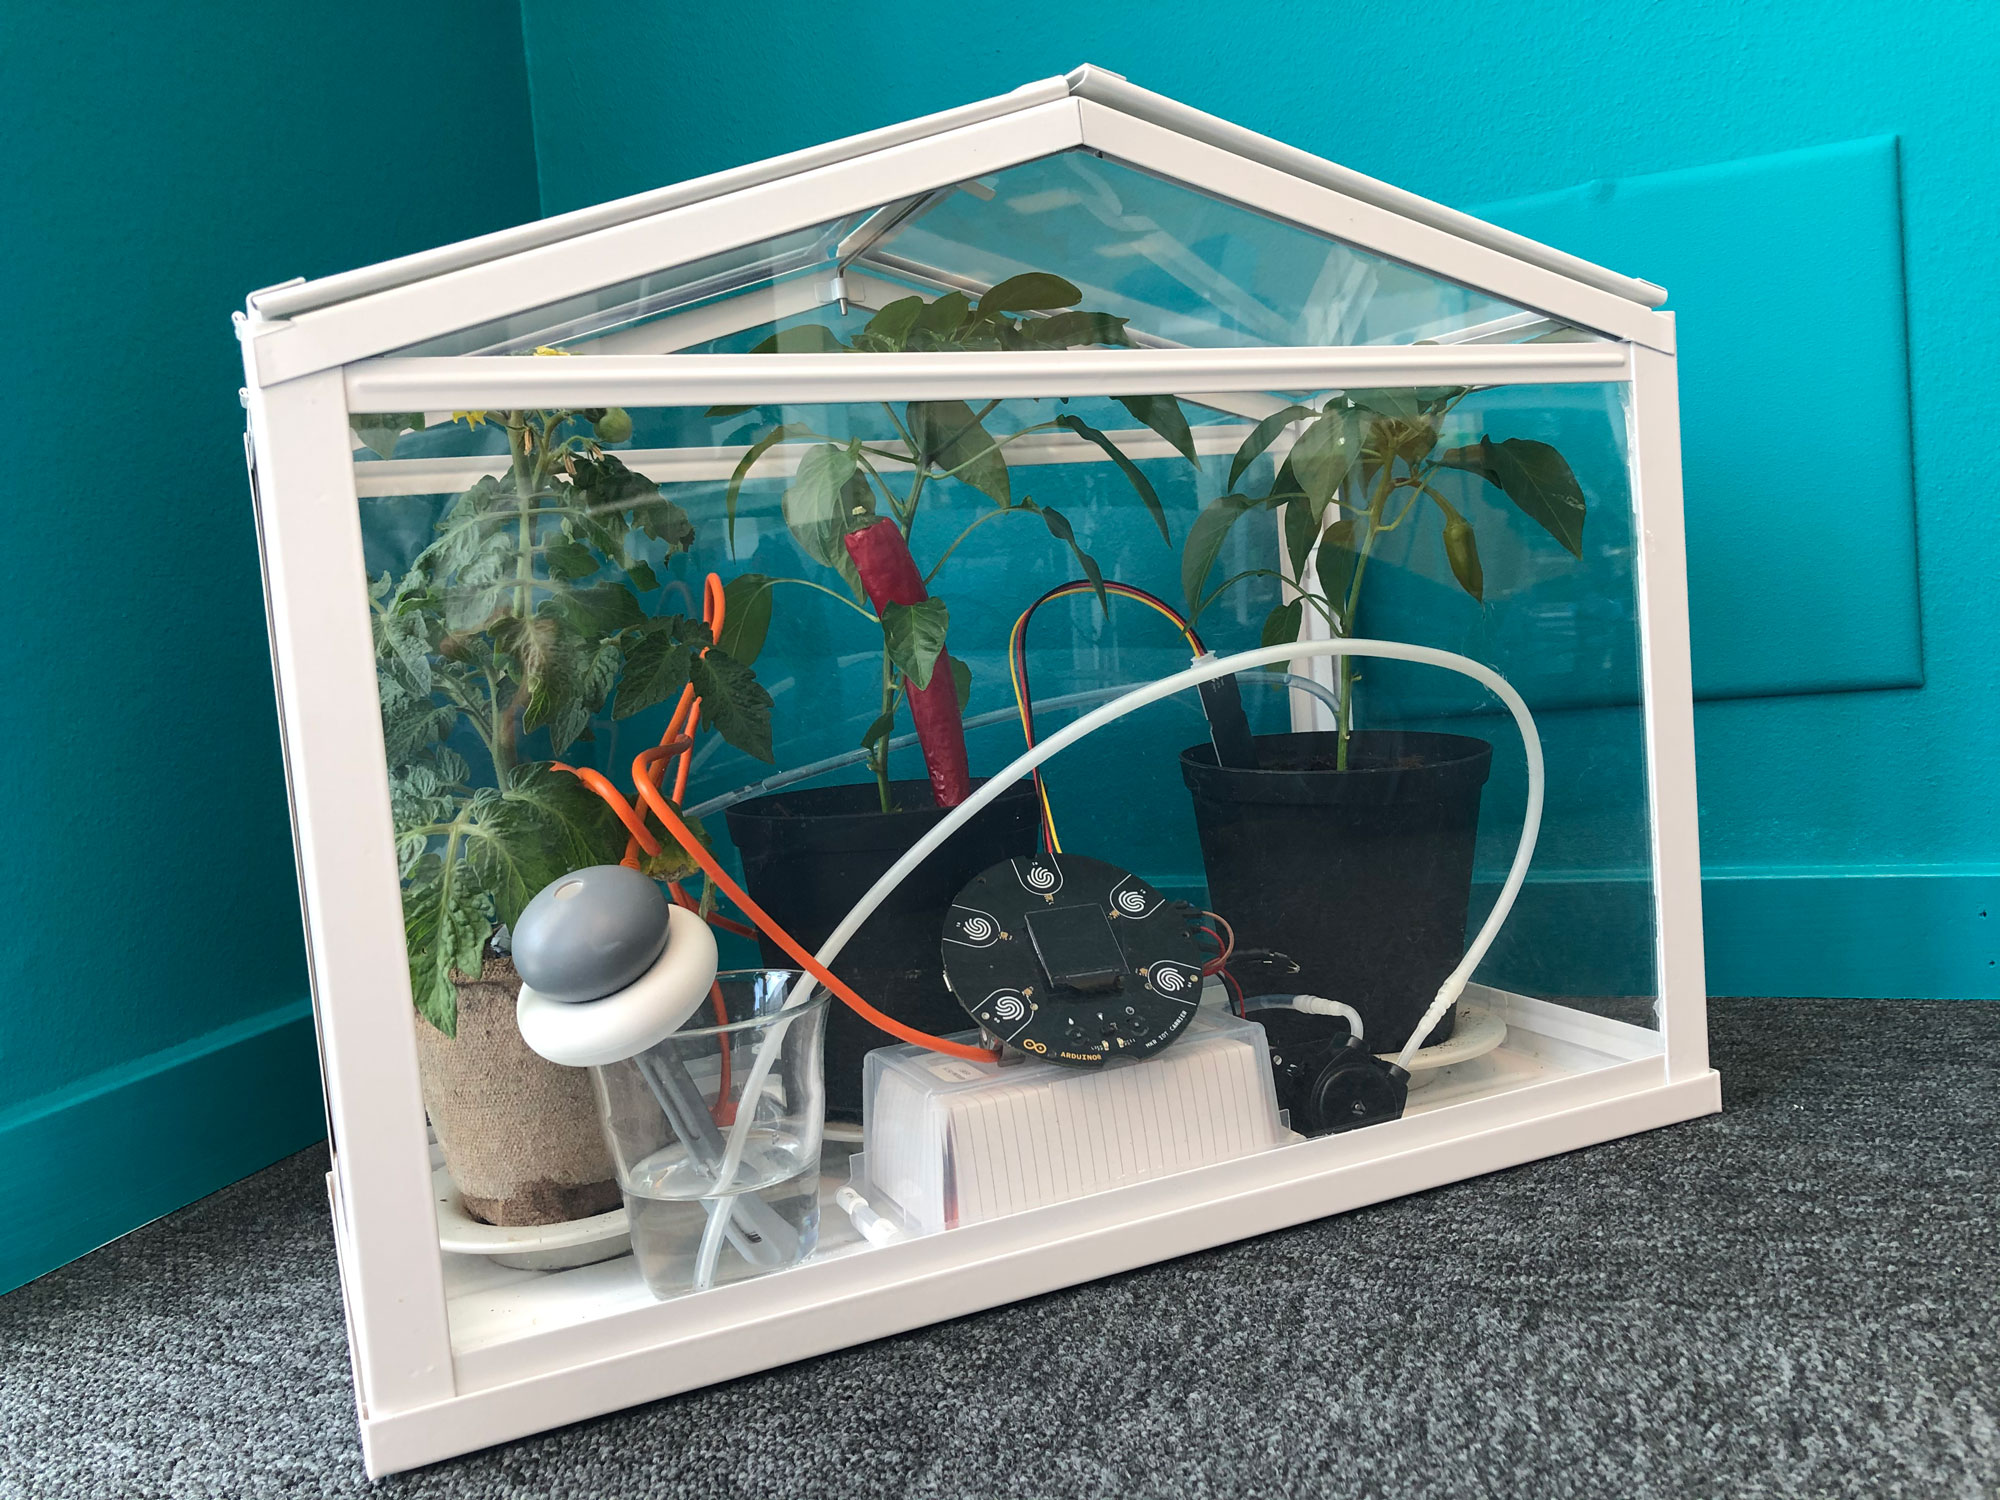
In EDUvision Season 3 Episode 02 we demoed a project that utilizes the Explore IoT Kit to build a greenhouse that takes care of your plants for you! In this project we take advantage of the internal sensors and relays in the MKR IoT Carrier to activate a humidifier and a waterpump.
Materials needed
- Explore IoT Kit (humidity, temperature, light and moisture sensors, relays, board and carrier)
- Greenhouse
- Plants
- Computer
- Humidifier (optional)
- Water pump (optional)
- Phone (optional)
Explore IoT Kit
This kit includes hardware, software and learning materials to build 10 step-by-step activities that cover a wide range of topics from collecting data and creating simple home appliances to urban farming solutions and weather monitoring systems.
Hardware
- Arduino MKR WiFi 1010 board
- MKR IoT Carrier
- Plastic encasing
- Micro USB cable
- Moisture sensor
- PIR sensor
- Plug-and-play cables for all the sensors
Software The Explore IoT Kit includes a 12 months free trial of the Arduino Create Maker Plan. Arduino Create is an online platform that enables anyone to write code, access content, configure boards and share projects. With the Arduino Create Free Plan, you can use the Web Editor to program your board, connect multiple devices with the Arduino IoT Cloud, browse a collection of projects on Arduino Project Hub, and connect remotely to your boards with Arduino Device Manager. With the Arduino Create Maker Plan, you get access to additional features and increase the productivity of your tools.
MKR IoT Carrier
The MKR IoT Carrier is an extension of the MKR WiFi 1010 board and it was developed for the Explore IoT Kit. The carrier does not come equipped with a microcontroller, meaning it needs to be used together with an Arduino board. Using a carrier we unlock many useful and interesting features, such as having a display, RGB LEDs, a gyroscope and different sensors. For example, relays allow us to use an Arduino board to control higher power circuits than the ones that the Arduino board is capable of controlling itself.
The MKR IoT Carrier includes:
- Two 24 V relays
- SD card holder
- Five Tactile buttons
- Plug and play connectors for different sensors
- Temperature sensor
- Humidity sensor
- Pressure sensor
- RGBC, Gesture and Proximity
- IMU
- RGB 1.20” display
- 18650 Li-Ion rechargeable battery holder (battery not included)
- Five RGB LEDs
Wiring
MKR IoT Carrier has all the sensors we need built-in to it and for etxra we can connect the moisture sensor using the plug-and-play cable. To control the humidifier we hacked it and cut the USB cable that came with the product and connected it to the relay on the MKR IoT Carrier. In the same way the water pump is also connected to the relay.
Configuring the Arduino IoT Cloud
Open the Arduino IoT Cloud and login using your Arduino account. With the free Create Base Plan you can have 1 IoT Thing with 5 variables. Click the button Create Thing. To get started, the first thing is to give a name to your Thing and then configure your device. To configure your Arduino board, connect it to the computer using the USB cable, click on the Select Device button and choose Set up an Arduino device option.
Variables
Click on the Add variable button. This will open up a new window, where we choose the name, data type, update setting and permission setting.
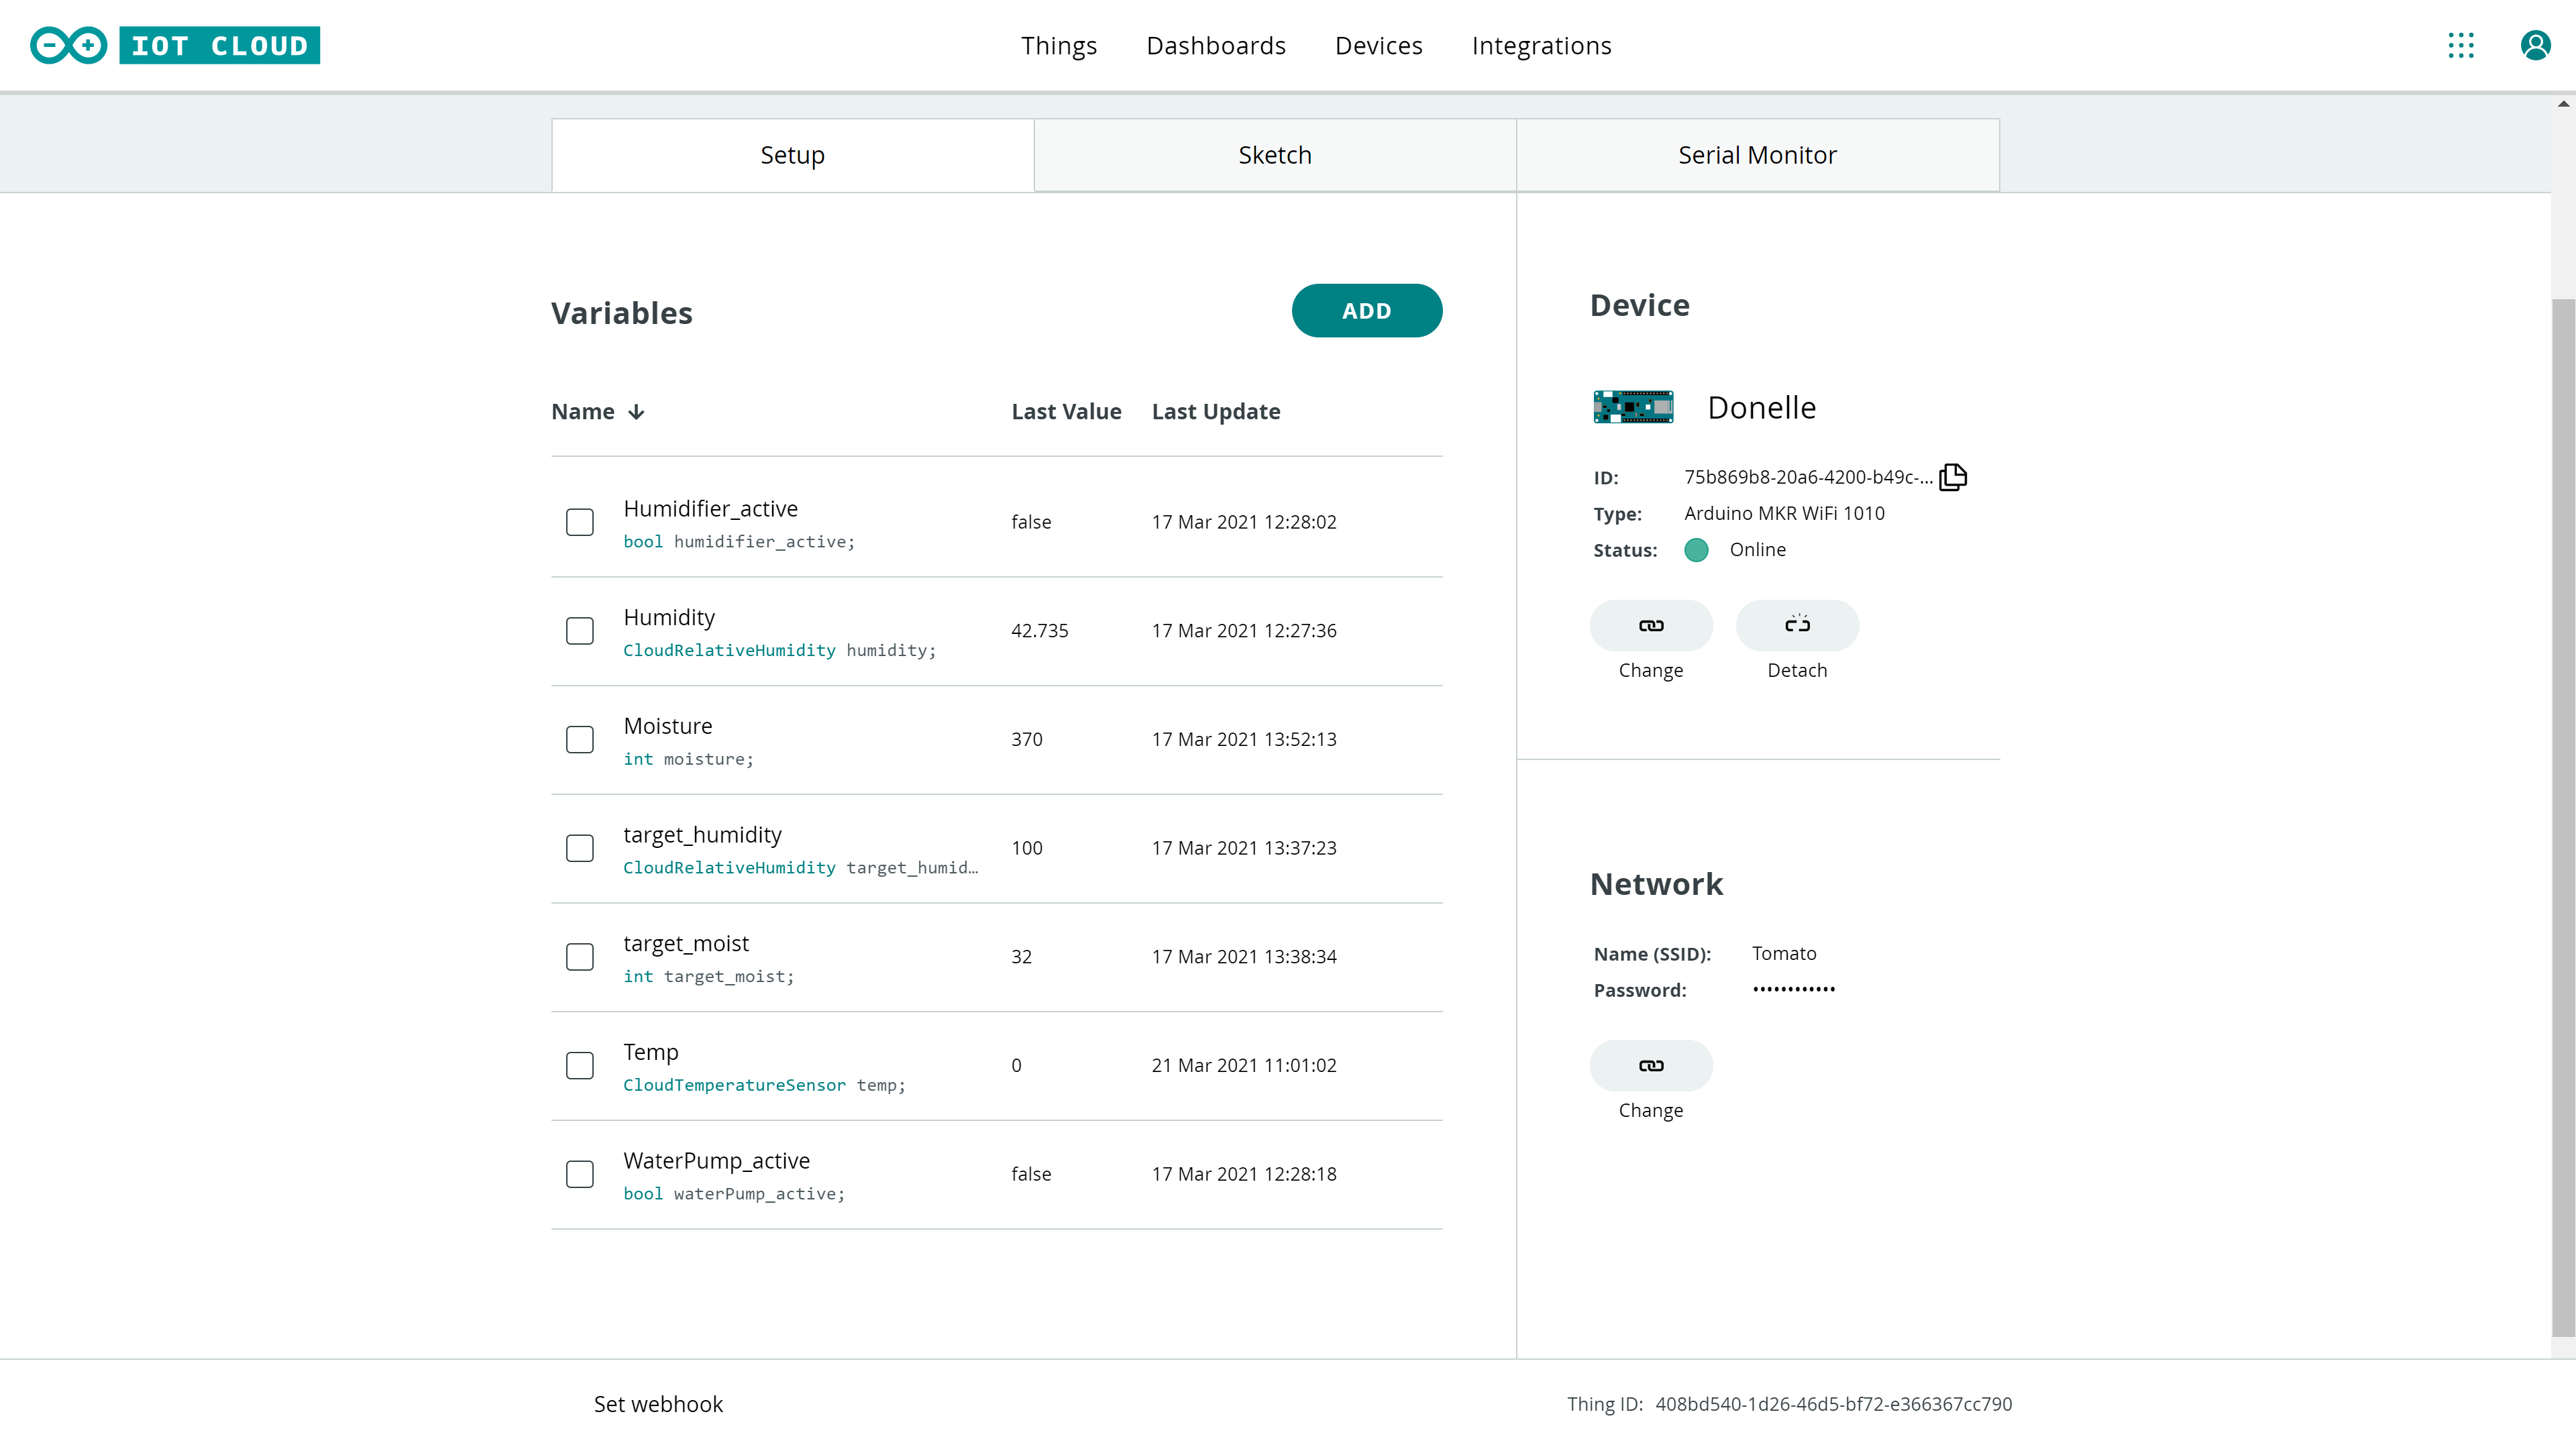
Wi-Fi® network details
If we click on the Configure button, a new window will pop up. Here, we will need to enter our credentials to our Wi-Fi® network, and click on the Save button. Remember that network name and password are always case-sensitive.
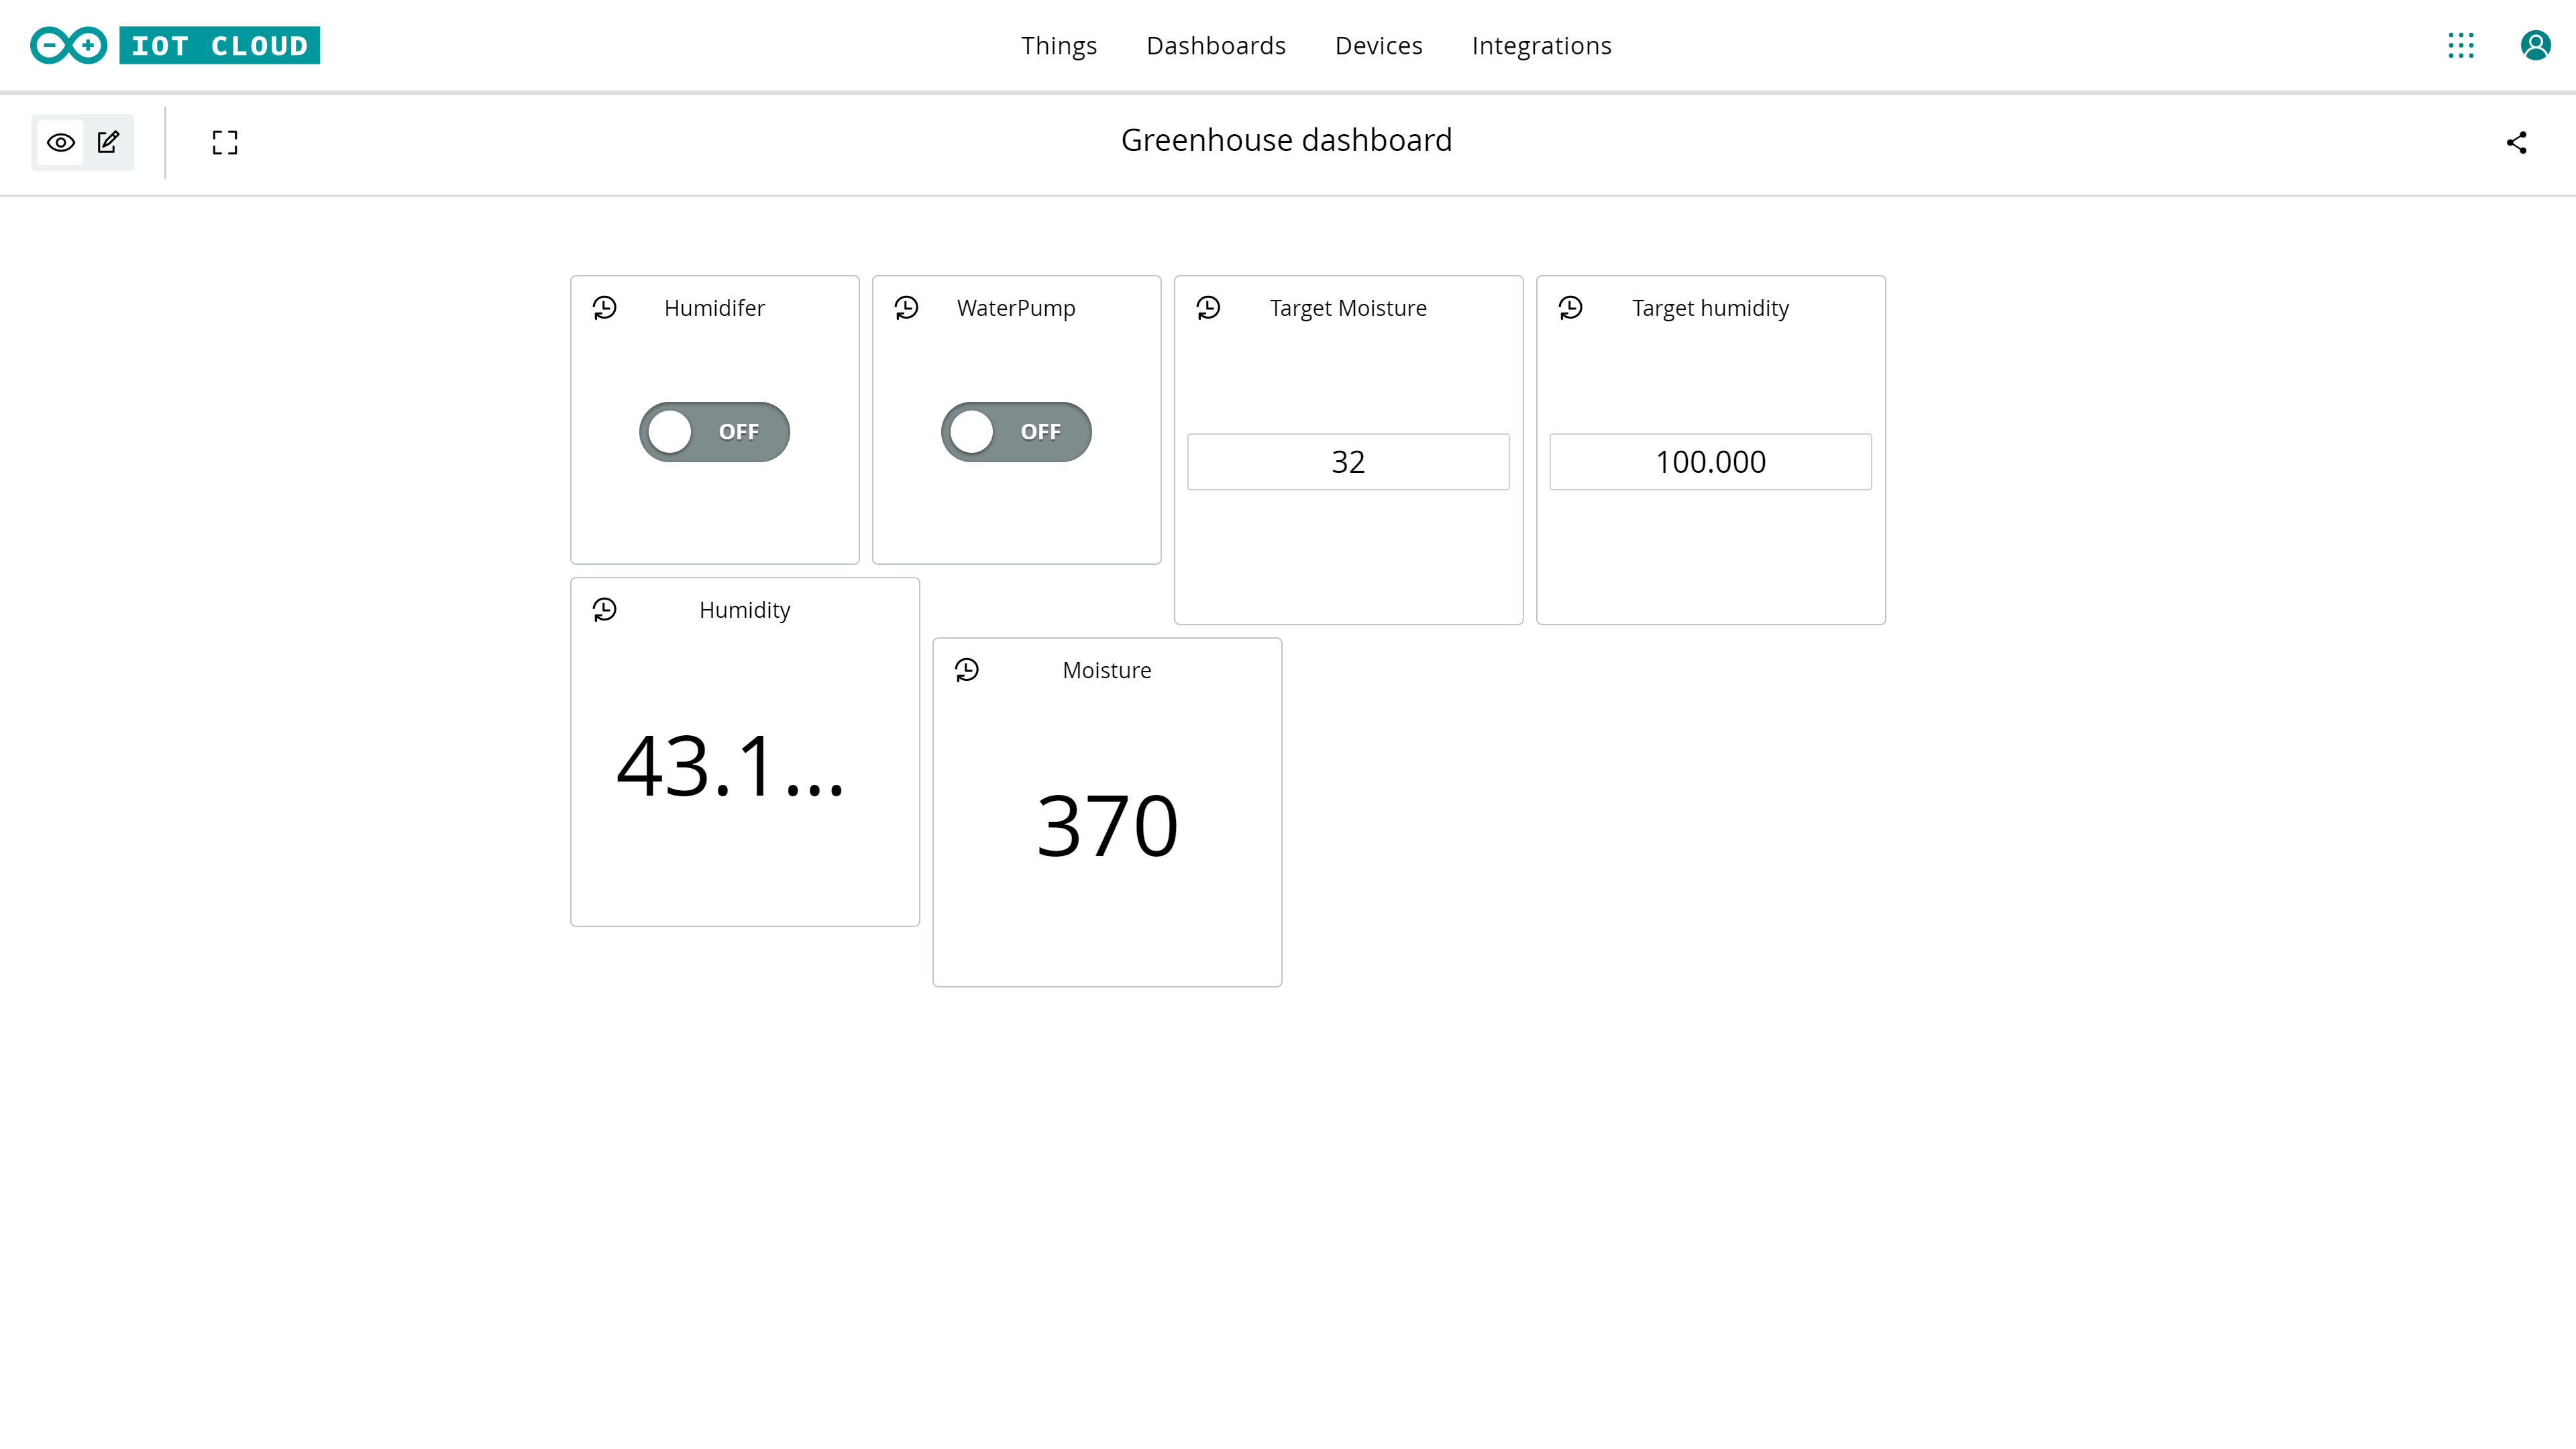
Dashboard
Once we have created variables, we can go on to creating the interaction for these. This is done through the Dashboards. Click the Build Dashboard button and name it. We now need to choose different widgets to visualize the data. If we click on the Add button at the top left, we can choose from a wide range of widgets, some more suitable for the data we are tracking.
Code
#include "thingProperties.h"
#include "Arduino_MKRIoTCarrier.h"
MKRIoTCarrier carrier;

int timer_delay = 2000;
int timer_start = 0;

int humidity_histeresys = 10;
int moisture_histeresys = 20;

void setup() {
  pinMode(A6, INPUT);
  // Initialize serial and wait for port to open:
  Serial.begin(9600);
  Serial.println("started");
  // This delay gives the chance to wait for a Serial Monitor without blocking if none is found
  delay(1500);

  // Defined in thingProperties.h
  initProperties();

  // Connect to Arduino IoT Cloud
  ArduinoCloud.begin(ArduinoIoTPreferredConnection);

  /*
     The following function allows you to obtain more information
     related to the state of network and IoT Cloud connection and errors
     the higher number the more granular information you’ll get.
     The default is 0 (only errors).
     Maximum is 4
 */
  setDebugMessageLevel(2);
  ArduinoCloud.printDebugInfo();

  carrier.begin();
  carrier.display.print("Initializating");

  humidity = 100;
  moisture = 1023;
}

void loop() {
  ArduinoCloud.update();
  // Your code here

  //carrier.display.fillScreen(ST77XX_BLACK);
  if(timer()){
    updateReadings();
    work();
  }

}

bool timer(){
  if ((millis() - timer_start) > timer_delay){
    timer_start = millis();
    return true;
  }else{
    return false;
  }

}

void work(){
  if(moisture > target_moist - (moisture_histeresys / 2) ){
    water(false);

  } else if(moisture < target_moist  + (moisture_histeresys / 2) ){
    water(true);
  }


 if (humidity > target_humidity - (humidity_histeresys / 2)) {
    humidify(false);
  } else if(humidity < target_humidity + (humidity_histeresys / 2) ){
    humidify(true);
  }
}

void updateReadings(){
  //temperature = carrier.Env.readTemperature();
  humidity    = carrier.Env.readHumidity();
  moisture = analogRead(A6);

  Serial.println("Reading sensors");
  /*Serial.print("Temperature: \t");
  Serial.println(temperature);*/
  Serial.print("Humidity: \t");
  Serial.println(humidity);
  Serial.print("Moisture: \t");
  Serial.println(moisture);
  Serial.print("Target humid: \t");
  Serial.println(target_humidity);
}

void printData(){

}
void printEmoji(){

}
void humidify(bool status){
  if(status){
    carrier.Relay2.open();
  }else{
    carrier.Relay2.close();
  }
}
void onHumidifierActiveChange() {
  // Do something
  humidify(humidifier_active);
}

void water(bool status){
  if (status){
    carrier.Relay1.open();
  }else{
    carrier.Relay1.close();
  }
}
void onWaterPumpActiveChange() {
  // Do something
  water(waterPump_active);
}

void onTargetHumidityChange() {
  // Do something
}

void onTargetMoistChange() {
  // Do something
}