Morse Code project
In EDUvision Season 3 episode 3 we presented a morse code project. Did you figure out the secret code in our episode?
In Morse code, each number and letter of the alphabet are represented by a series of dots and dashes. Create your own message in morse code using only one LED and an Arduino board. Morse Code Day (27th of April) pays tribute to this traditional form of communication that has been in practice for nearly 160 years. It involves using standardized sequences of two different signal durations: dots and dashes. It was named after Samuel F. B. Morse, that contributed to the telegraph invention.

Materials needed
- LED or Neopixels
- With LED you need a 220 ohm resistor
- Arduino board + USB cable
- Breadboard
- Jumper wires
Neopixels
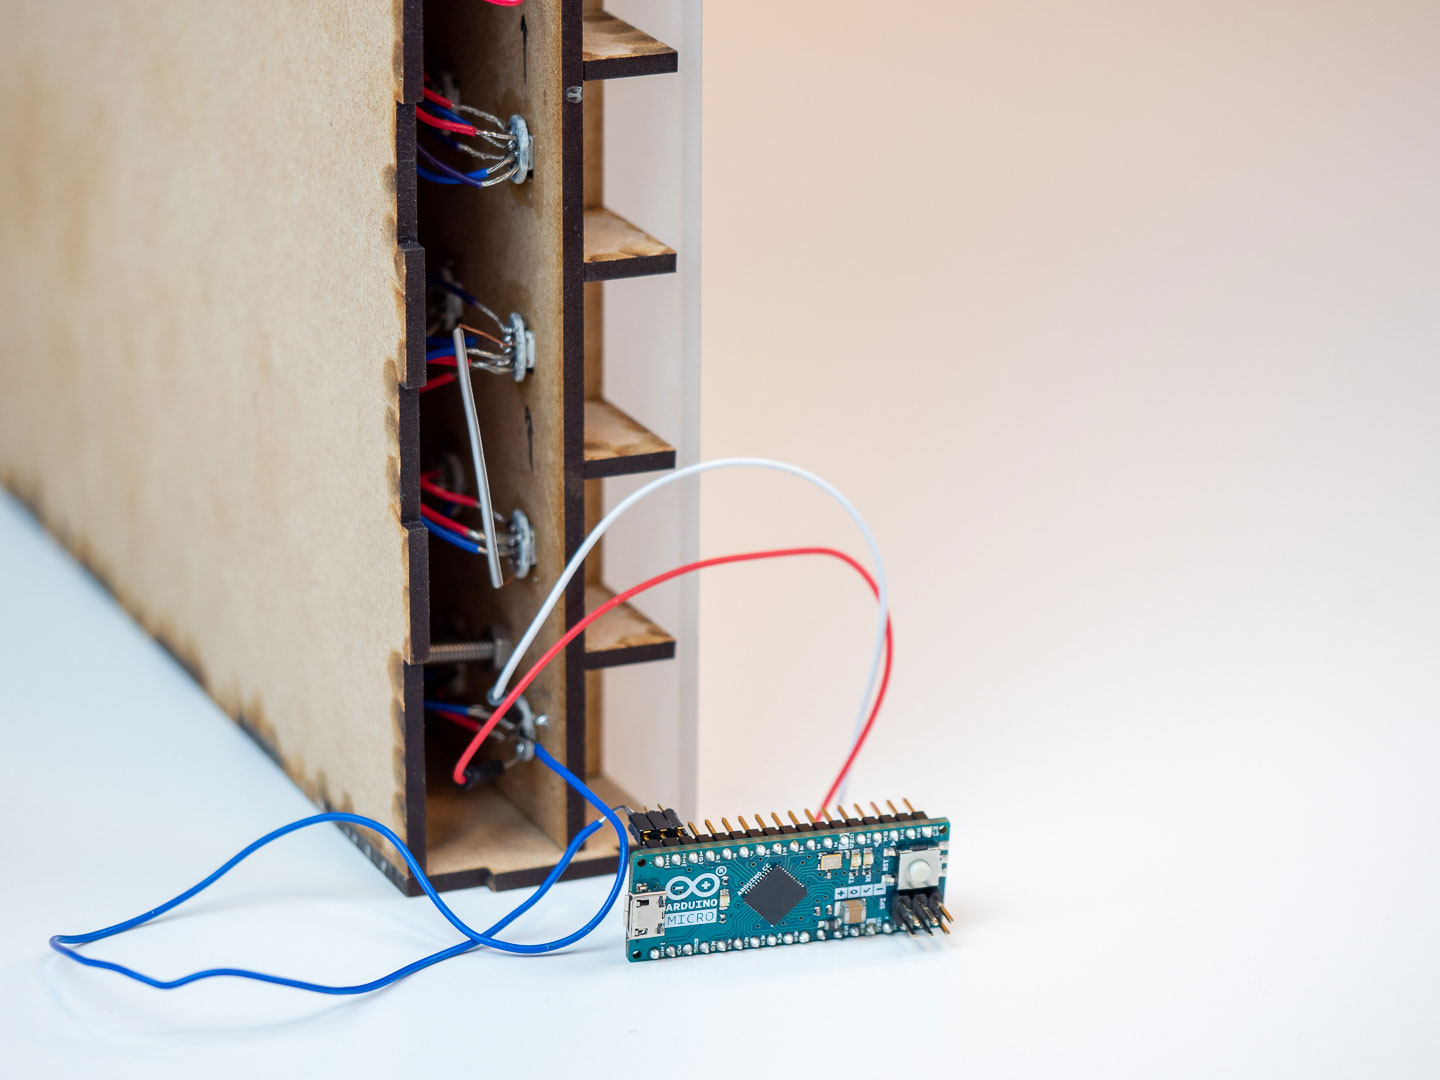
NeoPixels are addressable RGB LEDs that come in a variety of shapes such as rings, strips, matrices and as standalone LEDs and can be used in loads of different projects. They require only 3 wires: data, vcc and ground. The NeoPixels work with different libraries to make them easier to write code for. In this project we use standalone NeoPixels that are individually soldered.
LEDs
LEDs, also known as light-emitting diodes, convert electrical energy into light. They are small lamps. LEDs have polarity, the positive terminal (+) is called anode, and the negative terminal (-) is called cathode. In LEDs, the current enters the LED from the positive side and exits from the negative side. LEDs come in different colors and sizes. With LEDs we should use 220 ohm resistors. The resistors do not have polarity, which means that we do not need to pay attention to their alignment.
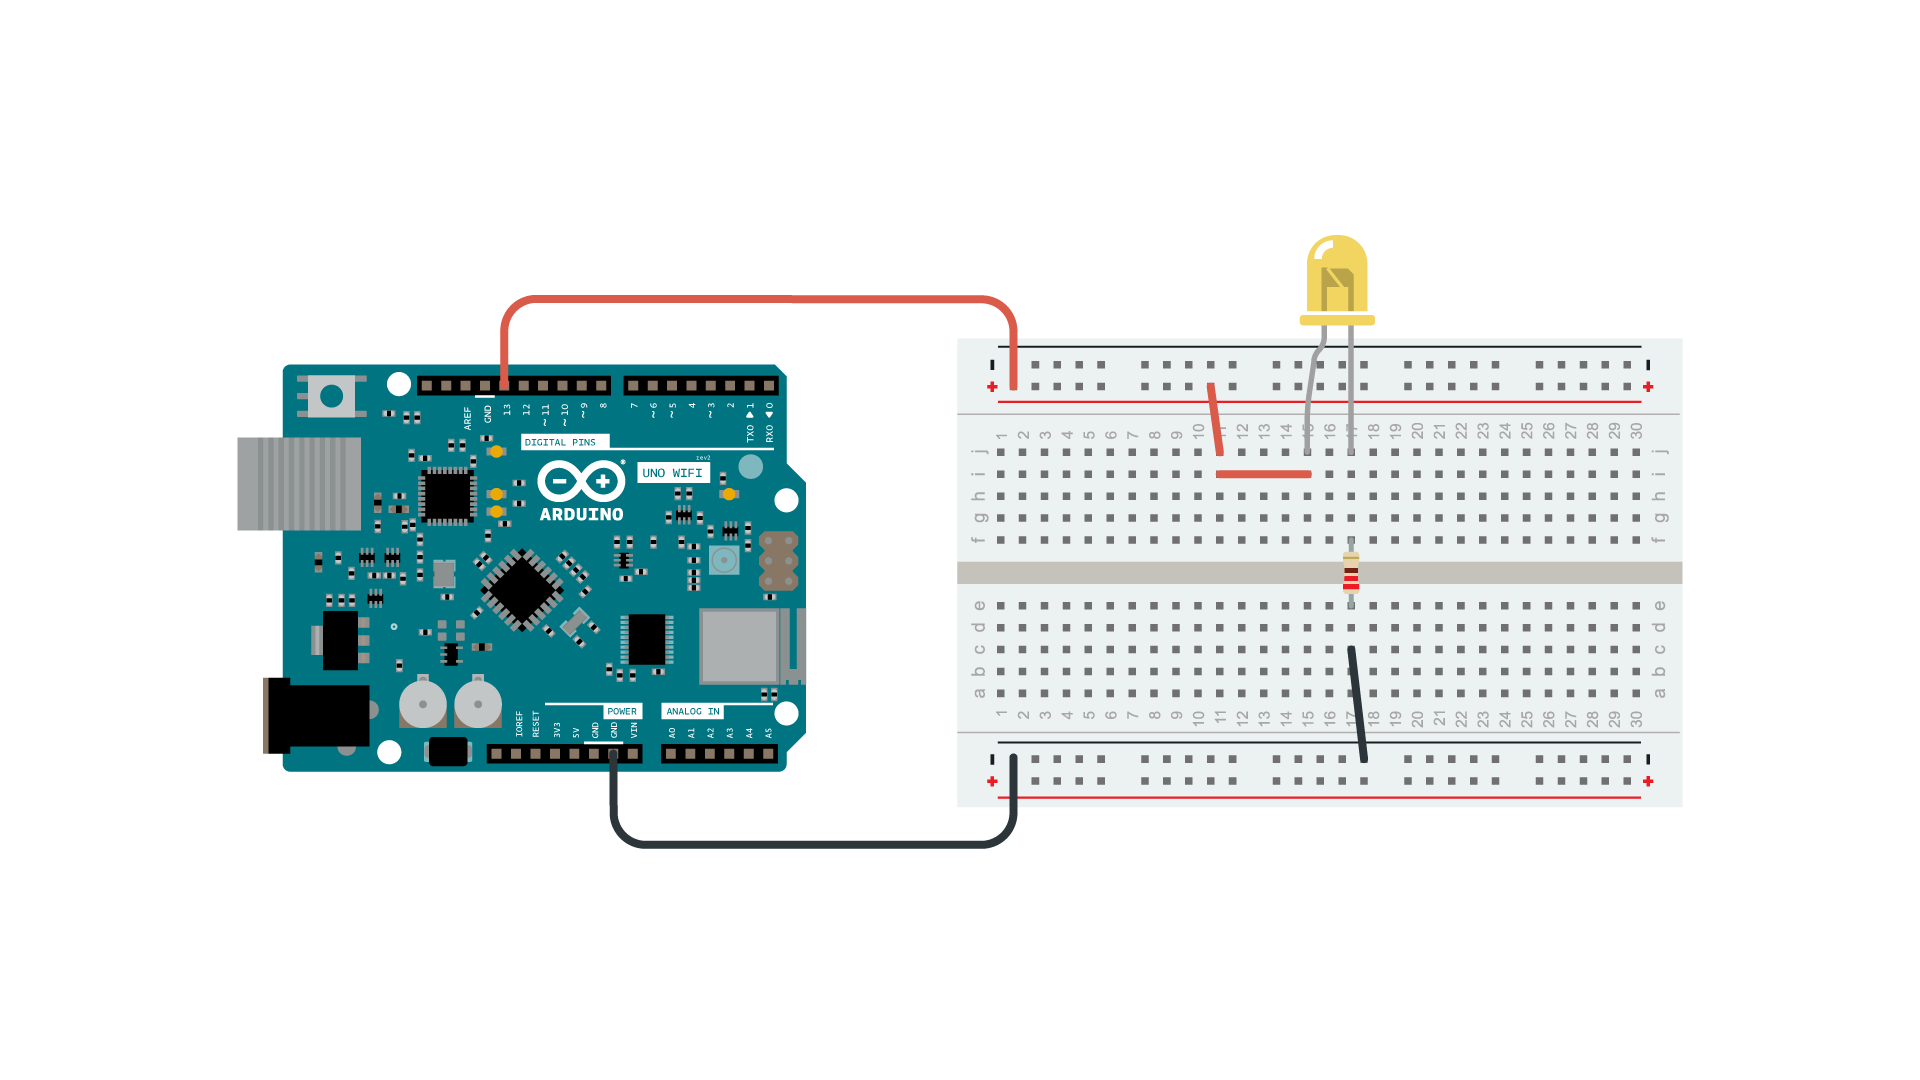
Wiring
If you are using an LED connect the positive terminal (longer leg) to a digital pin on the Arduino board. Connect the negative terminal through a 220 ohm resistor to ground (GND) on the Arduino board.
The project we presented in EDUvision is using Arduino Micro board and 100 neopixels soldered inside of the case.
Code
Example sketch for a project with one LED
From Project Hub you can find a tutorial Morse Code Translator created by Vidit Shah and Utkarsh Tiwari. This example sketch is based on their tutorial. After uploading the code to the board, open the Serial monitor and write a word you would like to be translated to morse code.
int ledPin = 13;

//For letters
char* letters[] = {
".-", "-...", "-.-.", "-..", ".", "..-.", "--.", "....", "..", // A-I
".---", "-.-", ".-..", "--", "-.", "---", ".--.", "--.-", ".-.", // J-R
"...", "-", "..-", "...-", ".--", "-..-", "-.--", "--.." // S-Z
};

//For Numbers
char* numbers[] = {
  "-----", ".----", "..---", "...--", "....-", ".....",
"-....", "--...", "---..", "----."
};
int dotDelay = 200;

void setup() {
  // put your setup code here, to run once:

  pinMode(ledPin, OUTPUT);
  Serial.begin(9600);

}

void loop() {
  // put your main code here, to run repeatedly:
  char ch;
if (Serial.available())
{
ch = Serial.read(); // read a single letter if (ch >= 'a' && ch <= 'z')
if (ch >= 'a' && ch <= 'z')
{
flashSequence(letters[ch - 'a']);
}
else if (ch >= 'A' && ch <= 'Z') {
flashSequence(letters[ch - 'A']); }
else if (ch >= '0' && ch <= '9') {
flashSequence(numbers[ch - '0']); }
else if (ch == ' ') {
delay(dotDelay * 4);
}
}

}

void flashSequence(char* sequence) {
int i = 0;
while (sequence[i] != NULL) {
        flashDotOrDash(sequence[i]);
i++; }
delay(dotDelay * 3);
}


void flashDotOrDash(char dotOrDash) {
digitalWrite(ledPin, HIGH); if (dotOrDash == '.')
{
    delay(dotDelay);
  }
else // must be a -
{
delay(dotDelay * 3); }
digitalWrite(ledPin, LOW); delay(dotDelay);
}
Example sketch with Neopixels
/**
*
*  gemma.SMN
*
*  Convert string to morse code and display via Neopixels
*
*  7/6/2015
*  klinstifen
*  https://github.com/klinstifen/gemma.SMN
*
*  Edited by Anton Sjöö
*
*  2021
*
**/

#include <Adafruit_NeoPixel.h>

// --- BEGIN DECLARATION (PINS, PIXELS, COLORS, ETC) ---

#define PIN 12 // Data pin number for the NeoPixels
#define NUMPIXELS 100 // Define how many pixels to use
Adafruit_NeoPixel pixels = Adafruit_NeoPixel(NUMPIXELS, PIN, NEO_GRB + NEO_KHZ800);

uint32_t red = pixels.Color(255, 63, 5);
uint32_t lightred = pixels.Color(140, 0, 0);
uint32_t off = pixels.Color(0, 0, 0);

uint8_t dit = 60;
uint8_t dah = 180;
uint8_t shogap = 180;
uint8_t medgap = 420;
uint8_t interchar = 60;

// --- END DECLARATION (PINS, PIXELS, COLORS, ETC) ---

void setup() {
  pixels.begin(); // Initialize the NeoPixel library.
  pixels.show();
  pixels.setBrightness(55);
  Serial.begin(9600);
}

void loop() {
  convert("Sample string"); // Write your message here!

}

/**
 *
 * Convert messages to morse code
 *
 */
void convert(String mCode) {
  for (int i = 0; i < mCode.length() + 1; i++) {
    switch (mCode.charAt(i)) {
      case 'a':
        mark(dit);
        mark(dah);
        break;
      case 'b':
        mark(dah);
        mark(dit);
        mark(dit);
        mark(dit);
        break;
      case 'c':
        mark(dah);
        mark(dit);
        mark(dah);
        mark(dit);
        break;
      case 'd':
        mark(dah);
        mark(dit);
        mark(dit);
        break;
      case 'e':
        mark(dit);
        break;
      case 'f':
        mark(dit);
        mark(dit);
        mark(dah);
        mark(dit);
        break;
      case 'g':
        mark(dah);
        mark(dah);
        mark(dit);
        break;
      case 'h':
        mark(dit);
        mark(dit);
        mark(dit);
        mark(dit);
        break;
      case 'i':
        mark(dit);
        mark(dit);
        break;
      case 'j':
        mark(dit);
        mark(dah);
        mark(dah);
        mark(dah);
        break;
      case 'k':
        mark(dah);
        mark(dit);
        mark(dah);
        break;
      case 'l':
        mark(dit);
        mark(dah);
        mark(dit);
        mark(dit);
        break;
      case 'm':
        mark(dah);
        mark(dah);
        break;
      case 'n':
        mark(dah);
        mark(dit);
        break;
      case 'o':
        mark(dah);
        mark(dah);
        mark(dah);
        break;
      case 'p':
        mark(dit);
        mark(dah);
        mark(dah);
        mark(dit);
        break;
      case 'q':
        mark(dah);
        mark(dah);
        mark(dit);
        mark(dah);
        break;
      case 'r':
        mark(dit);
        mark(dah);
        mark(dit);
        break;
      case 's':
        mark(dit);
        mark(dit);
        mark(dit);
        break;
      case 't':
        mark(dah);
        break;
      case 'u':
        mark(dit);
        mark(dit);
        mark(dah);
        break;
      case 'v':
        mark(dit);
        mark(dit);
        mark(dit);
        mark(dah);
        break;
      case 'w':
        mark(dit);
        mark(dah);
        mark(dah);
        break;
      case 'x':
        mark(dah);
        mark(dit);
        mark(dit);
        mark(dah);
        break;
      case 'y':
        mark(dah);
        mark(dit);
        mark(dah);
        mark(dah);
        break;
      case 'z':
        mark(dah);
        mark(dah);
        mark(dit);
        mark(dit);
        break;
      case ' ':
        pause(medgap);
        break;
    }
    pause(shogap);
  }
  eot();
}

/**
 *
 * Display short or long mark
 *
 */
void mark(uint8_t blip) {
  for (int i = 0; i < NUMPIXELS; i++) {
    pixels.setPixelColor(i, red);
  }
  pixels.show();
  delay(blip);
  for (int i = 0; i < NUMPIXELS; i++) {
    pixels.setPixelColor(i, off);
  }
  pixels.show();
  delay(1000);
}

/**
 *
 * Pause between a letter or word
 *
 */
void pause(uint8_t wait) {
  delay(600);
  Serial.print(wait);

}

/**
 *
 * Display end of transmission animation
 *
 */
void eot() {

  delay(20000); // 20 second delay after the finished message
}
Test your project
When you write a word to the Serial Monitor and press send the LED should blink and who you the word in morse code. Make sure you are using the same pin or your LED in the sketch and on the board. You can adjust the length of the dots and dashes as well as the length of the time between each character. Create your own secret message and see if your friends can crack the code! You can also add a piezo to your project to have sound output.
Other useful tutorials
Starter Kit tutorial: Project 02 Spaceship Interface. Watch the tutorial video for Starter Kit project 2 to learn more about how to connect multiple LEDs and control their blinking.