ARDUINO PROJECTS FOR MANAGING TIME BETTER WHEN STUDYING FROM HOME
When studying from home time management can be hard. Suddenly you spend many hours in a row in front of a computer or feel like you get nothing done when interrupted by other things at home. In our EduVision Season 1 second live session we presented three simple projects that you can build together with your children or students to help them while working from home or use as an inspiration for their own projects. Watch the presentations..
1. Simple study & pause device
Presented by Therese. A simple project to remember taking 5 min breaks while studying. Set the desired study time with the potentiometer and study according to the LEDs color indications.
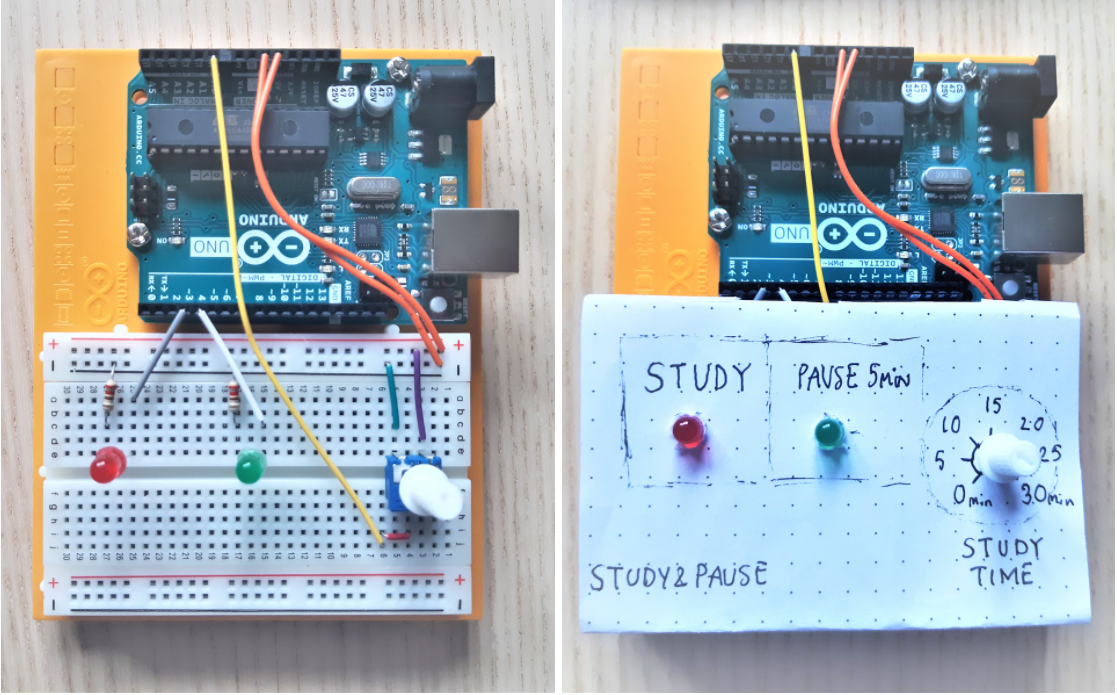
Materials used
- 1 x Arduino UNO
- 1 x Breadboard
- 1 x Green LED
- 1 x Red LED
- 2 x 220 Ohm Resistors
- 1 x Potentiometer
- Jumper wires
- Pen and paper for decoration
Example sketch
int redLed = 3;
int greenLed = 4;
int potVal = A0;
int studyTime = 0;

void setup() {
  pinMode(redLed, OUTPUT);
  pinMode(greenLed, OUTPUT);
  pinMode(potVal, INPUT);
}

void loop() {
  digitalWrite(greenLed, LOW);
  studyTime = analogRead(potVal);                  //reads the study time from the potentiometer
  studyTime = map(studyTime, 0, 1023, 1800000, 0); //maps the value from potentiometer from 0-1023 to 0-30 min
  digitalWrite(redLed, HIGH);
  delay(studyTime);                                // the red LED is on for as long as you set the potentiometer
  digitalWrite(greenLed, HIGH) ;                   //then the green LED turns on
  digitalWrite(redLed, LOW);                       //and the red turns off
  delay(3000000);                                  //for 5 min
}
2. Time management tool
Presented by Roxana. When working and learning from home, it is very easy to get distracted and it is challenging to get all tasks done. This is a solution that helps managing time to be totally focused on one task at a time for a determinate period of time.
This prototype is a mix of project 8 digital hourglass, and project 11 Crystal Ball on the Starter Kit Projects Book. You can power the board with the USB cable connected to your computer or by using a 9V battery.
You can set the time, in intervals of 5 minutes, you would like to focus on a task by pressing one of the switches. Once time is set, shake the board to start the time.
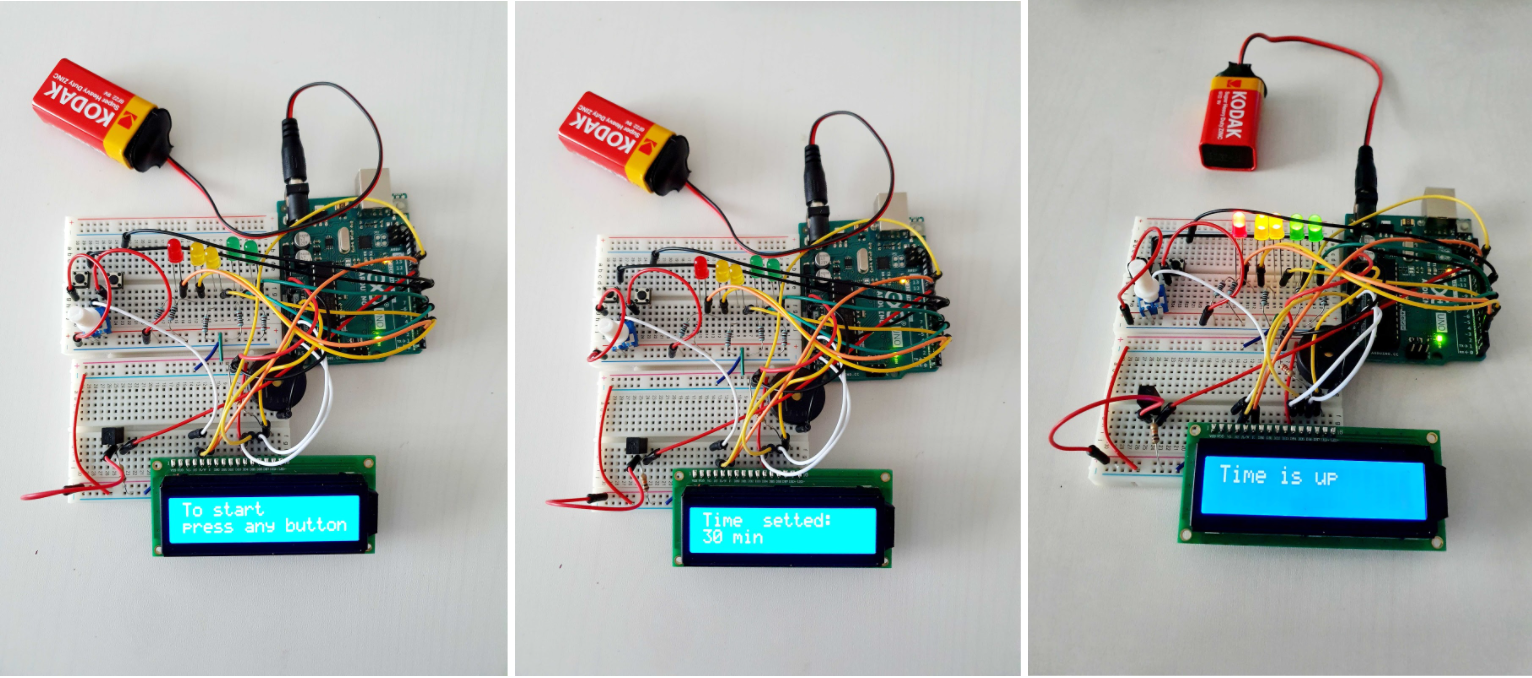
Materials used
- 1 x Arduino UNO board
- 1 x Potentiometer
- 1 x Tilt switch
- 1 x Piezo
- 2 x Green LEDs
- 2 x Yellow LEDs
- 1 x Red LEDs
- Jumper wires
- 2 x switches
- 1 x 10 kohm Resistor
- 1 x 220 ohm (4 band)
- 5 x 220 ohms (5 band)
3. Time to move
Presented by Melissa. A project based on the project 11 - Crystal Ball in the Starter Kit Projects book. When working or studying from home you lack the small acts of everyday life that make you exercise without noticing. You don’t walk to the school in the morning and afternoon or move between classes. This can make you feel more tired and unproductive. To help you with this you can use a project called Time to move.
When you press the button the LCD screen prints a text and tells using a random() function how many reps and what exercise you should do. To make it more advanced you could combine this project with the timers present above so you don’t have to press a button but the project reminds you to move, for example, every 45 minutes.
Materials used
- 1 x Arduino UNO
- 1 x Breadboard
- 1 x LCD screen
- 1 x 220 ohm resistor
- 1 x Potentiometer
- 1 x Pushbutton
- Jumper wires
Example sketch
/*
  Based on the Arduino Starter Kit example
  Project 11 - Crystal Ball
*/

// include the library code:
#include <LiquidCrystal.h>

// initialize the library with the numbers of the interface pins
LiquidCrystal lcd(12, 11, 5, 4, 3, 2);

// set up a constant for the tilt switch pin
const int switchPin = 13;

// variable to hold the value of the switch pin
int switchState = 0;

// variable to hold previous value of the switch pin
int prevSwitchState = 0;

// a variable to choose which reply from the crystal ball
int reply;
int amount;

void setup() {
  // set up the number of columns and rows on the LCD
  lcd.begin(16, 2);

  // set up the switch pin as an input
  pinMode(switchPin, INPUT);

  // Print a message to the LCD.
  lcd.print("Time for");
  // set the cursor to column 0, line 1
  // line 1 is the second row, since counting begins with 0
  lcd.setCursor(0, 1);
  // print to the second line
  lcd.print("some workout!");
}

void loop() {
  // check the status of the switch
  switchState = digitalRead(switchPin);

  // compare the switchState to its previous state
  if (switchState != prevSwitchState) {
    // if the state has changed from HIGH to LOW you know that the ball has been
    // tilted from one direction to the other
    if (switchState == LOW) {
      // randomly chose a reply
      reply = random(6);
      // clean up the screen before printing a new reply
      lcd.clear();
      // set the cursor to column 0, line 0
      lcd.setCursor(0, 0);
      // print some text
      lcd.print("Do ");
      amount = random(2, 8);
      lcd.print(amount);
      // move the cursor to the second line
      lcd.setCursor(0, 1);

      // choose a saying to print based on the value in reply
      switch (reply) {
        case 0:
          lcd.print("Pushups");
          break;

        case 1:
          lcd.print("Squats");
          break;

        case 2:
          lcd.print("X-jumps");
          break;

        case 3:
          lcd.print("Dips");
          break;

        case 4:
          lcd.print("Crunches");
          break;

        case 5:
          lcd.setCursor(0, 0);
          lcd.print("Kidding!");
          lcd.setCursor(0, 1);
          lcd.print("Eat chocolate");
          break;

        case 6:
          lcd.print("Toe touches");
          break;

        case 7:
          lcd.print("Lunges");
          break;
      }
    }
  }
  // save the current switch state as the last state
  prevSwitchState = switchState;
}