In EDUvision Season 4 Episode 02 we demonstrated a project that utilizes an Arduino UNO R3 and a phototransistor. The data from the phototransistor is parsed and sent to Processing. Processing is an open source integrated development environment (IDE) like the Arduino IDE and is used by designers and artists alike! With Processing, you can create stunning visual and interactive experiences. You can use Arduino serial data and send it to Processing using a serial library (in Processing). This allows you to use the data from all sorts of sensors!

Materials needed
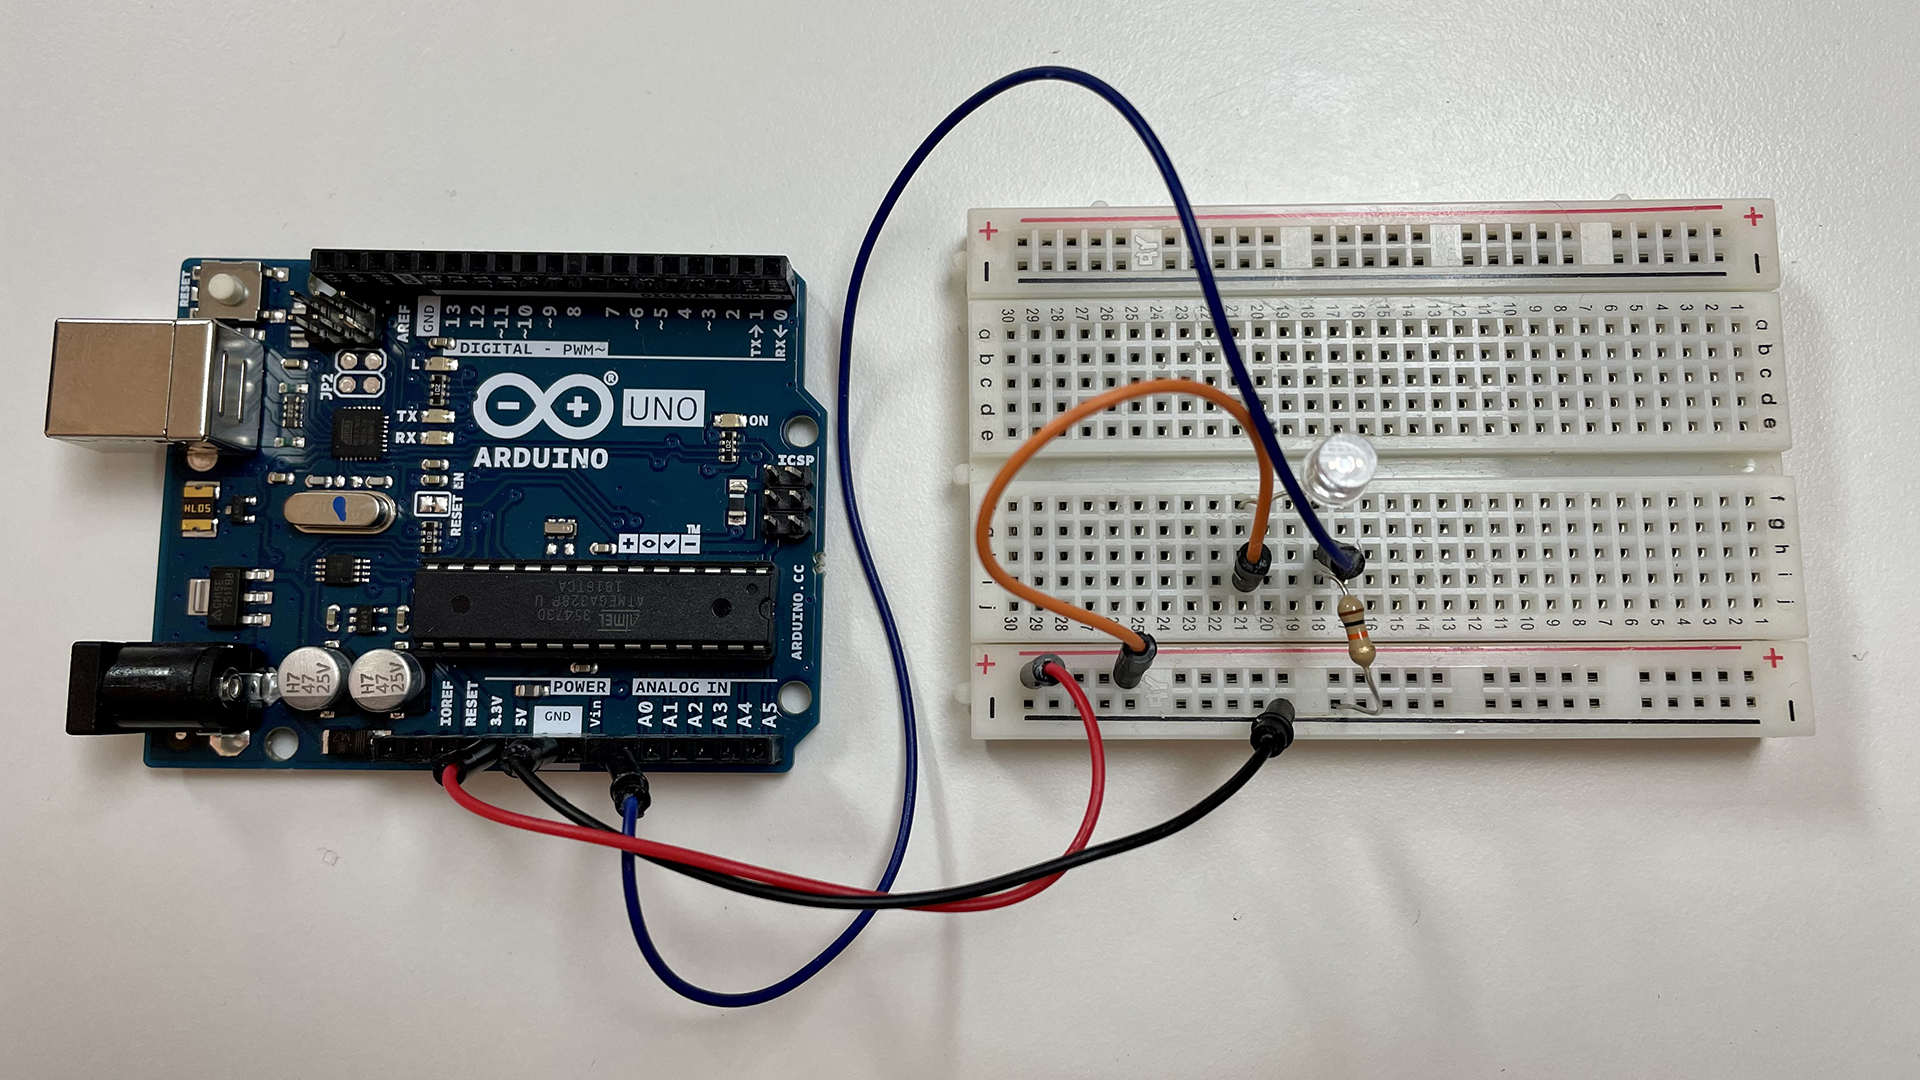
- Arduino UNO R3
- Photoresistor
- 10k Ω resistor
- Jumper cables
Phototransistor
The phototransistor is a transistor that responds to light hitting it by generating and amplifying an electric current. In this project we use it to control the visuals created in Processing.
Wiring/Circuit
Connect the GND pin from the Arduino board to the resistor and then connect the resistor to the short leg of the phototransistor. Connect the A0 pin between the resistor and the phototransistor. Finally connect the 5V pin to the long leg of the phototransistor.
Code
Arduino Sketch
Add this code snippet to your Arduino IDE.:
unsigned int ADCValue;
void setup(){
    Serial.begin(9600);
}

void loop(){

 int val = analogRead(0);
   val = map(val, 0, 300, 0, 255);
    Serial.println(val);
delay(50);
}
Connect the Arduino to the computer using a USB cable and upload the code to your board. Make sure that the serial monitor is printing the values from the phototransistor. When you are done uploading, you can move on to Processing.
Processing
In this project we are going to control Processing sketches with the Arduino board via serial communication. Processing is free, open source software based on Java. It was designed for the visual arts community for creating drawings, animations, and interactive programs. Download the latest version of Processing from Processing.org. Select the right file according to your operating system. Processing is available for Linux, MacOS X, and Windows. Extract all the files and click the Processing icon inside the folder to open it. The Processing IDE interface is very simple. The play icon in the toolbar allows you to compile and run the program and the stop icon will stop the program. In the bottom of the IDE there is a message area that, when you compile your program, gives you information about errors if any. Upload the different examples found below and play around with them!
Example 1: Directional light
Processing Sketch:
import processing.serial.*;

Serial myPort;  // Create object from Serial class
static String val;    // Data received from the serial port
int sensorVal = 0;

void setup()
{
  fullScreen(P3D);
  noStroke();
  fill(204);
  String portName = "COM5";// Change the number (in this case ) to match the corresponding port number connected to your Arduino.

  myPort = new Serial(this, portName, 9600);
}

void draw()
{
  if ( myPort.available() > 0) {  // If data is available,
  val = myPort.readStringUntil('\n');
  try {
   sensorVal = Integer.valueOf(val.trim());
  }
  catch(Exception e) {
  ;
  }
  println(sensorVal); // read it and store it in vals!
  }
  noStroke();
  background(0);
  float dirY = (sensorVal/ float(height) - 0.5) * 2 * -1;
  float dirX = (mouseX / float(width) - 0.5) * 2;
  directionalLight(204, 204, 204, -dirX, -dirY, -1);
  translate(width/2 - 100, height/2, 0);
  translate(200, 0, 0);
  sphere(200);


  fill(255);
  ellipse(random(width), random(height), 3, 3);

}
Example 2: Bezier
Processing Sketch:
import processing.serial.*;

Serial myPort;  // Create object from Serial class
static String val;    // Data received from the serial port
int sensorVal = 0;

void setup()
{
   size(720, 480);
  stroke(255);
  noFill();
  String portName = "COM5";// Change the number (in this case ) to match the corresponding port number connected to your Arduino.

  myPort = new Serial(this, portName, 9600);
}

void draw()
{
  if ( myPort.available() > 0) {  // If data is available,
  val = myPort.readStringUntil('\n');
  try {
   sensorVal = Integer.valueOf(val.trim());
  }
  catch(Exception e) {
  ;
  }
  println(sensorVal); // read it and store it in vals!
  }
 background(0);
  for (int i = 0; i < 200; i += 20) {
    bezier(sensorVal-(i/2.0), 40+i, 410, 20, 440, 300, 240-(i/16.0), 300+(i/8.0));
  }

}
Example 3: Interactive ellipse
Processing Sketch:
import processing.serial.*;

Serial myPort;  // Create object from Serial class
static String val;    // Data received from the serial port
int sensorVal = 0;

void setup()
{
   size(720, 480);
   noStroke();
  noFill();
  String portName = "COM5";// Change the number (in this case ) to match the corresponding port number connected to your Arduino.

  myPort = new Serial(this, portName, 9600);
}

void draw()
{
  if ( myPort.available() > 0) {  // If data is available,
  val = myPort.readStringUntil('\n');
  try {
   sensorVal = Integer.valueOf(val.trim());
  }
  catch(Exception e) {
  ;
  }
  println(sensorVal); // read it and store it in vals!
  }
 background(0);
  // Scale the mouseX value from 0 to 640 to a range between 0 and 175
  float c = map(sensorVal, 0, width, 0, 400);
  // Scale the mouseX value from 0 to 640 to a range between 40 and 300
  float d = map(sensorVal, 0, width, 40,500);
  fill(255, c, 0);
  ellipse(width/2, height/2, d, d);

}
Example 4: Particle system. Based on the sketch by Rahul Dedhia
Processing Sketch:
int n = 1000; // number of dots

float[] m = new float[n]; // make a new list of floating points
float[] x = new float[n];
float[] y = new float[n];
float[] vx = new float[n];
float[] vy = new float[n];
float[] redchannel = new float[n];
float[] bluechannel = new float[n];
float[] greenchannel = new float[n];
float[] shape = new float[n];

import processing.serial.*;

Serial myPort;  // Create object from Serial class
static String val;    // Data received from the serial port
int sensorVal = 0;

//::::::::::::::::::::::::::::::::::::::::::::::::::::::::::::::::::::::::::

void setup() {
  fullScreen();
  fill(0,10);
  reset();// running the reset when you click. 10000 random values being plugged in
  String portName = "COM5";// Change the number (in this case ) to match the corresponding port number connected to your Arduino.
  myPort = new Serial(this, portName, 9600);
}

//::::::::::::::::::::::::::::::::::::::::::::::::::::::::::::::::::::::::::

void draw() {
   if ( myPort.available() > 0) {  // If data is available,
  val = myPort.readStringUntil('\n');
  try {
   sensorVal = Integer.valueOf(val.trim());
  }
  catch(Exception e) {
  ;
  }
  println(sensorVal); // read it and store it in vals!
  }
  noStroke();
  fill(0,30);
  rect(0, 0, width, height); //  black background

  for (int i = 0; i < n; i++) { // runs the loop 10,000 times
    float dx = mouseX - x[i]; // distance from the mouse
    float dy = sensorVal - y[i];

    float d = sqrt(dx*dx + dy*dy); // calculating the distance between the points and the mouse
    if (d < 1) d = 1;

    float f = cos(d * 0.06) * m[i] / d*2; //decides if it gets closer or further from the mouse

    vx[i] = vx[i] * 0.4 - f * dx; //changing the velocity so it moves towards the ring
    vy[i] = vy[i] * 0.2 - f * dy;
  }

  for (int i = 0; i < n; i++) {
    x[i] += vx[i];
    y[i] += vy[i];

    if (x[i] < 0) x[i] = width;
    else if (x[i] > width) x[i] = 0;

    if (y[i] < 0) y[i] = height;
    else if (y[i] > height) y[i] = 0;

    if (m[i] < 0) fill(bluechannel[i], greenchannel[i] , 255);
    else fill(255, bluechannel[i],redchannel[i]);

      if (shape[i] > 2) fill(bluechannel[i], greenchannel[i] , 255);
    else fill(255, bluechannel[i],redchannel[i]);


    if (shape[i] > 2)  rect(x[i], y[i],10,10);
else if (shape[i] > 1 && shape[i] <=2) rect(x[i],y[i],2,2);
else ellipse(x[i], y[i],10,10);


  }
}

//::::::::::::::::::::::::::::::::::::::::::::::::::::::::::::::::::::::::::

void reset() { // counter that counts up to n
  for (int i = 0; i < n; i++) { // i = 0, i < 10,0000, i++ what to do after each loop.
    m[i] = randomGaussian() * 8; // gaussian distribution is a bell curve. Distribution of the mass
    x[i] = random(width);
    y[i] = random(height);
    bluechannel[i] = random(255);
    redchannel[i] = random(255);
    greenchannel[i] = random(255);
    shape [i] = random(0,3);
  }
}

//::::::::::::::::::::::::::::::::::::::::::::::::::::::::::::::::::::::::::

void mousePressed() {
  reset();
}
Test your project
After uploading the initial Arduino sketch to your board, run the examples provided in this tutorial in Processing. When the Processing sketch is up and running, point a lightsource towards the phototransistor to observe the result. You can also play around with the absence of light as well!