Getting Started with the Arduino Nano
The Arduino Nano is a small, complete, and breadboard-friendly board based on the ATmega328P. It offers the same connectivity and specs of the UNO board in a smaller form factor.
The Arduino Nano is programmed using the Arduino Software (IDE), our Integrated Development Environment common to all our boards and running both online and offline. For more information on how to get started with the Arduino Software visit the Getting Started page.
Use your Arduino Nano on the Arduino Web IDE
All Arduino boards, including this one, work out-of-the-box on the Arduino Web Editor, you only need to install Arduino Create Agent to get started.
The Arduino Web Editor is hosted online, therefore it will always be up-to-date with the latest features and support for all boards. Follow this simple guide to start coding on the browser and upload your sketches onto your board.
Use your Arduino Nano on the Arduino Desktop IDE
If you want to program your Arduino Nano while offline you need to install the Arduino Desktop IDE To connect the Arduino Nano to your computer, you'll need a Mini-B USB cable. This also provides power to the board, as indicated by the blue LED (which is on the bottom of the Arduino Nano 2.x and the top of the Arduino Nano 3.0).
Open your first sketch
Open the LED blink example sketch: File > Examples > 01.Basics > Blink.
Select your board type and port
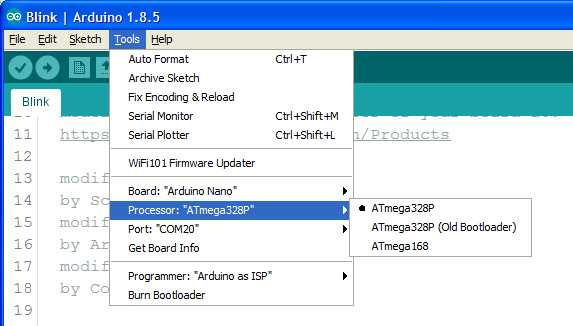
Select Tools > Board > Arduino AVR Boards > Arduino Nano.
NOTE: We have updated the Nano board with a fresh bootloader. Boards sold by us from January 2018 have this new bootloader, while boards manufactured before that date have the old bootloader. First, check that Tools > Board > Boards Manager shows you have the Arduino AVR Boards 1.16.21 or later installed. Then, to program the NEW Arduino NANO boards you need to chose Tools > Processor > ATmega328P. To program old boards you need to choose Tools > Processor > ATmega328P (Old Bootloader). If you get an error while uploading or you are not sure which bootloader you have, try each Tools > Processor menu option until your board gets properly programmed.

Upload and Run your first Sketch
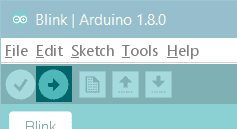
To upload the sketch to the Arduino Nano, click the Upload button in the upper left to load and run the sketch on your board:

Wait a few seconds - you should see the RX and TX LEDs on the board flashing. If the upload is successful, the message "Done uploading." will appear in the status bar.
Learn more on the Desktop IDE
See this tutorial for a generic guide on the Arduino IDE with more info on the Preferences, the Boards Manager, and the Library Manager.
Tutorials
Now that you have set up and programmed your Arduino Nano board, you may find inspiration in our Project Hub tutorial platform.
For more details on the Arduino Nano, see the hardware page.
The text of the Arduino getting started guide is licensed under a Creative Commons Attribution-ShareAlike 3.0 License. Code samples in the guide are released into the public domain.