Arduino - PachubeClient
Examples > Ethernet Library
Pachube Client
This example shows you how to answer a HTTP request using an Ethernet shield. Specifically, it connects to pachube.com, a free datalogging site. The example requires that you set up a pachube.com account, as well as a pachube feed (for more information on setting up an input feed, please click here). Your Ethernet shield will then connect to that feed and upload sensor data every 10 seconds.
Hardware Required
Arduino Ethernet Shield
Shield-compatible Arduino board
Two analog sensors to attach to the Ethernet Shield
Software Required
- pachube.com account
- pachube.com feed that accepts two data items
Circuit
The Ethernet shield allows you to connect a WizNet Ethernet controller to the Arduino via the SPI bus. It uses pins 10, 11, 12, and 13 for the SPI connection to the WizNet. Later models of the Ethernet shield also have an SD Card on board. Digital pin 4 is used to control the slave select pin on the SD card.
The shield should be connected to a network with an ethernet cable. You will need to change the network settings in the program to correspond to your network.
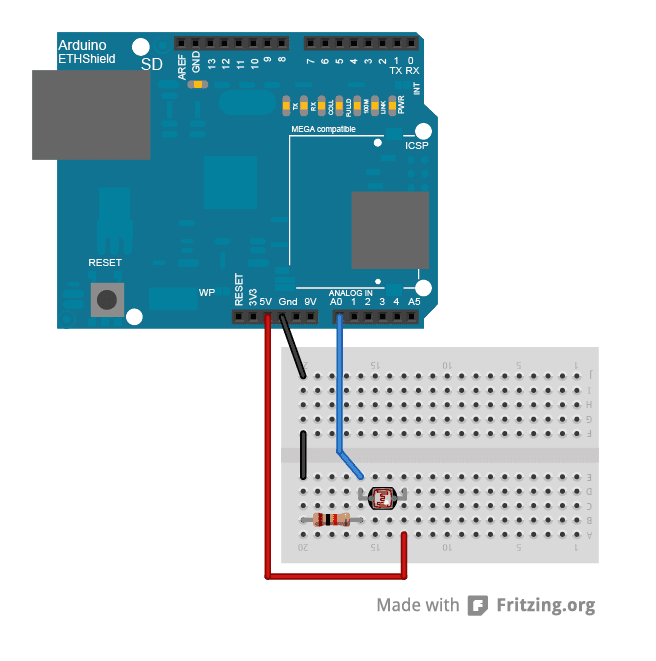
image developed using Fritzing. For more circuit examples, see the Fritzing project page
In the above image, your Arduino would be stacked below the Ethernet shield.
Schematic
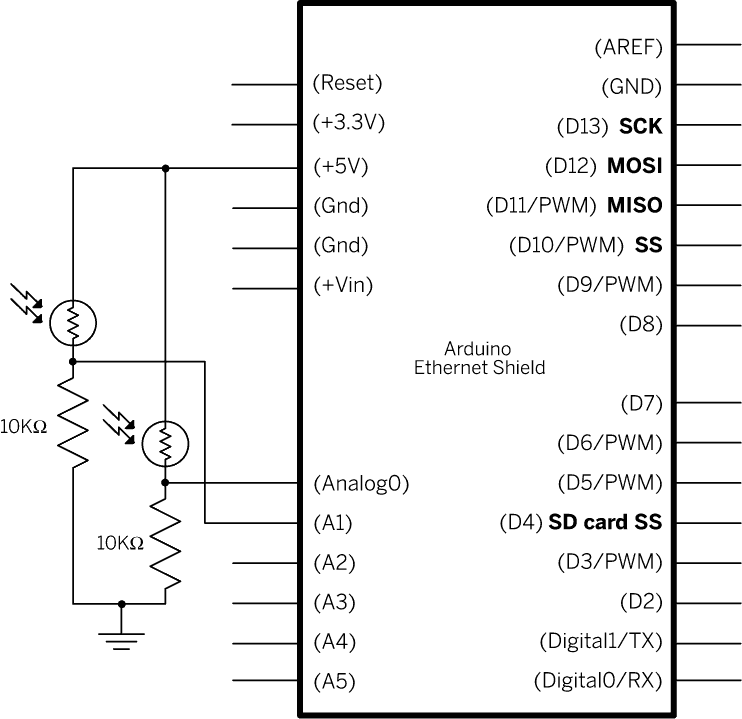
Pictured: Two CDS photocells with 10k ohm pull down resistors on analog pins 0 and 1.
Code
/*

  Pachube sensor client


 This sketch connects an analog sensor to Pachube (http://www.pachube.com)

 using a Wiznet Ethernet shield. You can use the Arduino Ethernet shield, or

 the Adafruit Ethernet shield, either one will work, as long as it's got

 a Wiznet Ethernet module on board.


 This example has been updated to use version 2.0 of the Pachube.com API.

 To make it work, create a feed with a datastream, and give it the ID

 sensor1. Or change the code below to match your feed.


 Circuit:

 * Analog sensor attached to analog in 0

 * Ethernet shield attached to pins 10, 11, 12, 13


 created 15 March 2010

 modified 9 Apr 2012

 by Tom Igoe with input from Usman Haque and Joe Saavedra


http://arduino.cc/en/Tutorial/PachubeClient

 This code is in the public domain.


 */

#include <SPI.h>
#include <Ethernet.h>

#define APIKEY         "YOUR API KEY GOES HERE" // replace your pachube api key here
#define FEEDID         00000 // replace your feed ID
#define USERAGENT      "My Project" // user agent is the project name

// assign a MAC address for the ethernet controller.
// Newer Ethernet shields have a MAC address printed on a sticker on the shield
// fill in your address here:
byte mac[] = {

  0xDE, 0xAD, 0xBE, 0xEF, 0xFE, 0xED};

// fill in an available IP address on your network here,
// for manual configuration:

IPAddress ip(10,0,1,20);
// initialize the library instance:

EthernetClient client;

// if you don't want to use DNS (and reduce your sketch size)
// use the numeric IP instead of the name for the server:

IPAddress server(216,52,233,122);      // numeric IP for api.pachube.com
//char server[] = "api.pachube.com";   // name address for pachube API

unsigned long lastConnectionTime = 0;          // last time you connected to the server, in milliseconds
boolean lastConnected = false;                 // state of the connection last time through the main loop

const unsigned long postingInterval = 10*1000; //delay between updates to Pachube.com

void setup() {

 // Open serial communications and wait for port to open:

  Serial.begin(9600);

   while (!Serial) {

    ; // wait for serial port to connect. Needed for Leonardo only

  }

 // start the Ethernet connection:

  if (Ethernet.begin(mac) == 0) {

    Serial.println("Failed to configure Ethernet using DHCP");

    // DHCP failed, so use a fixed IP address:

    Ethernet.begin(mac, ip);

  }
}

void loop() {

  // read the analog sensor:

  int sensorReading = analogRead(A0);

  // if there's incoming data from the net connection.

  // send it out the serial port.  This is for debugging

  // purposes only:

  if (client.available()) {

    char c = client.read();

    Serial.print(c);

  }

  // if there's no net connection, but there was one last time

  // through the loop, then stop the client:

  if (!client.connected() && lastConnected) {

    Serial.println();

    Serial.println("disconnecting.");

    client.stop();

  }

  // if you're not connected, and ten seconds have passed since

  // your last connection, then connect again and send data:

  if(!client.connected() && (millis() - lastConnectionTime > postingInterval)) {

    sendData(sensorReading);

  }

  // store the state of the connection for next time through

  // the loop:

  lastConnected = client.connected();
}

// this method makes a HTTP connection to the server:
void sendData(int thisData) {

  // if there's a successful connection:

  if (client.connect(server, 80)) {

    Serial.println("connecting...");

    // send the HTTP PUT request:

    client.print("PUT /v2/feeds/");

    client.print(FEEDID);

    client.println(".csv HTTP/1.1");

    client.println("Host: api.pachube.com");

    client.print("X-PachubeApiKey: ");

    client.println(APIKEY);

    client.print("User-Agent: ");

    client.println(USERAGENT);

    client.print("Content-Length: ");

    // calculate the length of the sensor reading in bytes:

    // 8 bytes for "sensor1," + number of digits of the data:

    int thisLength = 8 + getLength(thisData);

    client.println(thisLength);

    // last pieces of the HTTP PUT request:

    client.println("Content-Type: text/csv");

    client.println("Connection: close");

    client.println();

    // here's the actual content of the PUT request:

    client.print("sensor1,");

    client.println(thisData);


  }

  else {

    // if you couldn't make a connection:

    Serial.println("connection failed");

    Serial.println();

    Serial.println("disconnecting.");

    client.stop();

  }

   // note the time that the connection was made or attempted:

  lastConnectionTime = millis();
}

// This method calculates the number of digits in the
// sensor reading.  Since each digit of the ASCII decimal
// representation is a byte, the number of digits equals
// the number of bytes:

int getLength(int someValue) {

  // there's at least one byte:

  int digits = 1;

  // continually divide the value by ten,

  // adding one to the digit count for each

  // time you divide, until you're at 0:

  int dividend = someValue /10;

  while (dividend > 0) {

    dividend = dividend /10;

    digits++;

  }

  // return the number of digits:

  return digits;
}
See Also:
Example project using Pachube and the Ethernet shield (the code above is more recent, however)