Reflashing the OpenWrt-Yun image on the Yún
There are situations in which the recommended upgrade procedure does not or cannot work. Typically, this is because there is something wrong with the existing Linux installation. Changing the default configuration and installing packages that take up too much space may cause the installation to become unstable.
This procedure uses U-Boot, something similar to the BIOS on a PC. U-Boot is a very small program executed right after you power on a Yún. With U-Boot you can restore a Yún to its factory settings. To reflash the Yún from the U-Boot prompt, you will download 3 different image files and write their contents on the flash memory of the Yún, erasing all previously stored information. It's a bit like formatting a computer's hard drive.
This should be considered an advanced topic, pay heed to the warnings throughout. These notes are for reference only. You should read and understand this document before trying anything mentioned below. If you are in doubt about any of these steps, DO NOT follow this guide and send an email to support@arduino.cc
WARNING Following this guide will VOID the WARRANTY of your Yún
Download and unpack the image files
Download the base images zip file. Extract the three files (uboot, kernel, rootfs).
Setup a TFTP server
For U-Boot to download the 3 files from your computer to the Yún, you first need to setup a TFTP server on your computer.
Setup a TFTP server on Windows
Download and install TFTP Utility from http://sourceforge.net/projects/tftputil/.
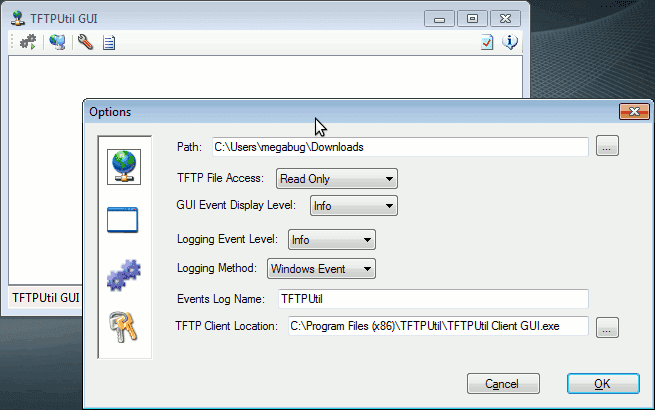
Once the program has been installed, and you've started it, press the settings button and change the path, specifying the location where you have unpacked the base images zip file you downloaded earlier
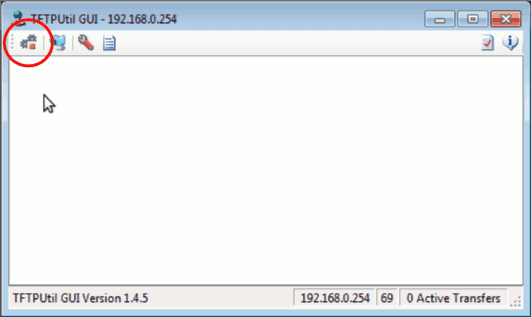
Then start the TFTP server by pressing the first button on the left
Setup a TFTP server on Mac OS X
Open Terminal (found in Applications>Utilities) and type
sudo launchctl load -F /System/Library/LaunchDaemons/tftp.plist
sudo launchctl start com.apple.tftpd
Move the unpacked base images files into the folder /private/tftpboot/
You can access hidden directories like /private/ by using the Go To Folder option in the Go menu of the taskbar. In this instance, click on 'Go To Folder'' and enter /private/tftpboot/ to open the directory in the Finder.
Setup a TFTP server on GNU/Linux (Ubuntu, Debian based distributions)
Open Terminal and type
sudo apt-get install tftpd-hpaWhen asked for the directory to use as root for the TFTP server, leave the default value /var/lib/tftpboot
Move the unpacked base images files into folder /var/lib/tftpboot
Setup a TFTP server on GNU/Linux (Fedora)
Open Terminal and type
yum install tftp-serverEdit file /etc/xinetd.d/tftp and change disable = yes to disable = no. Then type
systemctl restart xinetd.serviceCheck if it's running with
chkconfig tftpMove the unpacked base images files into folder /var/lib/tftproot
Setup your Yún
Connect your Yún to your computer with a USB cable. Then connect the Yún to your router or your computer with a wired Ethernet cable. This is crucial: you cannot reflash via wifi.
Open the Arduino IDE and upload the YunSerialTerminal example to your Yún.
You'll need to do the next step quickly. Open the Serial Monitor from the Arduino IDE, press the YUN RST button (the white one near the LEDs), and press the Enter button a couple of times on your keyboard. If you're fast enough, you'll get something like the following in the Serial Monitor :
...
...
ATHRS26: s26 reset done
eth1 up
eth0, eth1
Hit any key to stop autoboot:  4  3  2
ar7240>
The ar7240> is U-Boot prompt.
If you don't hit enter at the right time, and don't enter U-Boot, press the YUN RST button once more and retry until you get U-Boot prompt.
Once inside U-Boot, you need to tell it your computer's IP address and the IP address for the Yún. Find the IP for your computer, and choose a unique address for the the Yún. If you're on a home network, you probably won't have any issues assigning something in the appropriate range (if you're in a network full of computers, you first need to ensure the IP address you'll assign to the Yún is not already used by someone else).
For example, your computer's IP address is 192.168.0.231, and you want to assign the Yún the address of 192.168.0.146. First set the IP of your computer in the Serial Monitor :
setenv serverip 192.168.0.231;
and press Enter. Then set the IP address for the Yún :
setenv ipaddr 192.168.0.146;
The Yún is now ready for reflashing.
Reflashing U-Boot (optional)
Reflashing U-Boot is a last option. These commands are only a reference.
In the Serial Monitor, type
tftp 0x80060000 openwrt-ar71xx-generic-linino-u-boot.bin;
and press Enter.
If it takes a long time to see the prompt ar7240> again, it means that you have used the wrong IP address for the Yún or your computer, your TFTP server is not running, or the Ethernet cable between the computer and Yún is not properly connected. Check these variables, and start over by pressing the YUN RST button.
If the U-Boot prompt does appear (it should be quite quick), type the following commands, pressing Enter after each line :
erase 0x9f000000 +0x40000;
cp.b $fileaddr 0x9f000000 $filesize;
erase 0x9f040000 +0x10000
Reflashing Kernel
In the Serial Monitor, type
tftp 0x80060000 openwrt-ar71xx-generic-yun-16M-kernel.bin;
If it takes a long time to see the prompt ar7240> again, it means that you have used the wrong IP address for the Yún or your computer, your TFTP server is not running, or the Ethernet cable between the computer and Yún is not properly connected. Check these variables, and start over by pressing the YUN RST button.
If the U-Boot prompt does appear, type the following commands, pressing Enter after each line :
erase 0x9fEa0000 +0x140000;
cp.b $fileaddr 0x9fea0000 $filesize;
Reflashing OpenWrt-Yun
In the Serial Monitor, type
tftp 0x80060000 openwrt-ar71xx-generic-yun-16M-rootfs-squashfs.bin;
If it takes a long time to see the prompt ar7240> again, it means that you have used the wrong IP address for the Yún or your computer, your TFTP server is not running, or the Ethernet cable between the computer and Yún is not properly connected. Check these variables, and start over by pressing the YUN RST button.
If the U-Boot prompt does appear, type the following commands, pressing Enter after each line :
erase 0x9f050000 +0xE50000;
cp.b $fileaddr 0x9f050000 $filesize;
Rebooting
After completing the above steps, if the U-Boot prompt appears, type the following command in the Serial monitor, followed by Enter :
bootm 0x9fea0000
OpenWrt-Yun will now start its boot process. Wait a couple of minutes (first boot is always slightly slower) and enjoy your freshly reflashed Yún.