Getting Started with the Arduino MKR NB 1500
The Arduino MKR NB 1500 adds the Narrow Band IoT and LTE CAT M1 networks to the Arduino platform. It is a learning and development board which contains the ATMEL SAMD21 micro controller, designed to integrate the core's low power-consumption and high performance with the Arduino's ease-of-use. The MKR NB 1500 brings the Arduino Zero functionalities in the smaller form factor established by the Arduino MKR1000.
The Arduino MKR NB 1500 is programmed using the Arduino Software (IDE), our Integrated Development Environment common to all our boards and running both online and offline. For more information on how to get started with the Arduino Software visit the Getting Started page. The Narrowband communication functions are available through the NB Library.
Please remove the black conductive foam from the MKR board pins before usage. If you don't remove it, the board may behave erratcally.
Use your Arduino MKR NB 1500 with the Arduino IoT Cloud

This board is compatible with the Arduino IoT Cloud, where you can create IoT applications in a few simple steps. The cloud includes powerful features, such as building dashboards to monitor and control sensor networks, while making sure your data is secure.
Getting started is quick and easy, and requires just three simple steps:
- Create an Arduino Create account here.
- Download and install the Arduino Create plugin here.
- Go to Arduino IoT Cloud and start your journey through IoT!
Use your Arduino MKR NB 1500 on the Arduino Web IDE

All Arduino boards, including this one, work out-of-the-box on the Arduino Web Editor, you only need to install Arduino Create Agent to get started.
The Arduino Web Editor is hosted online, therefore it will always be up-to-date with the latest features and support for all boards. Follow this simple guide to start coding on the browser and upload your sketches onto your board.
Use your Arduino MKR NB 1500 on the Arduino Desktop IDE
If you want to program your MKR NB 1500 while offline you need to install the Arduino Desktop IDE and add the Atmel SAMD Core to it. This simple procedure is done selecting Tools menu, then Boards and last Boards Manager, as documented in the Arduino Boards Manager page.
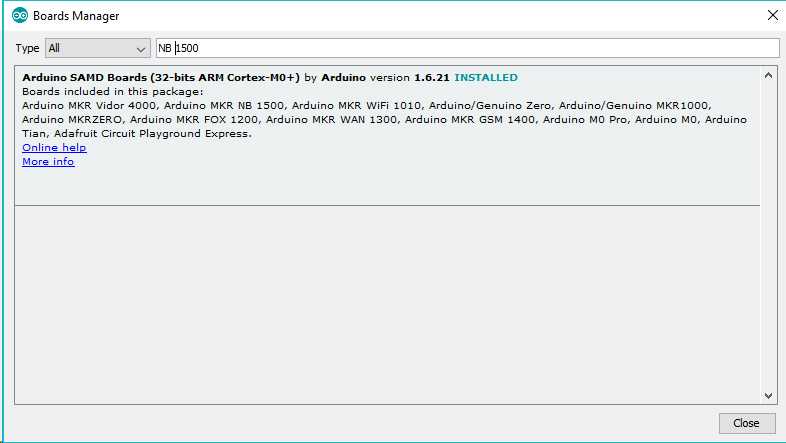
Here you can search MKR or MKR NB 1500 to find the core. Click on its box and click on the install button. On the bottom bar of the window you can follow the download and install procedure, including the installation of the proper driver, needed by the operating system to use the board. For more information about cores, see the guide on installing additional Arduino cores.
Now that the SAMD Core is installed, you can connect the board to the computer using a standard USB cable. The very first time your computer may go through the new hardware installation process.
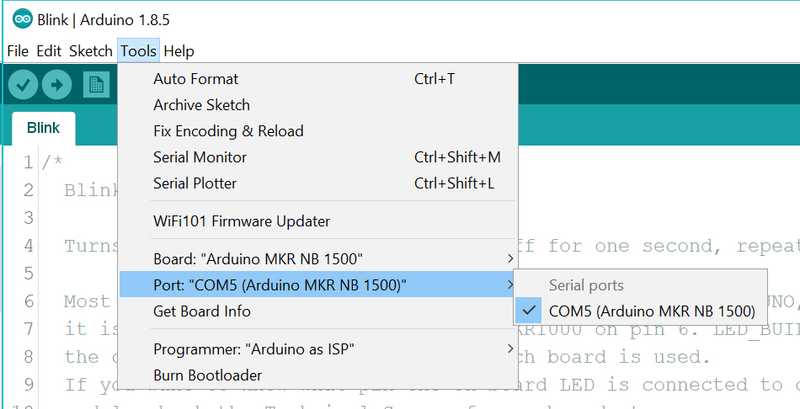
Select your board type and port
From Tools select the Board Arduino MKR NB 1500

and then the Port that is labeled with the same name.
Open your first sketch
Go to File on the Arduino Software (IDE) and open the Examples tree; select 01. Basic and then Blink
This sketch just flashes the built in LED connected to Digital pin LED_BUILTIN at one second pace for on and off, but it is very useful to practice the loading of a sketch into the Arduino Software (IDE) and the Upload to the connected board.
Upload the program
Press the second round icon from left on the top bar of the Arduino Software (IDE) or press Ctrl+U or select the menu Sketch and then Upload.
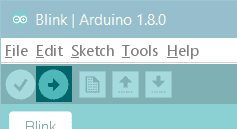
The sketch will be compiled and then uploaded. After a few seconds the bottom bar should show Done Uploading.
You have successfully set up your MKR NB 1500 board and uploaded your first sketch. You are ready to move on with our tutorials and projects: choose your next destination below.
Tutorials
Now that you have set up and programmed your Arduino MKR NB 1500 board, you may find inspiration in our Project Hub tutorial platform.
Don't forget to have a look at the MKRNB library page and its tutorials that will teach you how to use the various functions available to develop IoT applications.
To set up your board we have prepared a ''Radio Access Technology configuration" sketch that will speed up the connection of the MKR NB 1500 board to the wireless network.
Here is a tutorial that will help you in making very cool things with the SAMD microcontroller available on the MKR NB 1500!
Adding more Serial interfaces to SAMD microcontrollers
More examples on the following library pages:
Scheduler - Manage multiple non-blocking tasks.
AudioFrequencyMeter - Sample an audio signal and get its frequency back
I2S - To connect digital audio devices together
The text of the Arduino getting started guide is licensed under a Creative Commons Attribution-ShareAlike 3.0 License. Code samples in the guide are released into the public domain.