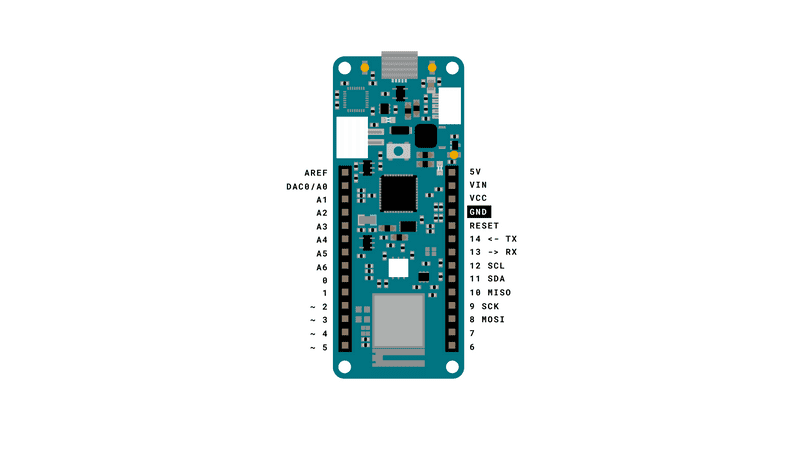
Connecting MKR WiFi 1010 to a Wi-Fi network
One of the MKR WiFi 1010's core strengths is the possibility to connect to a Wi-Fi network. In this tutorial, we will focus on achieving this with the help of the WiFiNINA library. We will first connect to a Wi-Fi network, and then we will look at some functions that can help us provide information such as the IP address of our board, encryption type, RSSI strength and the name of the network we are connecting to.
This tutorial is a great starting point for any maker interested in making applications connected to the Internet.
Hardware needed
- Arduino MKR WiFi 1010
- Micro USB cable
Circuit
This tutorial requires no circuit: we just need a Micro USB cable to connect our MKR WiFi 1010 board to a computer.
Software needed
- Arduino IDE (offline and online versions available)
- Arduino SAMD core installed (for offline editor only)
- WiFiNINA library (explained later in this tutorial)
Using the offline editor
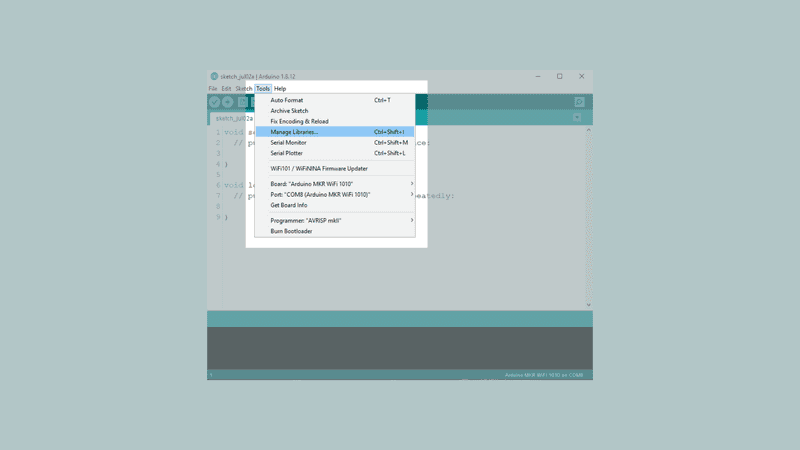
If you are using the offline editor, make sure you have installed the core needed for the MKR WiFi 1010. If you do not have it, please visit our Getting Started page for this board. We will also need to install the WiFiNINA library, following the instructions below:
In the editor, navigate to Tools > Manage Libraries.
Then, search for WiFiNINA. Click the install button. After it is installed, it should look like the following image:
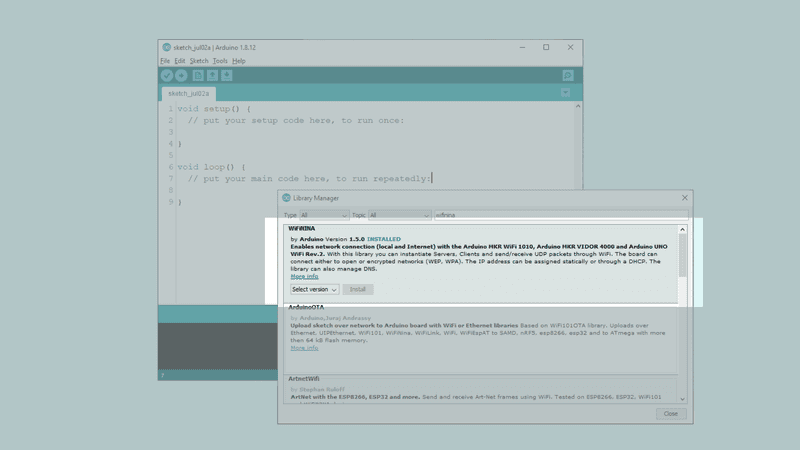
It is recommended to re-start the editor after installing a library.
Using the online editor

All Arduino boards, including this one, work out-of-the-box on the Arduino Web Editor, you only need to install Arduino Create Agent to get started.
The Arduino Web Editor is hosted online, therefore it will always be up-to-date with the latest features and support for all boards. Follow this simple guide to start coding on the browser and upload your sketches onto your board.
Let's start
The goal with this tutorial is to be able to connect our MKR WiFi 1010 board to a Wi-Fi network, and print relevant information regarding the connection.
The following steps are needed to create this program:
- Create a header file to store our credentials for the Wi-Fi network we will connect to.
- Create a function to connect to the Wi-Fi network.
- Create a function to print information regarding the connection.
Let's begin by opening the editor of our choice, and create a new sketch. Now, we need to create a new header file, to store our credentials. We do this, so we don't accidentally store our credentials in a code we may share on the internet. Depending on what editor you are using, the process is slightly different, but we can follow the instructions below:
Using the offline editor
If you are using the offline editor, simply click on the arrow pointing downwards in the top right corner, following the picture below.
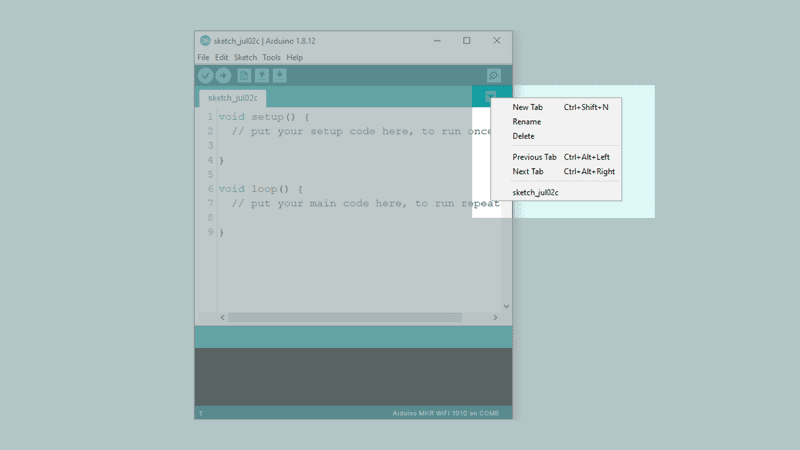
This will open up a yellow field in the bottom of the editor, where we need to name our file "arduino_secrets.h". When we have named it, click "OK" and a new tab will open.

Inside this tab, we need to enter the following code. Simply replace "yourNetwork" and "yourPassword" with the credentials of your Wi-Fi network. Remember that it is case-sensitive!
#define SECRET_SSID "yourNetwork"
#define SECRET_PASS "yourPassword"
Using the online editor
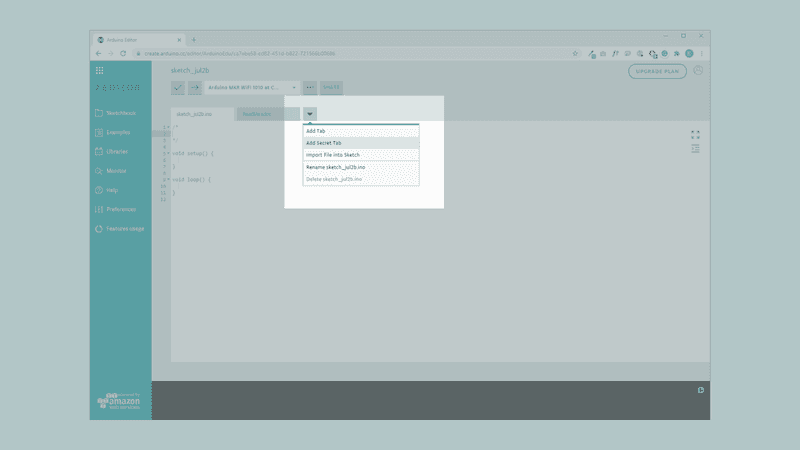
In the online editor, we need to click the downward arrow next to our sketch tab, and click "Add Secret Tab. This will create a tab called Secret.
We now need to head back to the original sketch file, and enter the following code:
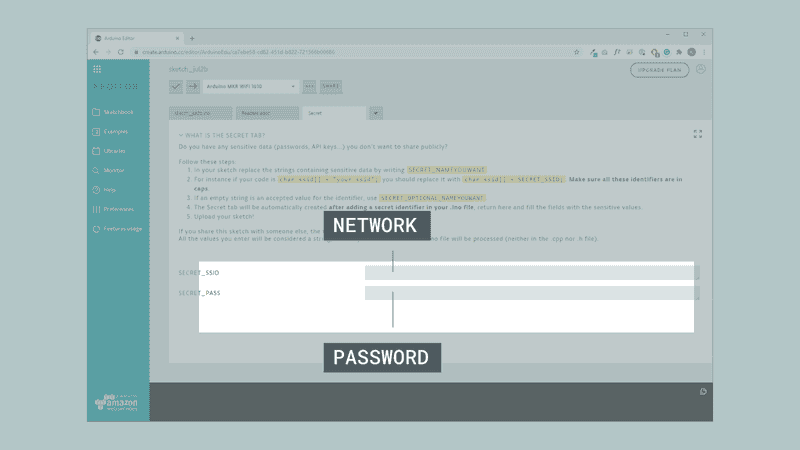
char ssid[] = SECRET_SSID;
char pass[] = SECRET_PASS;
This will automatically create 2 fields in the Secret tab. If we go back to this tab, we can enter our credentials here.
Code explanation
NOTE: This section is optional, you can find the complete code further down this tutorial.
We have now finished creating our secret credential tab in either the offline or online editor, so let's get started with the code! In this tutorial, we will be going through the code, step by step, to get familiar with the different programming concepts we are using.
First, we need to include the WiFiNINA library to access its functionalities. We then need to include the arduino_secrets.h file we created (not required in online editor). After that, we need to create two char variables, one to store our network name, another to store our network password. If you are using the online editor, we have already pasted this in the code in the previous step. We then set the initial WiFi radio's status to idle.
#include <WiFiNINA.h>

#include "arduino_secrets.h"

char ssid[] = SECRET_SSID;        // your network SSID (name)
char pass[] = SECRET_PASS;    // your network password (use for WPA, or use as key for WEP)
int status = WL_IDLE_STATUS;     // the Wifi radio's status
In the setup(), we start serial communication, followed by while(!Serial);, which basically means that unless we open the Serial Monitor, the program will not run. We then create a while loop that checks if we are not connected to Wi-Fi, begin connecting to it. We then use status = WiFi.begin(ssid, pass); to start connecting to WiFi, and a delay of 10 seconds to give it enough time to connect.
Finally, we will print a simple line, and call on the printData() function. This function contains information regarding the connection.
void setup() {
  //Initialize serial and wait for port to open:
  Serial.begin(9600);
  while (!Serial);

  // attempt to connect to Wifi network:
  while (status != WL_CONNECTED) {
    Serial.print("Attempting to connect to network: ");
    Serial.println(ssid);
    // Connect to WPA/WPA2 network:
    status = WiFi.begin(ssid, pass);

    // wait 10 seconds for connection:
    delay(10000);
  }

  // you're connected now, so print out the data:
  Serial.println("You're connected to the network");

  Serial.println("----------------------------------------");
  printData();
  Serial.println("----------------------------------------");
}
The loop is very easy: it only executes the printData() function every 10 seconds, and then prints a line to separate the information in the Serial Monitor.
void loop() {
  // check the network connection once every 10 seconds:
 delay(10000);
 printData();
 Serial.println("----------------------------------------");
}
The final step of this code is to create the printData() function, that we have used in both the setup and loop.
The function is quite basic: it simply prints out three different types of information:
- Board's IP address
- Name of network connected to
- Signal strength
This information is then printed in the Serial Monitor.
void printData() {
  Serial.println("Board Information:");
  // print your board's IP address:
  IPAddress ip = WiFi.localIP();
  Serial.print("IP Address: ");
  Serial.println(ip);

  Serial.println();
  Serial.println("Network Information:");
  Serial.print("SSID: ");
  Serial.println(WiFi.SSID());

  // print the received signal strength:
  long rssi = WiFi.RSSI();
  Serial.print("signal strength (RSSI):");
  Serial.println(rssi);

}
Complete code
If you choose to skip the code building section, the complete code can be found below:
NOTE: You will still need to create a secrets tab yourself and add your credentials if you copy this code.
Upload sketch and testing the program
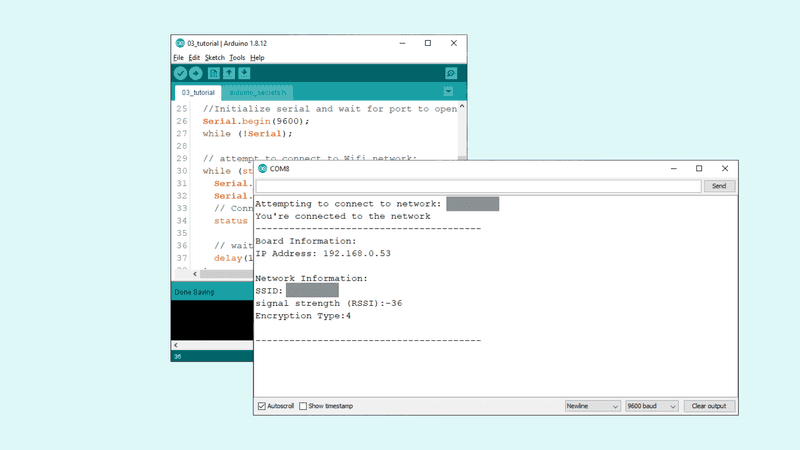
Once we are finished with the coding, we can upload the sketch to the board. Once it has been successfully uploaded, open the Serial Monitor, and it should match the following images. Note that the network information in this example is greyed out for security reasons.
If you are using the OFFLINE editor, it will look like this:
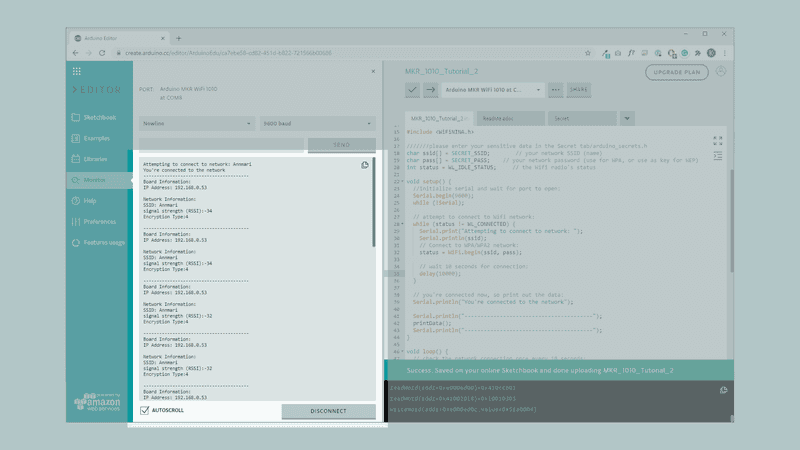
If you are using the ONLINE editor, it will look like this:
Congratulations, you have not only connected your board to your Wi-Fi network, but you have also retrieved information on the network. One particularly good feature is the signal strength (rssi). An experiment you can do is to try to move your MKR WiFi 1010 board close to the router, and observe the Serial Monitor.
Troubleshoot
If the code is not working, there are some common issues we need can troubleshoot:
- We have not updated the latest firmware for the board.
- We have not installed the core required for the board.
- We have not installed the WiFiNINA library
- We have not entered the SSID and PASS: remember, it is case sensitive.
- We have not selected the right port to upload: depending on what computer we use, sometimes the board is duplicated. By simply restarting the editor, this issue can be solved.
Conclusion
In this tutorial, we have learned how to simply connect to a Wi-Fi network, by using the credentials in the code. We also learned how to obtain specific information regarding our connection, such as signal strength, IP address and name of our network.
Now that you have learned a little bit how to use the WiFiNINA library, you can try out some of our other tutorials for the MKR WiFi 1010 board. You can also check out the WiFiNINA library for more examples and inspiration for creating wireless projects!
More tutorials
You can find more tutorials for this board in the MKR WiFi 1010 getting started page.
Author: Karl Söderby Reviewed by: Simone [18.07.2020] Last revision: 26.06.2020