Getting started with the MKR WiFi 1010
MKR WiFi 1010 board has been designed to offer a practical and cost effective solution for makers seeking to add Wi-Fi connectivity to their projects with minimal previous experience in networking. Learn how to set up the programming environment and get the hardware up and running, ready for your projects, in minutes.
The MKR WIFI 1010 is programmed using the Arduino Software (IDE), our Integrated Development Environment common to all our boards and running both online and offline. For more information on how to get started with the Arduino Software visit the Getting Started page.
Important: You should remove the black conductive foam from the MKR board pins before usage. If you don't remove it, the board may behave erratically.
Use your Arduino MKR WIFI 1010 with the Arduino IoT Cloud
This board is compatible with the Arduino IoT Cloud, where you can create IoT applications in a few simple steps. The cloud includes powerful features, such as building dashboards to monitor and control sensor networks, while making sure your data is secure.
Getting started is quick and easy, and requires just three simple steps:
- Create an Arduino Create account here.
- Download and install the Arduino Create plugin here.
- Go to Arduino IoT Cloud and start your journey through IoT!
Use your Arduino MKR WIFI 1010 on the Arduino Web IDE
All Arduino boards, including this one, work out-of-the-box on the Arduino Web Editor, you only need to install Arduino Create Agent to get started.
The Arduino Web Editor is hosted online, therefore it will always be up-to-date with the latest features and support for all boards. Follow this simple guide to start coding on the browser and upload your sketches onto your board.
Use your Arduino MKR WIFI 1010 on the Arduino Desktop IDE
If you want to program your MKR WIFI 1010 while offline you need to install the Arduino Desktop IDE and add the Arduino SAMD Core to it. This simple procedure is done selecting Tools menu, then Boards and last Boards Manager, as documented in the Arduino Boards Manager page.
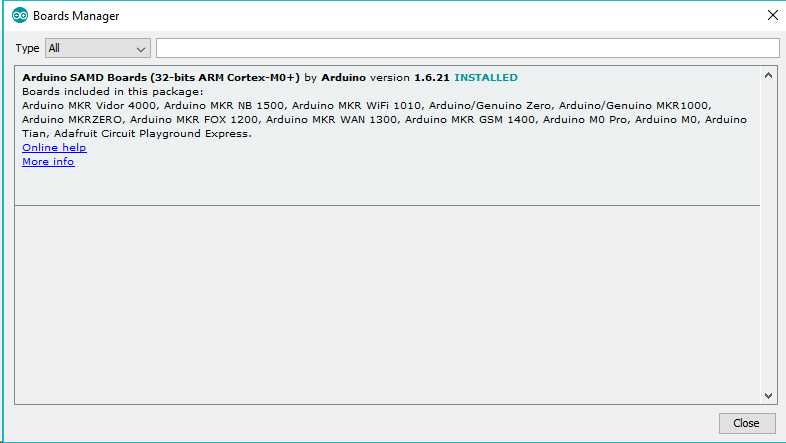
Installing Drivers for the MKR WIFI 1010
With the SAMD core installed, you now proceed with the driver installation.
OSX No driver installation is necessary on OSX. Depending on the version of the OS you're running, you may get a dialog box asking you if you wish to open the "Network Preferences". Click the "Network Preferences..." button, then click "Apply". The MKR WIFI 1010 will show up as "Not Configured", but it is still working. You can quit the System Preferences.
Windows (tested on 7, 8 and 10) If you properly installed the SAMD Core, just connect the MKR WIFI 1010 to your computer with a USB cable. Windows should initiate its driver installation process once the board is plugged in.
Linux No driver installation is necessary for Linux.
Open your first sketch
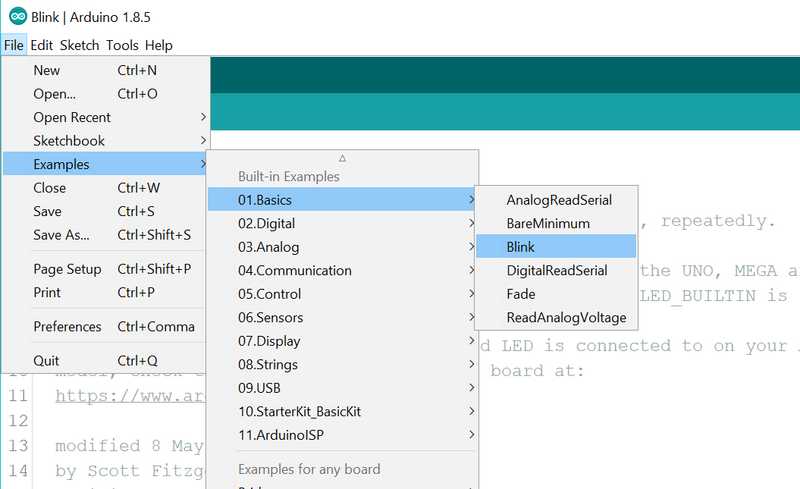
Open the LED blink example sketch: File > Examples >01.Basics > Blink.
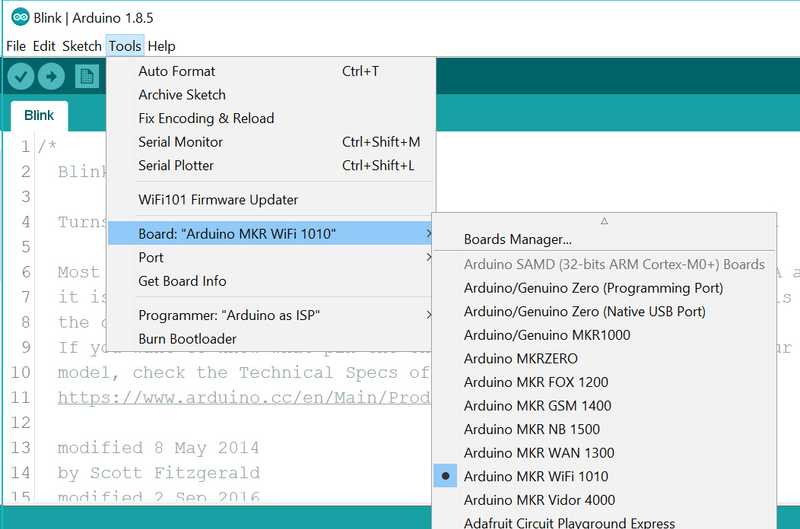
Select your board type and port
You'll need to select the entry in the Tools > Board menu that corresponds to your Arduino board.
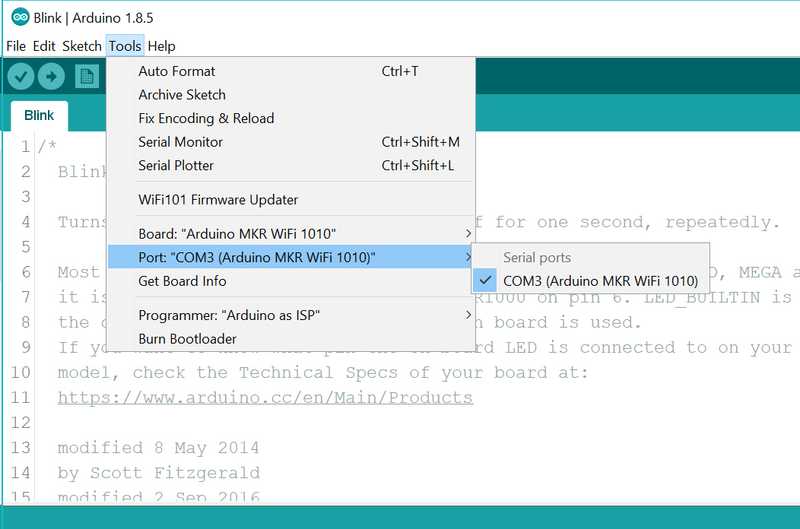
Select the serial device of the board from the Tools | Serial Port menu. This is likely to be COM3 or higher (COM1 and COM2 are usually reserved for hardware serial ports). To find out, you can disconnect your board and re-open the menu; the entry that disappears should be the Arduino board. Reconnect the board and select that serial port.
Upload the program
Now, simply click the "Upload" button in the environment. Wait a few seconds - you should see the green progress bar on the right of the status bar. If the upload is successful, the message "Done uploading." will appear on the left in the status bar.
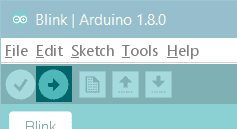
A few seconds after the upload finishes, you should see the on-board LED start to blink (in orange). If it does, congratulations! You've gotten your MKR WIFI 1010 up-and-running. If you have problems, please see the troubleshooting suggestions.
Learn more on the Desktop IDE
See this tutorial for a generic guide on the Arduino IDE with a few more infos on the Preferences, the Board Manager, and the Library Manager.
Tutorials
You can check out some of the tutorials below to get started with your MKR WiFi 1010 board.
Basic tutorials
The basic tutorials are designed to be completed with minimal amount of extra components, and introduces some interesting topics.
- Connecting MKR WiFi 1010 to a Wi-Fi network
- Web Server using Access Point (AP) mode with MKR WiFi 1010
- Host a webserver on the MKR WiFi 1010
- MKR WiFi 1010 Bluetooth® Low Energy
- Powering MKR WiFi 1010 with batteries
- How to connect sensors to the MKR WiFi 1010
Project Hub tutorials
You can also find inspiration in our Project Hub tutorial platform. The Project Hub has thousands of interesting projects, some of which are listed below:
Other tutorials
You can also check out some of the tutorials below that works with a variety of other boards.
Please Read...
The microcontroller on the MKR WIFI 1010 runs at 3.3V, which means that you must never apply more than 3.3V to its Digital and Analog pins. Care must be taken when connecting sensors and actuators to assure that this limit of 3.3V is never exceeded. Connecting higher voltage signals, like the 5V commonly used with the other Arduino boards, will damage the MKR WIFI 1010.
Features
Serial ports on the MKR WIFI 1010
The USB connector of the board is directly connected to the USB host pins of the SAMD21. This routing enables you to use the MKR WIFI 1010 as a client USB peripheral (acting as a mouse or a keyboard connected to the computer) or as a USB host device so that devices like a mouse, keyboard, or an Android phone can be connected to the MKR WIFI 1010. This port can also be used as a virtual serial port using the "Serial" object in the Arduino programming language.
ADC and PWM resolutions
The MKR WIFI 1010 has the ability to change its analog read and write resolutions (defaults to 10-bits and 8-bits, respectively). It can support up to 12-bit ADC/PWM and 10-bit DAC resolutions. See the analog write resolution and analog read resolution pages for more information.
WiFi on the MKR WIFI 1010
This board is fully compatible with the WiFiNINA library and all the examples made for it.
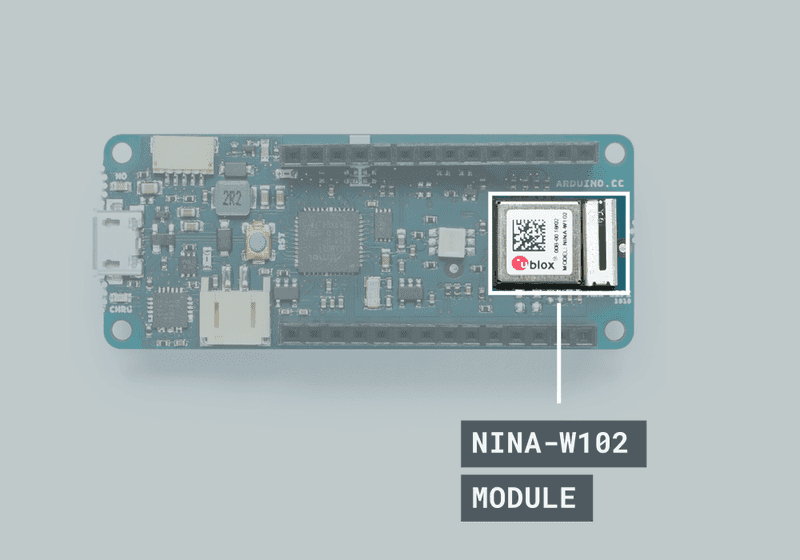
Note: the WiFi antenna built in in the u-blox NINA-W102 module is made for embedded products and should NOT be touched. Applying pressure or force on it could cause damage. Be very careful when you detach shields on this board because you may pull the WiFi antenna.
For more details on the Arduino MKR WIFI 1010, see the product page.