Host a web server on the MKR WiFi 1010
In this tutorial, we will use the MKR WiFi 1010 to set up a simple web server, using the WiFiNINA library. The web server will be used as an interface for our board, where we will create two buttons to remotely turn ON or OFF an LED.
If you have never used the WiFiNINA library, you can check out this tutorial that shows how to install the library.
Hardware needed
- Arduino MKR WiFi 1010
- Micro USB cable
- Generic LED
- 82 ohm resistor
- Breadboard
- Jumper wires
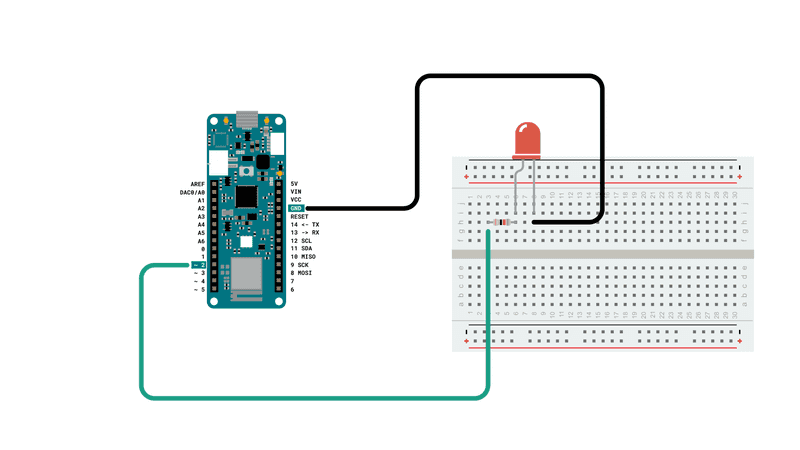
Circuit
Follow the wiring diagram below to connect the LED to the MKR WiFi 1010 board.
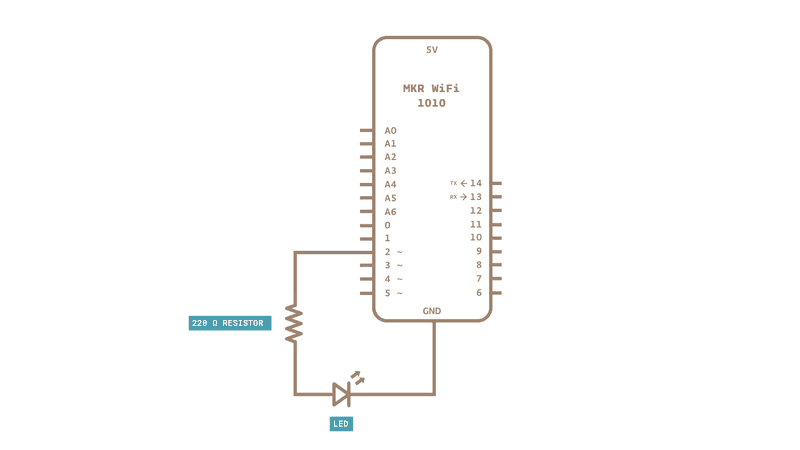
Schematic
This is the schematic of our circuit.
Software needed
- Arduino IDE (offline and online versions available).
- Arduino SAMD core installed, follow this link for instructions.
- WiFiNINA library (explained later in this tutorial).
Let's start
This tutorial uses barely any external hardware: we have only LED that we will control remotely. But the most interesting aspects lies in the library we are going to use: WiFiNINA. This library can be used for many different connectivity projects, where we can both connect to WiFi, make GET requests and - as we will explore in this tutorial - how to create a web server.
We will go through the following steps in order to create a web server on our MKR WiFi 1010:
- First, we need to initialize the WiFiNINA library.
- Then, we connect to our local WiFi by entering our
SSID(name of network) andPASS(password of network). - Once connected, it will start hosting a server, and starts waiting for a client.
- If we now enter the IP address of our board in our regular browser (e.g. Chrome, Firefox) we connect as a client.
- As long as we are connected, the program detects it, and enters a
while()loop. - In the
while()loop, two links are simply printed in HTML format, which is visible in the browser. - These links control the LED we connected to the board, simply "ON" or "OFF".
- If we press the "ON" link, the program is configured to add an "H" to the end of the URL, or if we press the "OFF" link, we add an "L" to the end of the URL.
- If the URL ends with "H", it will turn on the LED, and if it ends with "L" it turns it off. H stands for "HIGH" and L stands for "LOW".
And that is the configuration we will be using in this tutorial. There are a few other functionalities, such as checking if we have the latest firmware and that we are using the right board, and these potential errors will be printed in the Serial Monitor.
Code explanation
NOTE: This section is optional, you can find the complete code further down this tutorial.
The initialization begins by including the WiFiNINA library, after which we need to enter our credentials to our network. If you want to, you can create a secret tab to store your credentials. This can be useful if you want to share your sketch online, and don't want anyone to see your credentials. You can find out how to do that in this tutorial.
#include <WiFiNINA.h>

char ssid[] = " ";             //  your network SSID (name) between the " "
char pass[] = " ";      // your network password between the " "
int keyIndex = 0;                 // your network key Index number (needed only for WEP)
int status = WL_IDLE_STATUS;      //connection status
WiFiServer server(80);            //server socket

WiFiClient client = server.available();

int ledPin = 2;
We can then configure the setup(). Here we set the Serial Communication to 9600, configure the pinMode for our LED, and use the line while(!Serial); to only initialize the rest of the program as long as we open the Serial Monitor. We do this since important information is printed in the Serial Monitor, and if we upload it, we may risk missing it. Then, we execute two functions: enable_WiFi() and connect_WiFi, which we will use to connect to our WiFi. We then use server.begin() to start hosting the server, once we are connected. The final function, printWiFiStatus() simply prints the information about the connection status in the Serial Monitor. Here, we will see the IP address we need to connect to.
void setup() {
  Serial.begin(9600);
  pinMode(ledPin, OUTPUT);
  while (!Serial);

  enable_WiFi();
  connect_WiFi();

  server.begin();
  printWifiStatus();

}
The loop of this program is very short. First, we use client to check if the server is available. If it is, we execute the printWEB() function.
void loop() {
  client = server.available();

  if (client) {
    printWEB();
  }
}
Next up is the functions that we used in setup(). These are printWiFiStatus(), enableWiFi(), and connect_WiFi().
If we look at printWiFiStatus(), you can see that it basically prints different things in the Serial Monitor. Most importantly, it prints the board's IP address, which we will need to enter in the browser to control the Arduino.
void printWifiStatus() {
  // print the SSID of the network you're attached to:
  Serial.print("SSID: ");
  Serial.println(WiFi.SSID());

  // print your board's IP address:
  IPAddress ip = WiFi.localIP();
  Serial.print("IP Address: ");
  Serial.println(ip);

  // print the received signal strength:
  long rssi = WiFi.RSSI();
  Serial.print("signal strength (RSSI):");
  Serial.print(rssi);
  Serial.println(" dBm");

  Serial.print("To see this page in action, open a browser to http://");
  Serial.println(ip);
}

void enable_WiFi() {
  // check for the WiFi module:
  if (WiFi.status() == WL_NO_MODULE) {
    Serial.println("Communication with WiFi module failed!");
    // don't continue
    while (true);
  }

  String fv = WiFi.firmwareVersion();
  if (fv < "1.0.0") {
    Serial.println("Please upgrade the firmware");
  }
}

void connect_WiFi() {
  // attempt to connect to Wifi network:
  while (status != WL_CONNECTED) {
    Serial.print("Attempting to connect to SSID: ");
    Serial.println(ssid);
    // Connect to WPA/WPA2 network. Change this line if using open or WEP network:
    status = WiFi.begin(ssid, pass);

    // wait 10 seconds for connection:
    delay(10000);
  }
}
Now, we will look at the core of this program: the printWEB() function, which we call from the loop().
Here, we first begin by checking if client is available, and if it is, we enter a while() loop. Inside the while loop, we will use client.print to start printing HTML code that can be viewed from the browser. To not overload the Arduino boards memory, we use a very basic setup: two links that either turn ON or OFF an LED.
This line of code is used to turn ON the LED, by adding a /H to the end of the URL.
client.print("Click <a href=\"/H\">here</a> turn the LED on<br>");
This line of code is used to turn OFF the LED, by adding a /L to the end of the URL.
client.print("Click <a href=\"/L\">here</a> turn the LED off<br>");
We will also make a reading on an analog pin (A1). Even though we do not have anything connected, we can simply see how we can also read something connected to the board, and then print it to the client.
client.print("Random reading from analog pin: ");client.print(randomReading);
When the printing is done, we use break; to exit the while loop. Now, we configure the program to check whether there's a H or L added to the URL, where we use digitalWrite(ledPin, STATE) to turn ON or OFF the LED.
void printWEB() {

  if (client) {                             // if you get a client,
    Serial.println("new client");           // print a message out the serial port
    String currentLine = "";                // make a String to hold incoming data from the client
    while (client.connected()) {            // loop while the client's connected
      if (client.available()) {             // if there's bytes to read from the client,
        char c = client.read();             // read a byte, then
        Serial.write(c);                    // print it out the serial monitor
        if (c == '\n') {                    // if the byte is a newline character

          // if the current line is blank, you got two newline characters in a row.
          // that's the end of the client HTTP request, so send a response:
          if (currentLine.length() == 0) {

            // HTTP headers always start with a response code (e.g. HTTP/1.1 200 OK)
            // and a content-type so the client knows what's coming, then a blank line:
            client.println("HTTP/1.1 200 OK");
            client.println("Content-type:text/html");
            client.println();

            //create the links
            client.print("Click <a href=\"/H\">here</a> turn the LED on<br>");
            client.print("Click <a href=\"/L\">here</a> turn the LED off<br>");

            int randomReading = analogRead(A1);
            client.print("Random reading from analog pin: ");
            client.print(randomReading);

            // The HTTP response ends with another blank line:
            client.println();
            // break out of the while loop:
            break;
          }
          else {      // if you got a newline, then clear currentLine:
            currentLine = "";
          }
        }
        else if (c != '\r') {    // if you got anything else but a carriage return character,
          currentLine += c;      // add it to the end of the currentLine
        }

        if (currentLine.endsWith("GET /H")) {
        digitalWrite(ledPin, HIGH);
        }
        if (currentLine.endsWith("GET /L")) {
        digitalWrite(ledPin, LOW);
        }

      }
    }
    // close the connection:
    client.stop();
    Serial.println("client disconnected");
  }
}
Complete code
If you choose to skip the code building section, the complete code can be found below:
Upload sketch and testing the program
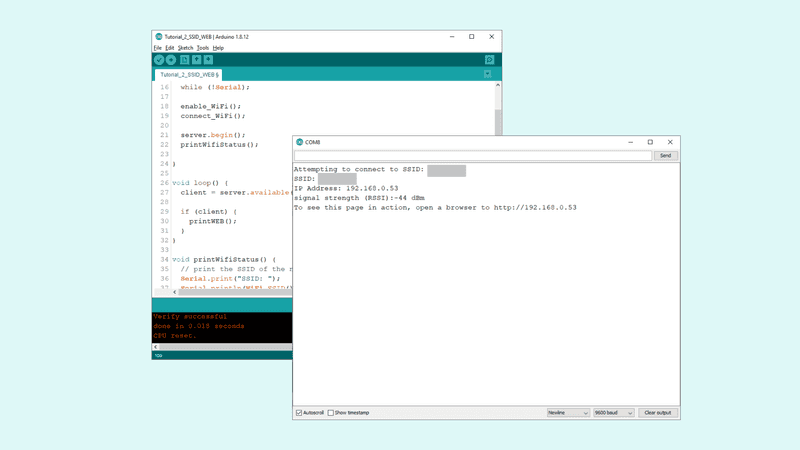
Once we are finished with the coding, we can upload the sketch to the board. Once it is successful, open the Serial Monitor and it should look like the following image:
Copy the IP address and enter it in a browser. Now, we should see a very empty page with two links at the top left that says "Click here to turn the LED on" and "Click here to turn the LED off".
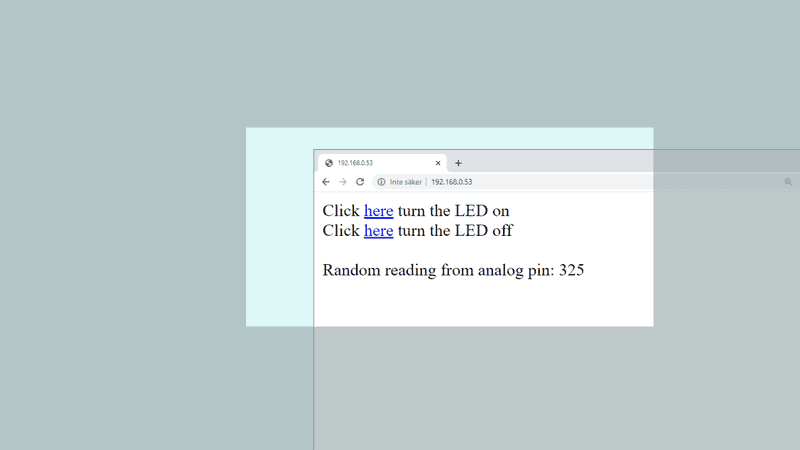
When interacting with the links, you should see the LED connected to pin 2 turn on and off depending on what you click, and we have successfully created a way of interacting with our MKR WiFi 1010 board remotely.
Troubleshoot
If the code is not working, there are some common issues we need can troubleshoot:
- We have not updated the latest firmware for the board.
- We have not installed the core required for the board.
- We have not installed the WiFiNINA library
- We have entered the SSID and PASS incorrectly: remember, it is case sensitive.
- We have selected the right port to upload: depending on what computer we use, sometimes the board is duplicated. By simply restarting the editor, this issue can be solved.
Conclusion
In this tutorial, we learned how to create a basic web interface from scratch. We learned how to control an LED remotely, and how to display the value of an analog pin in the browser as well. Using this example, we can build much more complex projects, and if you are familiar with both HTML and CSS, you can probably create some really cool looking interfaces! If you are new to HTML and CSS, there are plenty of guides online that can guide you, you can visit w3schools or codecademy for many tips and tricks.
NOTE: The memory of the Arduino MKR WiFi 1010 is not infinite. It is encouraged to use external CSS files if you are planning a bigger project, as it reduces the memory.
Tip: Check out fontawesome to get access to thousands of free icons that you can customize your local web server with!
More tutorials
You can find more tutorials for this board in the MKR WiFi 1010 getting started page.
Authors: Karl Söderby Reviewed by: Simone [18.07.2020] Last revision: 26.06.2020