Motivation
Location of a robot to a precision of small distances (i.e. <.1 inches) is valuable for navigation of small robots. The goal of this project was to create an affordable "GPS" system that could locate a robot within .1 inches and be easy to construct from off the shelf parts and easy to setup in the field.
General Theory of Operation
I cannot take credit for this idea but it is beautifully simple. Use a radio transmitter/receiver pair on two different Arduinos. One to transmit the request for a "ping" from a beacon, the other a beacon to receive the request and then "ping". When the beacon gets the request for a ping over radio it "pings" by oscillating an acoustic transducer for a short period of time. The requesting Arduino simply measures the amount of time between the request and the ping. This is very highly correlated with the distance between the requesting Arduino and the beacon Arduino. To multiplex this if the request is for a particular Beacon to ping then the distance to N Beacons can be measured by one requesting Arduino. I will refer to the requesting Arduino as the GPS unit because it becomes an analogy for a "real" GPS unit after this point.
Components
For each Beacon you need
- Arduino
- Battery
- Power Switch
- A radio receiver similar to MO-RX3400 (cheap will be fine)
- An LED
- Some Jumpers
- A high frequency transducer (although lower might work also) like the ones from an ultra-sonic measuring device.
For the requesting Arduino (GPS Unit)
- Arduino
- Battery
- Power Switch
- A radio transmitter the compliment of the MO-RX3400 in the receiver
- An LED
- Some Jumpers
- A high frequency transducer (although lower might work also) like the ones from an ultra-sonic measuring device.
- One LM324 and some capacitors and resistors (details later)
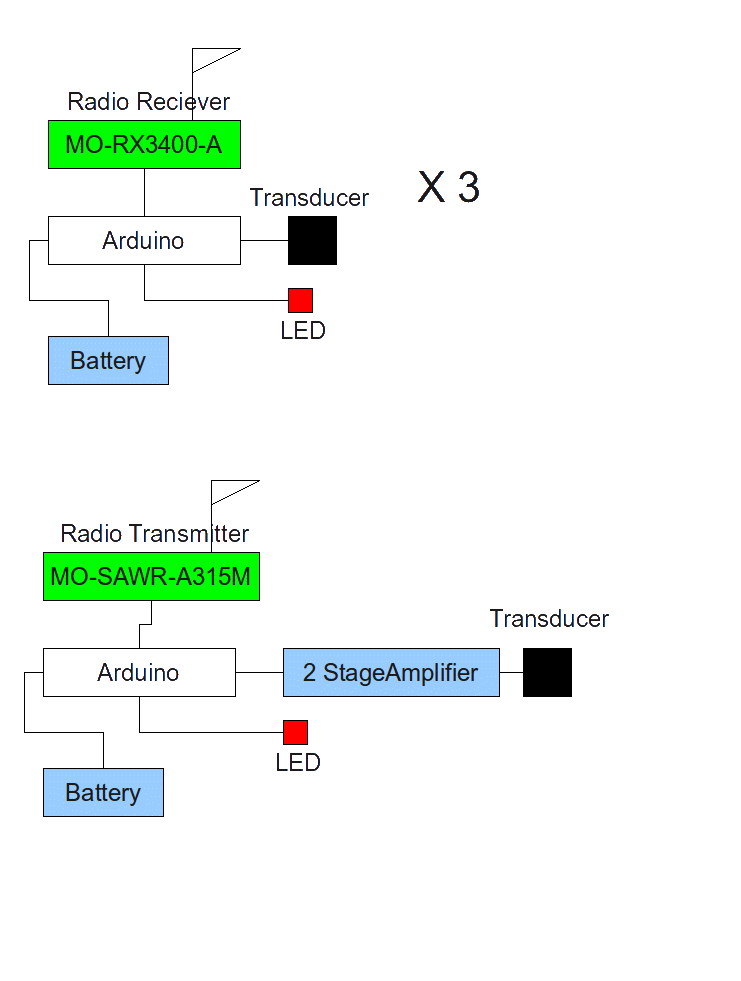
Block Diagram
The block diagram is basically to get a feel for the two devices.
In the Beacon the Transducer is connected across two digital lines, so a 10 -> 01 pattern on those lines causes a 2 X 5V movement of the transducer. Where if a single line was used only a 5V deflection would occur. The current limited on the Arduino is relied upon so the transducer is directly connected across the two lines. The LED is used to debug/diagnose problems. In general it flashes when a ping request for it is received. The output of the receiver is tied to the hardware serial input line. Not shown are three (or more) pins used to set the "address" of the beacon. If these pins are labeled X, Y, and Z then no short is Address 0. A short between X and Y is Address 1 and a short between Y and Z is Address 2. The LED is nice when three beacons are used because you can see the requests cycling through the beacons. It is kinda fun to see as well.
The GPS uses the same transducer but it is connected through a LM324 Operation Amplifier Circuit that essentially is tuned to the frequency of the transducer and creates levels that are Digital Level (0-5V) with distances of many feet away. The circuit is very much like the first two stages of EFYMag February 2006 Ultrasonic Proximity Detector or Maxim App-notes on Proximity Detector. The detector part d1 to the rest of the left is not needed that is done with software. Any ultrasonic range finder amplifier will do. I used one that only needed capacitors and resistors and used a single ended power supply for the Op Amp (the LM324 my favorite Op Amp). The transmitter is tied to pins that are a software serial port. This leaves the hardware serial port for communication with another device. The LED blinks when a "ping" from at least one Beacon is heard through the amplifier.
Code
This code was written with certain choices for connecting the LED, Jumper for setting Address, and Transducer. The Beacon software is
- #define SigPin 7
- #define Node1Pin 6
- #define Node2Pin 8
- #define Transducer1 13
- #define Transducer2 9
- #define PacketPin 2
- #define LEDC 3
- #define LEDA 4
- int beaconNumber;
- void findBeaconNumber() {
- pinMode(SigPin,OUTPUT);
- pinMode(Node1Pin,INPUT);
- pinMode(Node2Pin,INPUT);
- digitalWrite(Node1Pin,HIGH); // activate pullup
- digitalWrite(Node2Pin,HIGH); // activate pullup
- digitalWrite(SigPin,LOW);
- // need to check code below
- if (digitalRead(Node1Pin)==LOW) beaconNumber=1; // must be connected to SigPin
- else if (digitalRead(Node2Pin)==LOW) beaconNumber=2; // must be connected to SigPin
- else beaconNumber=0;
- }
- void setup() {
- pinMode(LEDC,OUTPUT);
- pinMode(LEDA,OUTPUT);
- digitalWrite(LEDC,LOW);
- digitalWrite(LEDA,LOW);
- pinMode(Transducer1,OUTPUT);
- pinMode(Transducer2,OUTPUT);
- digitalWrite(Transducer1,LOW);
- digitalWrite(Transducer2,LOW);
- findBeaconNumber();
- Serial.begin(2400);
- }
- void PulseTransducer() { // 42Khz pulsing
- for (int i=0;i<13;i++) {
- digitalWrite(Transducer1,HIGH);
- delayMicroseconds(5);
- digitalWrite(Transducer2,HIGH);
- digitalWrite(Transducer1,LOW);
- delayMicroseconds(5);
- digitalWrite(Transducer2,LOW);
- }
- }
- void loop() {
- if (Serial.available()) {
- char frame=Serial.read();
- // Serial.write('|');
- while (!Serial.available());
- if (frame==0x5a) {
- while (!Serial.available()); // Wait for second byte
- Serial.write('-');
- char request=Serial.read();
- if (request==beaconNumber) {
- PulseTransducer();
- digitalWrite(LEDA,HIGH);
- } else {
- digitalWrite(LEDA,LOW);
- }
- }
- }
- }
The GPS Software is
- #include <SoftwareSerial.h>
- #define ADDetector 5
- #define rxPin 3
- #define txPin 4
- #define LEDC 7
- #define LEDA 8
- SoftwareSerial mySerial(rxPin,txPin);
- void setup() {
- Serial.begin(9600);
- pinMode(rxPin,INPUT);
- pinMode(txPin,OUTPUT);
- pinMode(LEDC,OUTPUT);
- pinMode(LEDA,OUTPUT);
- digitalWrite(LEDC,LOW);
- digitalWrite(LEDA,LOW);
- mySerial.begin(2400);
- }
- long minDetectorNoise() {
- long val=analogRead(ADDetector);
- for (int i=0;i<500;i++) {
- long tmp=analogRead(ADDetector);
- if (tmp<val) val=tmp;
- }
- return val;
- }
- void loop() {
- long start;
- long dist[3]; // in roughly tenths of a foot
- boolean any=false;
- for (int i=0;i<3;i++) {
- long ADMin=(minDetectorNoise()*95)/100; // Below 95 percent of min of 500 samples is a signal
- dist[i]=0;
- mySerial.print((char)0xff);
- mySerial.print((char)0x00);
- mySerial.print((char)0x5a);
- mySerial.print((char)i);
- start=millis();
- // delayMicroseconds(400); // let detector settle from radio noise
- do {
- dist[i]++;
- }while (dist[i]<1000 && analogRead(ADDetector)>ADMin);
- if (dist[i]<1000) {
- delay(100-dist[i]/10);
- any=true;
- }
- }
- if (any) digitalWrite(LEDA,HIGH);
- else digitalWrite(LEDA,LOW);
- for(int i=0;i<3;i++) {
- Serial.print(i);
- Serial.print("|");
- Serial.print(dist[i]/10);
- Serial.print('.');
- Serial.print(dist[i]%10);
- Serial.print('|');
- }
- Serial.println();
- }
I have a version of the GPS receiver that performs the Trilateralization that takes the three distances and converts to an X and Y in a plane.
Next Steps
We have reproduced another set of this GPS system and experimented with cheaper radios. The cheaper radios required and extra byte be transmitted to give the radio receivers a more data before actual data is transmitted.
The different Arduino had some time synchronization issues. Most importantly is that you "tune" the delay in lines 42 and 45 of the beacon to get the most signal from the transducer on the receiver. We did this by connecting a spare transducer to an oscilloscope and changing the loop function to just repeatedly call PulseTransducer. We then changed the time delay to get the maximum peak on the oscilloscope.