Fpu Library
This library provides support for using the uM-FPU V3.1 floating point coprocessor (FPU) with Arduino. (See also: Fpu64 library)
Download
The uM-FPU V3_1 download contains two libraries: Fpu, and FpuSerial. The Fpu library contains function calls for interfacing Arduino to the uM-FPU V3.1 chip using the SPI interface. Several example sketches are included with the Fpu library. The FpuSerial library contains functions to display information on the serial port.
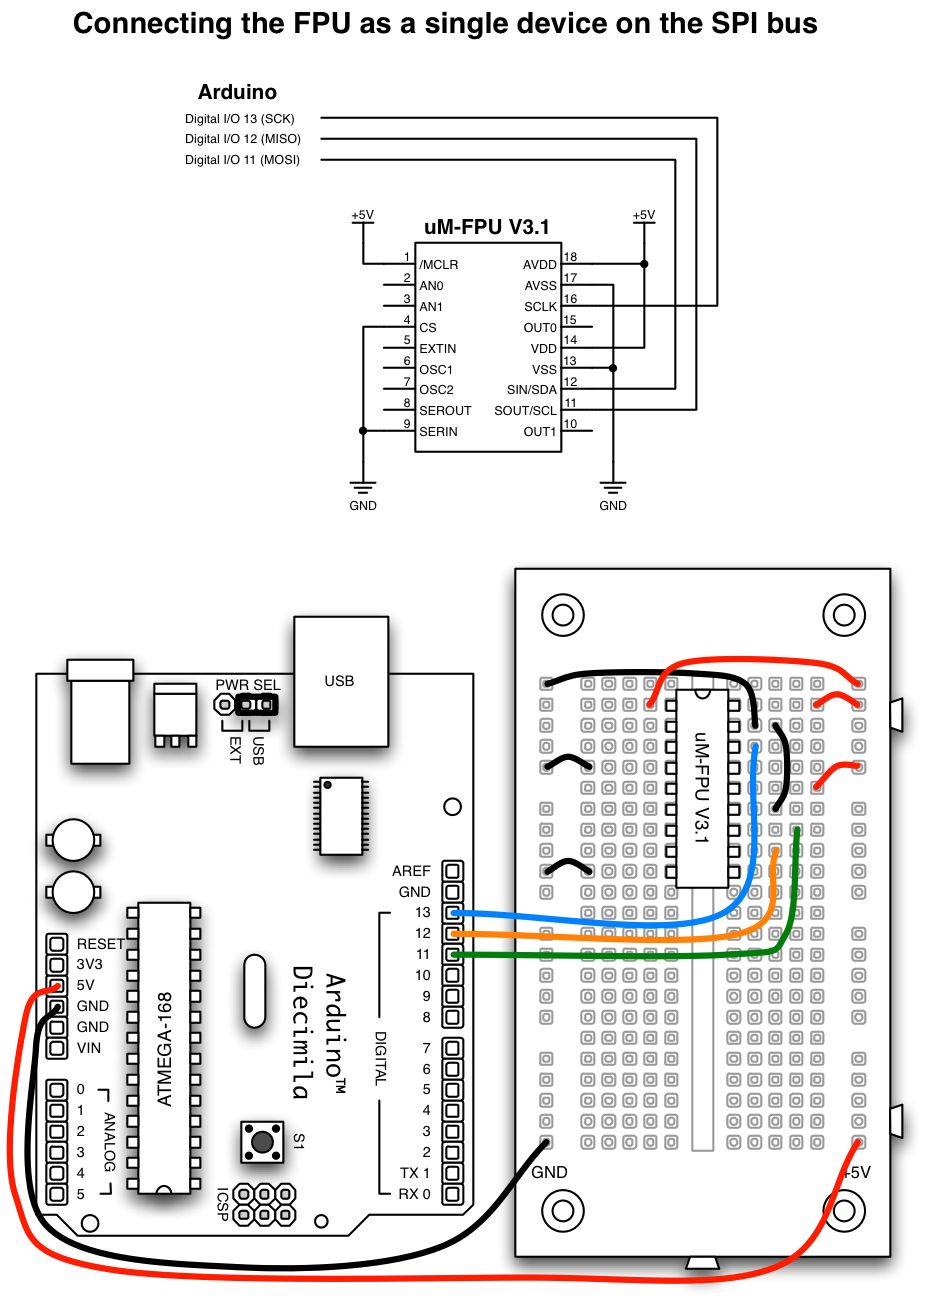
Connecting the FPU
The FPU is connected to Arduino using the Serial Peripheral Interface (SPI). The SPI transfer functions are
contained in the Spi library. See the following diagrams for examples of connecting the FPU.
Functions
- begin()
-
- begin(pin)
- This function must be called in setup() to initialize the pins used to interface with the uM-FPU V3.1 chip, configure the SPI, and reset the uM-FPU V3.1 chip and . It must be called before any other Fpu library functions are called. The pins used on the Arduino to interface with the FPU chip are as follows:
    pin 13 SCK    SPI clock (connects to FPU SCLK pin)
    pin 12 MISO   SPI master in, slave out (connects to FPU SOUT pin)
    pin 11 MOSI   SPI master out, slave in (connects to FPU SIN pin)
    pin 10 SS     SPI slave select
The pin parameter specifies the pin to use as the FPU chip select. If the pin parameter is not specified, pin 10 is used by default. Even if a different pin is used, pin 10 is still set as a digital output, as required by the SPI hardware module.
Example:
    Fpu.begin();    // (default) use pin 10 for FPU chip select
    Fpu.begin(8);   // (alternative example) use pin 8 for FPU chip select
- void reset()
- Reset the FPU and configure the SPI hardware. This function is called by begin(), so a separate call is not required in setup().
- byte sync()
- Confirms communication with the FPU. It returns SYNC_CHAR (0x5C) if successful.
Example:
    if (Fpu.sync() == SYNC_CHAR) Serial.println("FPU sync OK");
- wait()
- The uM-FPU V3.1 chip has a 256 byte instruction buffer which allows it to process in parallel with the Arduino. Before sending an instruction to read data from the FPU, the wait() function must be called to ensure that all instructions in the buffer have been completed, and the FPU is ready to send data.
Example:
    byte bval;
    Fpu.wait();                // wait until FPU is ready, then read byte
    Fpu.write(LREADBYTE);      // read 8-bit integer from register A
    dataByte = Fpu.readByte();
If a long series of calculations is done, wait must be called at least every 256 bytes to ensure that the instruction buffer doesn’t overflow. A wait call is not required before using any of the FpuPrint functions, since they call the wait function themselves.
- write(b1)
-
- write(b1, b2)
-
- write(b1, b2, b3)
-
- write(b1, b2, b3, b4)
-
- write(b1, b2, b3, b4, b5)
-
- write(b1, b2, b3, b4, b5, b6)
- These functions are used to send instructions and data to the FPU. Each parameter specifies an 8-bit integer value to be sent to the FPU. Definitions for all of the FPU opcodes are included in the Fpu.h header file.
Example:
Fpu.write(SELECTA, 1, LOADPI, FSET0);
- writeWord(int wval)
- Sends a 16-bit integer value to the FPU.
Example:
Fpu.write(SELECTA, 1, LOADWORD);
Fpu.writeWord(1000);
Fpu.write(FSET0);
- writeLong(long lval)
- Sends a 32-bit integer value to the FPU.
Example:
Fpu.write(LWRITE, 1);
Fpu.writeLong(500000);
- writeFloat(float fval)
- Sends a 32-bit floating point value to the FPU.
Example:
Fpu.write(FWRITEA);
Fpu.writeFloat(350.75);
- writeString(char *s)
- Sends a zero-terminated string to the FPU.
Example:
Fpu.write(SELECTA, 1, ATOF);
Fpu.writeString("125.3335");
Fpu.write(FSET0);
- byte read()
- Reads an 8-bit value from the FPU.
Example:
byte bval;
Fpu.wait();              // wait until FPU is ready
Fpu.write(LREADBYTE);    // read 8-bit integer from register A
bval = Fpu.readByte();
- int readWord()
- Reads an 16-bit value from the FPU.
Example:
int wval;
Fpu.wait();              // wait until FPU is ready
Fpu.write(LREADWORD);    // read 16-bit integer from register A
wval = Fpu.readWord();
- long readLong()
- Reads an 32-bit long integer value from the FPU.
Example:
long lval;
Fpu.wait();              // wait until FPU is ready
Fpu.write(LREAD0);       // read 32-bit integer from register 0
lval = Fpu.readLong();
- float readFloat()
- Reads an 32-bit floating point value from the FPU.
Example:
float fval;
Fpu.wait();              // wait until FPU is ready
Fpu.write(FREAD, 2);     // read 32-bit float from register 2
fval = Fpu.readLong();
- char *readString(char *s)
-
- char *readString(char *s, byte opcode)
- Reads a zero-terminated string from the FPU and stores it at the location specified by the *s parameter. A pointer to the string is returned. By default, the entire string buffer is read using the READSTR opcode. If the opcode parameter is READSEL, only the current string selection is read. Note: The following functions are called internally before the string is read:
Fpu.wait()
Fpu.write(READSTR) or Fpu.write(READSEL)
Fpu.readDelay()
Characters are read and stored in sequential bytes until a zero terminator is read. Care must be taken to ensure that the string buffer is large enough for the string being read.
Example:
Fpu.wait();              // wait until FPU is ready
Fpu.write(FREAD, 2);     // read 32-bit float from register 2
longData = Fpu.readLong();
- byte Fpu.readStatus()
- Reads the status byte from the FPU. Note: The following functions are called internally before the status byte is read:
Fpu.wait()
Fpu.write(READSTATUS)
Fpu.readDelay()
Definitions for the bits in the status byte are defined in the Fpu.h header file.
Example:
Fpu.write(FSTATUSA);    // get the status of register A
if ((Fpu.readStatus() && STATUS_SIGN) == 1) Serial.println(“Negative value”);
- readDelay()
- After a read instruction is sent, and before the first data byte is read, a read setup delay is required to ensure that the FPU is ready to send data. This function provides the required read setup delay. Note: All functions in the Fpu library that read data call readDelay() , so user programs do not normally call this function directly.
Further Information