DisablingAutoResetOnSerialConnection
So you have found need for disabling the auto reset? So that the arduino does not reset when establishing a connection. Here are some solutions.
Note: This does NOT apply to the new Arduino Leonardo that uses USB and serial differently. The Leonardo does not auto-reset, however, it is difficult to make Leonardo reset even if desired. See the bottom of this page for Leonardo-specific issues with reset.
The simple way that doesn't require any permanent modifying of your hardware or software configuration changes:
Stick a 120 ohm resistor in the headers between 5v and reset (you can find these on the isp connector too). 120 is hard to find so just combine resistors. Don't go below 110 ohms or above 124 ohms, and don't do this with an isp programmer attached. You can just pull out the resistor when you want auto-reset back.

Note: this may not work on the Arduino Uno due to differing reset current from the USB chip (see this discussion). For the Uno, connecting a 10μF capacitor between the RESET and GND lines works for me (as described in the linked thread). A 100nF ceramic capacitor has also been tested successfully.
More options
Another way to avoid autoreset is connecting a capacitor between reset pin and ground. 10 uf should be enough.
The ATmega168 is reset by pulsing its reset pin to GND. The Arduino IDE itself cannot create such pulses, but by setting the DTR line to LOW and adding a capacitor (R3 on the pcb, marked red), the reset pin gets sucked to LOW until the capacitor is charged through the internal pull up resistor and R1 - which resets the chip. This works in the same spirit as adding "auto reset" to a chip for proper startup after connecting power.

Unfortunately this reset usually also happens if you initiate any other serial connection (routed through usb) to the device, even if not desired. Imagine your device is finished, the code has converged to a "bug-free" (tm) state and you just want your doodad to run and collect data, survive reboots of the host pc/mac ... (needs external power of course).
Permanently disabling the auto reset on Arduino Diecimila boards:

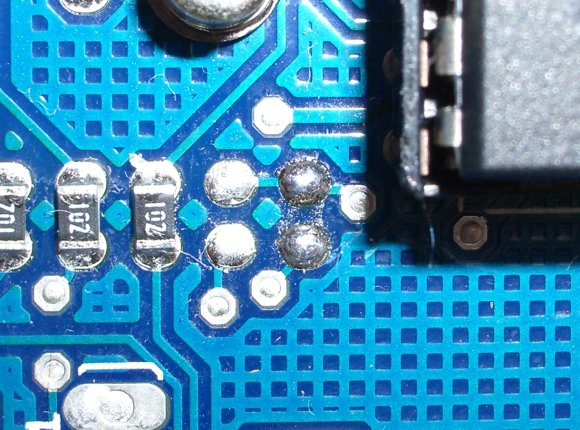
How to remove R3 without damaging the PCB:
As you can see in the picture, there are several vias and 2 unused spots with solder pretty close to R3. Best not to disturb sleeping dogs!
Just in case someone wants to try, there's just no sensible way of mechanically removing the smd capacitor (cutting it in half, grinding it away, scratching at it with an exacto knife...) in finite time without getting mad - been there, done that.
There's two working methods of removing smd capacitors/resistors that I personally tested. Some esoteric ones (not bad mind you) can be found on youtube.
Method A is nicely described on the SPARKFUN page with lots of pictures. The basic idea is to put a rather BIG blob of solder on the smd part, touching and heating up both ends. If properly heated, the smd part can simply be pushed away with the solder iron's tip. This should not take too long, as the pcb will get pretty hot and might start to disintegrate (stink). Some discoloration is to be expected. There's also special solder out there with a melting point of about 180�C, which makes it especially easy to remove parts without overheating, but it's not exactly cheap (google: LOWMELT/CHIPQUICK).
I did not use the big-blob-of-solder-method as I expected to touch any of the vias near by.
Method B is what I used on my Arduino PCB. I just grabbed an old pair of metal tweezers with flat and rather thick tips (about the same width as the smd capacitor) and heated it up with a small gas torch until it glowed in dark orange. The tips must be massive enough to store some of the heat till you get to the PCB. How much heat is required can and should be tested before with some piece of solder. It should melt easily when touched by the tweezers, but the right temperature ought to be approached from below its melting point ( not the tweezers' :-) ). Then basically grab the capacitor on both ends, making good contact with the tinned parts without touching the PCB, and just lift it. DONE.
This is how it should look like if all goes well:
How to upload code without auto reset:
Even without the auto reset feature it's still quite easy to get code uploaded.
- press and hold the reset button
- fix your eyes on the RX/TX leds on the PCB
- press the upload button in the IDE
- as soon as the RX led flashed once, quickly release the reset button
After that, the normal upload procedure should start with the RX/TX leds flashing madly. In case the IDE (or avrdude) throws an error, just work on your timing a bit. I'm doing this on a regular basis and it works well with the current bootloader.
Software settings to disable the DTR pin on the host:
This section is meant to be helpful for development of code talking to the Arduino board. As far as I understand, it cannot provide a system-wide setting to disable DTR on the host. If some rogue application decides to enable DTR of its own accord, this cannot be helped.
There's a thread on this in the arduino forum.
- Using PERL (linux/win32) - provided by akak1656
#!/usr/bin/perluse strict;use Device::SerialPort;my $port = Device::SerialPort->new("/dev/ttyUSB0");$port->databits(8);$port->baudrate(9600); # <-- match to arduino settings$port->parity("none");$port->stopbits(1);$port->dtr_active(0);
- Using c++ (linux/win32)
- On Linux you can directly disable hangup-on-close for serial ports: `stty -F /dev/usbTTY0 -hupcl` (replace device as needed).
Note: The SW solution does not work on all HOST systems. Especially some small factor Linux boards including the Raspberry Pi do not support controling the DTR line (http://lavalink.com/2012/04/more-on-raspberry-pi-serial-ports/). Here, the only non-HW solution seems to be establishing the serial connection through a different serial port on the arduino that only has the RX/TX lines, which is currently only possible with the Mega andthe new Leonardo. For Leonardo-reset issue, read on...
USB, Serial and Reset with the Leonardo under Linux (RPi)
The Arduino Leonardo uses a different solution for USB and serial. Please, first read this and this.
That said, Leonardo does NOT reset when a serial connection is established, regardless if the DTR line is used or not. This is very good if auto-reset is non desired. But how to reset Leonardo via serial?. The documentation sais you must open the serial port with 1200baud and then close. Here are two python programs, one for reading serial and the other one for reset. Both are tested on a Raspberry Pi.
reset_arduino:
#!/usr/bin/python
# usage: reset_arduino <DEVICE>
# where <DEVICE> is typically some /dev/ttyfoobar
import sys
import serial
ser = serial.Serial()
ser.port=sys.argv[1]
ser.baudrate=1200
ser.open(); ser.close()
send_and_receive_arduino:
#!/usr/bin/python
# usage: send_and_receive_arduino <DEVICE> <BAUDRATE> <TEXT>
# where <DEVICE> is typically some /dev/ttyfoobar
# and where <BAUDRATE> is the baudrate
# and where <TEXT> is a text, e.g. "Hello"
import sys
import serial
import time
ser = serial.Serial()
ser.port=sys.argv[1]
ser.baudrate=sys.argv[2]
ser.open()
time.sleep(0.5)
ser.write(sys.argv[3])
time.sleep(0.5)
while 1:
   print ser.readline()
So, I was partially successful so far. However, sometimes (I did not yet figure out under which exact circumstances) the Raspberry looses the USB connection to the Leonardo and never finds again until you dis- and re-connect physically the Leonardo from/to the RPi, which is not good in my remote environments. Trying on ...