Honeywell HumidIconTM Digital Humidity/Temperature Sensors: HIH6130/6131 and 6120/6121 Series is a digital output-type relative humidity (RH) and temperature sensor combined in the same package. The library uses I2C to connect to the sensor (see the Wire library). SPI can also be used, but is not implemented in this library.
The library consists of 2 classes (actually 2 libraries):
If you have multiple devices connected to the I2C bus, remember that this device screws up the bus when it is not powered. One solution is to keep the device powered all the time. Another possible solution is to add an analog switch to physically disconnect the GND line or the SDA line to the device.
This library has been tested, but might still contain bugs, so please be careful.
Bugs, suggestions, comments are always welcome here.
Components:
Components:
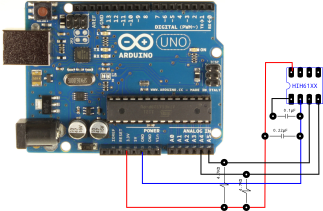
Of course, you can always connect the alarm outputs (pins 5 and 6 on the HIH61XX chip) to a digital input pin on the Arduino to do some fancy stuff when the humidity goes above (or falls below) a certain point. See HIH61XXCommander.h (and of course the datasheets) for details.
Connect everything like the first image.
#include <Wire.h>
#include <HIH61XX.h>
// Create an HIH61XX with I2C address 0x27, powered by 3.3V pin
HIH61XX hih(0x27);
void setup()
{
Serial.begin(9600);
Wire.begin();
}
void loop()
{
// start the sensor
hih.start();
// request an update of the humidity and temperature
hih.update();
Serial.print("Humidity: ");
Serial.print(hih.humidity(), 5);
Serial.print(" RH (");
Serial.print(hih.humidity_Raw());
Serial.println(")");
Serial.print("Temperature: ");
Serial.print(hih.temperature(), 5);
Serial.println(" C (");
Serial.print(hih.temperature_Raw());
Serial.println(")");
while(true);
}
Connect everything like the first image.
Available commands:
#include <Wire.h>
#include <HIH61XX.h>
HIH61XX hih(0x27);
void setup()
{
Serial.begin(115200);
Wire.begin();
}
void loop()
{
while(Serial.available()) {
hih.commandRequest(Serial);
}
delay(100);
}
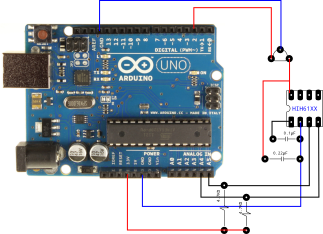
Connect everything like the second image.
#include <Wire.h>
#include <HIH61XX.h>
#include <HIH61XXCommander.h>
// Create an HIH61XXCommander with I2C address 0x27, powered by digital pin 3
// If you want to use Command Mode you MUST use the powerPin!
HIH61XXCommander hih(0x27, 3);
void setup()
{
Serial.begin(9600);
Wire.begin();
}
void loop()
{
// start the sensor, eeprom data is automatically read.
hih.start();
// print out the whole EEPROM
Serial.print("EEPROM: ");
for(int i = 0; i < 8; ++i) {
if(i) {
Serial.print(' ');
}
Serial.print(hih.eeprom()[i]);
}
Serial.println();
Serial.println();
// print out all properties. the changes to EEPROM have been commented out,
// so you don't accidentally screw up your chip.
Serial.print("StartupMode: ");
Serial.println(hih.startupMode() ? "FastStartup" : "SlowStartup");
// set the fast startup mode (3ms)
// hih.setStartupMode(HIH61XXCommander::FastStartup);
// set the slow startup mode (10ms)
// hih.setStartupMode(HIH61XXCommander::SlowStartup);
Serial.print("High alarm on (raw): ");
Serial.println(hih.highAlarmOn_Raw());
// hih.setHighAlarmOn_Raw(12345);
Serial.print("High alarm off (raw): ");
Serial.println(hih.highAlarmOff_Raw());
// hih.setHighAlarmOff_Raw(12345);
Serial.print("High alarm on: ");
Serial.println(hih.highAlarmOn());
// hih.setHighAlarmOn(0.5);
Serial.print("High alarm off: ");
Serial.println(hih.highAlarmOff());
// hih.setHighAlarmOff(0.5);
Serial.print("High alarm polarity: ");
Serial.println(hih.highAlarmPolarity() ? "ActiveLowPolarity" : "ActiveHighPolarity");
// hih.setHighAlarmPolarity(HIH61XXCommander::ActiveHighPolarity);
// hih.setHighAlarmPolarity(HIH61XXCommander::ActiveLowPolarity);
Serial.print("High alarm output config: ");
Serial.println(hih.highAlarmOutputConfig() ? "OpenDrainOuputConfig" : "PushPullOuputConfig");
// hih.setHighAlarmOutputConfig(HIH61XXCommander::PushPullOuputConfig);
// hih.setHighAlarmOutputConfig(HIH61XXCommander::OpenDrainOuputConfig);
// same as above for the low alarm... (not included)
Serial.print("Customer ID: ");
Serial.println(hih.customerId());
// hih.setCustomerId(0xABCDEF);
Serial.println();
// To write the changes to the chip use:
// hih.writeEEPROM();
// But then you still have to cycle the power for the changes to take effect, so it's easier to do:
hih.restart();
// which will automatically commit all changes made.
// If you don't want to save your changes, use:
// hih.resetEEPROM();
// This is how you change the I2C address to 0x28:
// hih.setAddress(0x28);
// hih.restart();
// Make sure we're not in Command Mode any more:
hih.leaveCommandMode();
// Update the sensor readings, you must call this to have current readings
hih.update();
Serial.print("Humidity: ");
Serial.print(hih.humidity(), 5);
Serial.println(" RH");
Serial.print("Temperature: ");
Serial.print(hih.temperature(), 5);
Serial.println(" C");
while(true);
}
Connect everything like the second image.
Available commands:
#include <Wire.h>
#include <HIH61XX.h>
HIH61XX hih(0x27);
void setup()
{
Serial.begin(115200);
Wire.begin();
}
void loop()
{
while(Serial.available()) {
hih.commandRequest(Serial);
}
delay(100);
}


