:: Wire Library, Explored
An indepth reference to the Arduino Wire library.
Introduction
Greetings, fellow Arduinoid! GreyGnome here. The Arduino Wire library documentation is notoriously stingy in details. Nowhere does it explain its relationship to the twi library of the avr-lib, and worse, to the TWI hardware in the ATmega chips. This reference attempts to fill in the gaps and give the Wire library the documentation it needs and deserves.
Throughout the exploration of the code and the design of this document, this author has used the Arduino Duemilanove, based on the ATmega328 datasheet. See the ATmega328 datasheet for more information. It is an invaluable reference for understanding the TWI hardware and the ATmega's I2C communication methodology.
Inside the ATmega328
This discussion is based on the ATmega328 datasheet, revision Rev. 8271C – 08/10. Newer revisions are fine, I'm sure, but my page numbers might be off a little bit.
In order to fully understand the Wire library code, we need to understand what it needs to do to the MCU, to get it set up.
Review of the datasheet (http://www.atmel.com/dyn/resources/prod_documents/8271S.pdf) for the processor shows how the Two Wire system works. To note are:
- The MCU includes a hardware TWI module which handles the I2C communication. ...Interestingly, this means that the communication is not handled exclusively via the software library, as you might think! In other words, the library doesn't create the bitstream itself in software. The library interfaces with a hardware component which does the heavy lifting. See p. 222 of the datasheet.
- "The AVR TWI is byte-oriented and interrupt based...." (section 21.6 on p. 224). This is key; it means that the way it was designed to handle the communication is
- You set up registers.
- You let the TWI module perform the communication.
- Ostensibly, you go do something else; your 16MHz MCU is not tied up controlling a 100KHz serial communication.
- The TWI module sends an interrupt when it finishes, to notify the processor of the change in conditions (including successful operations, and/or errors).
- However, notice that the Wire library has blocking I/O. That means, it goes into a busy loop and waits for the I2C communications to complete. Your application can do nothing while the TWI hardware is talking over the I2C bus. Note that this may not be what you want: If you have a time-critical sketch, having your 16MHz processor stuck in a busy loop waiting on a 100kHz communication stream is not efficient. You may be better off writing your own I2C code. There is an example in ./doc/examples/twitest/twitest.c in the avr-libc source code (see http://www.nongnu.org/avr-libc/). You can find the version of avr-libc used by your particular Arduino development environment by consulting the versions.txt in your Arduino install location. It will be somewhere under
Java/hardware/tools/avr. On the Mac the full path is/Applications/Arduino.app/Contents/Resources/Java/hardware/tools/avr/versions.txt; the path on your platform will be different but similar.
Registers
Here are some of the registers involved with the Two Wire Interface (TWI) hardware module:
| Register | Name | Function |
|---|---|---|
| TWCR | Two Wire Control Register | Controls the actions of the TWI module |
| TWSR | Two Wire Status Register | Reports the status of the TWI actions |
| TWDR | Two Wire Data/Address Register | Contains the data you want to transmit or have received |
| TWBR | Two Wire Bit Rate Register | Controls the frequency of the clock (SCL) |
The TWI Hardware
See the following flow schematic for performing a write on the I2C bus:
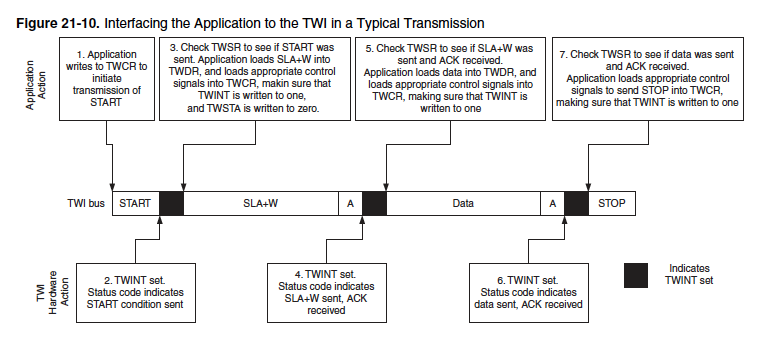
Referring to the Registers table above, the Reader's Digest version of an I2C write operation using the TWI hardware goes like this:
- The Wire library configures the ATmega chip so that the internal TWI hardware uses its pins, which are hardcoded to two of the ATmega's analog pins (4 and 5 on the Duemilanove).
- The Wire library sets up the
TWCRregister to generate a START condition.- It first tests the I2C bus to see if it's free. The bus is free when both SDA and SCL are high (because device pins default to a tri-state, or "not connected" state on the bus. It is up to a common resistor to pull the bus signal high).
- What is a START condition? The clock line SCL remains high, while the master changes the SDA line to low. This is unique because during normal data transfer, the SDA data line changes state only when the SCL clock line is low. When the data changes to low while the SCL is high, this is the signal to all I2C devices on the bus that a master is about to initiate a communication.
- TWI hardware interrupts the processor when it's done.
- Wire library checks
TWSRfor status. Assuming all is well, - Wire library loads
TWDRwith the slave's address, plus the "write" bit. Together, this value is known as "SLA+W" ("SLave Address plus Write"). - Wire Library sets up the
TWCRregister to send the SLA+W. - If successful, the Wire library loads
TWDRwith data,TWCRis set, and data is sent. - Wire library checks
TWSRfor status. Assuming all is well, - Wire library sets up the
TWCRregister to send a STOP condition. In the STOP condition, the SCL line is released (to go high), and then the SDA line goes high. Normally the SDA line must remain stable when the SCL line is high.
A read operation is performed similarly.
Issues using the ATtiny
The Wire library uses a large amount of memory for buffers. It includes 3 different byte buffers, each 32 bytes in size. This isn't a big issue in the ATmega line, but the ATtiny (such as the ATtiny48) line has less available RAM (512/1K on ATmega vs. (256/512 on ATtiny). When I attempted to use the wire library on the ATtiny, I had random failures, hangs, etc. Once I changed the buffer size (in .\libraries\Wire\utility\twi.h) to 6, everything worked just fine.
Don't make the mistake of thinking that you can just do a #define TWI_BUFFER_LENGTH 6 in your sketch because that wont work. The way that the Arduino environment compiles your code is not obvious. The library is compiled separately from your sketch and then linked together later. So you you'll have to change the buffer size in the library header which is also included by the library source (twi.c).
The Wire Library
A detailed Wire library reference.
Note that the Wire library is written in C++. Therefore, all the library calls listed here are in truth methods of a C++ class. If you're unfamiliar with C++ programming, you can think of a "method" as simply a function or a subroutine and you'll have the right idea. You can safely leave the gory details to the language geeks, and go ahead and work on getting your Arduino to communicate over the I2C bus.
The Wire library's I/O blocks. This means that when sending or receiving over the I2C bus, your application is prevented from running until the communication is complete. In truth the operation of the TWI hardware in your processor is interrupt-driven, so your application should be free to run at full speed while the TWI communication takes place, but this capability is not utilized by the Wire library.
In the following reference section, "Under the Hood" describes the action that each method has on the ATmega's TWI hardware, and consequently on the I2C bus.
begin()
Function:Wire.begin() or Wire.begin(address) must first be called to start any I2C communication using the Wire library. The Wire.begin() method sets the Wire library's internal read and write buffer indices and lengths to 0, then readies the ATMEL TWI hardware with the twi.init() function call.
The twi.init() call is internal to the Wire library. It performs the following tasks:
- enables the TWI hardware to access the appropriate pins on the ATmega processor. In the case of the ATmega 328, these are analog pins 4 for SDA and 5 for the SCL line of the I2C bus.
- sets the clock frequency that the TWI hardware will use if/when it is the master on the I2C bus. It is set in the source code to 100kHz, but theoretically at least you can reset this frequency by calling
Wire.setClock(). The value passed is the bitrate from 400000L to 31000L.Wire.setClock(400000L);should set it to 400kHz.Wire.setClock()must be called afterWire.begin().Wire.begin()initializes the bitrate to 100kHz.
Arguments:
None.
Under the Hood:
- Initializes Wire library internal variables.
- Calls
twi.init(), which- Sets two of the ATmega ports to be used by the TWI hardware:
- if ATmega168, ATmega8, or ATmega328P: PC4 for SDA and PC5 for SCL.
- else PD0 for SCL and PD1 for SDA. See the reference sheet for your processor for more details.
- Sets the TWI communication bit rate. to 100kHz.
- Enables the TWI hardware.
begin(address)
Function:
- Sets the
TWAR(TWI Address Register) with the lower 7 bits of its address argument. The 8 bits of the argument are shifted left and a 0 is appended. That 0 is theTWGCEbit. - runs the
twi_attachSlaveTxEvent(onRequestService);andtwi_attachSlaveRxEvent(onReceiveService);functions. These functions assign user-designated functions that are called during an I2C transmit and/or receive, when the processor is acting as an I2C slave. Thus,onRequest()and/oronReceive()should have been called prior to this method call. SeeonReceive(handler)oronRequest(handler), below. - runs the
begin()method as above.
Arguments:
address: 8 bit integer, or an int value (ints are 16 bits long by default). This is the I2C address of the ATmega processor, in slave address mode. It is cast to an 8-bit unsigned integer. If given an integer (16 bit) value, the number will have its most significant 8 bits truncated.
Notes:
- If you want to have a function called automatically after every I2C transmit, you must use this method to begin the I2C communication using the Wire library.
- You must use this function if you want to use your Arduino as an I2C slave.
This method sets the TWAR register in the TWI hardware, which is used when you want the Arduino to act as an I2C slave. The TWI's Address Match unit checks incoming I2C communications against the TWAR. When there's a match, the TWI Control Unit is informed and the TWI hardware will perform an action depending on the settings of the TWCR. Note that in the Wire library, the TWGCE bit is not set. This means that the Arduino will not respond to the I2C General Call address (address 0x00, which is basically an I2C broadcast).
The twi_attachSlaveTxEvent() assigns a callback function to be used in an I2C transmit, if the ATmega is acting as an I2C slave transmitter. This function must have been previously set using the onRequest(handler) method. It is called after a SLA+R has been received, and it must call twi_transmit() in order to fill the transmit buffer with data. It also must call a twi_reply(1) to actually begin the transfer over the I2C bus (the argument to twi_reply() specifies that the ATmega will send an ACK after its reply). Once the twi_reply() is called, the Wire library's interrupt handler and the TWI hardware will handle the data transfer.
The twi_attachSlaveRxEvent() assigns a callback function to be used in an I2C receive, if the ATmega328 is acting as an I2C slave. This function must have been previously set using the onReceive(handler) method; it will be called with 2 arguments: a receive buffer, and the index to the last of the data in the buffer. The function is called after a STOP condition has been received, signaling the end of the I2C conversation. The ATmega328 will stretch the clock, thereby causing the I2C master to wait until the handler has completed.
Under the Hood:
- Sets the
TWARregister in the TWI hardware. - Assigns a callback funcion to be used in an I2C transmit. This function is called after a SLA+R has been received, and it must call
twi_transmit()andtwi_reply(1).
requestFrom(address, count)
Function:
Used when the ATmega is acting as an I2C master. Requests count bytes from the I2C slave given by address. Each call to this method resets the read buffer index; that is, the internal buffer is read into beginning with array cell 0. Note that address must be a 7-bit address; if an 8-bit address is given, the top bit is simply truncated.
The requestFrom() method calls twi_readFrom(), which actually performs the I2C read by sending the START condition and waiting for the buffer to be filled as requested. The I2C slave will NACK the read request if you request more bytes than are available, and the requestFrom() method will exit cleanly.
The method returns the number of bytes read from the slave.
Arguments:
- address: 8 bit integer, or an int value (ints are 16 bits long by default). This is the address of an I2C slave that the ATmega will communicate with. It is cast to an 8-bit unsigned integer. If given an integer (16 bit) value, the number will have its most significant 8 bits truncated. The address is then shifted left one bit, so only the least significant 7 bits are used. If you do have an address with 8 bits, you must shift your address to the right (drop the lowest bit) in order to use it with the Arduino.
- count: an integer or an 8-bit value (type uint8_t), this specifies the number of bytes to be read. Count's value is limited by
BUFFER_LENGTHwhich is defined in the Wire.h include file; at the time of this writing that number is 32. If count is greater than 32 it will be set to 32 without notice.
Under the Hood:
- Enables the TWI hardware which sends the I2C Start Condition, thus beginning the I2C conversation.
- Therefore, the SIGNAL function call will be utilized upon CPU interrupt by the TWI hardware to continue the I2C conversation and populate the receive buffer.
beginTransmission(address)
Function:
Used when the ATmega is acting as an I2C master. Sets internal variables in the Wire library in preparation for transmitting to the given address.
The next Wire library call should be the send() method.
Arguments:
The argument is the address of an I2C slave. This is a 7-bit address; if 8 bits are given, the top bit is simply truncated.
Under the Hood:
No TWI activity. This method simply modifies some Wire library internal variables.
endTransmission()
Function:
Calls the twi routine that does the actual TWI transmission when in master transmitter mode: It attempts to become the twi bus master and write a series of bytes to a device on the bus. The bytes should have been previously loaded into the Wire library send buffer by the send() call.
The results are returned as a byte. The results are as follows:
- 0: Successful send.
- 1: Send buffer too large for the twi buffer. This should not happen, as the TWI buffer length set in twi.h is equivalent to the send buffer length set in Wire.h.
- 2: Address was sent and a NACK received. This is an issue, and the master should send a STOP condition.
- 3: Data was sent and a NACK received. This means the slave has no more to send. The master can send a STOP condition, or a repeated START.
- 4: Another twi error took place (eg, the master lost bus arbitration).
Under the Hood:
- Enables the TWI hardware which sends the I2C Start Condition, which will begin the I2C conversation.
- Therefore, the SIGNAL function call will be utilized upon CPU interrupt by the TWI hardware to continue the I2C conversation and transfer the data buffer out over the I2C bus.
send()
Function:
Populate the send data buffer with the data found in the argument list. See Arguments, below.
The term "send" for this method is something of a misnomer. Nothing is actually sent via this method. Only a data buffer (an array) is populated with the data argument.
For Master Transmitter mode: In the case of send(value), a single byte is appended to the data buffer. In the case of send(string) or send(data, quantity), the data presented is appended to the data buffer up to the limit of BUFFER_LENGTH. Any data requested to send that would overflow the buffer past BUFFER_LENGTH (which is 32 at the time of this writing), is simply ignored.
When acting as an I2C slave transmitter, the data is inserted into the slave I2C transmit buffer for delivery by the TWI hardware. See Wire.begin(address) and onRequest(handler).
Arguments:
Can take one of three parameters:
send(value): Send a byte, where value is of type uint8_t (...or, simply: a byte).send(string): Send a string of chars. Callssend(data, quantity)where the quantity is computed as the length of the string.send(data, quantity): An array of data bytes to send. This array is limited toBUFFER_LENGTHwhich is given as 32 bytes in the header files. If quantity is greater thanBUFFER_LENGTH, the additional data is quietly ignored.
Under the Hood:
No TWI activity. This method simply modifies some Wire library internal variables.
available()
Returns the number of bytes available in the Wire library receive buffer. This buffer is filled:
- In the
requestFrom()method - In the
onReceiveService()method. That is called after a master has sent a STOP or repeated START condition during an I2C slave receive session, effectively finalizing the data transfer.
Arguments:
None.
Under the Hood:
No TWI activity. This method simply modifies some Wire library internal variables.
receive()
Returns the next byte in the Wire library receive buffer. See available(), above, for more information about the Wire library receive buffer.
Arguments:
None.
Under the Hood:
No TWI activity. This method simply modifies some Wire library internal variables.
onReceive(handler)
Sets a function ("handler") to be called after the ATmega has received data as an I2C slave. The handler is called with a single argument, an integer which is the number of bytes that have been received. It should return no values. Therefore, it should look like this:
void handler(int byteCount)
The I2C bus is not released until the handler returns, so it is probably wise to ensure that the handler is relatively quick to complete. Note, however, that "relatively quick" means there's a lot of room for the ATmega to work, as on most Arduinos it runs at 16MHz and the I2C communication is only at 100kHz.
The handler can use the receive() method to read the next byte from the Wire library's receive buffer.
onRequest(handler)
Sets a function ("handler") to be called when the ATmega is in slave transmitter mode. The handler takes no arguments and returns no values. Therefore, it should look like this:
void handler(void)
The handler is called after the ATmega has received SLA+R ("SLave Address plus the Read bit"). It must call twi_transmit() in order to fill the transmit buffer with data. It also must call the Wire library's send() method to fill the transmit buffer; see
send().
Then it must call twi_reply(1) to actually begin the transfer over the I2C bus (the argument "1" to twi_reply() specifies that the ATmega will send an ACK after its reply). Once the twi_reply() is called, the Wire library's interrupt handler and the TWI hardware will handle the data transfer.