Arduino Playground is read-only starting December 31st, 2018. For more info please look at this Forum Post

:: The Background ::

Many of the WowWee robots are ideal for hacking. The RoboSapien Version 1.0 is very complex inside and simple at the same time. Doing a simple motor and switch count though yeilds 9 Motors and 8 Switches. Assuming you want both forward and reverse on each motor you would need on the order or 26 digital/analog IO pins. The Arduino barebones from Modern Device has 13 digital and 6 analog but that is not enough to replace all this functionality.

So a "Wedge" implementation seemed the best choice. The concept of the software "Wedge" has been around for a while. Basically it is a program that does nothing most of the time but then can be activated on a special sequence. Wedges have other names like hooks (as in Kernel Hooks), Terminate and Stay Resident, or call back. This approach allows me to still use the RoboSapien as normal but also take complete control.

Location of the head connector.

Basically I powered the Barebones Arduino board off the VCC of the RoboSapien. This makes it so the Arduino goes on and off with the Robosapien itself. VCC is the Red and the Black is ground on the head connector. The White wire is the IR from the IR module to the RoboSapien controller and is shunted through the Arduino.

:: The Wiring ::

I am working on some diagrams. Here is a verbal description.

  • Set USB/EXT Jumper to EXT
  • Set J2
  • You need to solder an additional wire to the Red (VCC) wire on the head connector and run to the +5V on the Arduino. I just cut the wire and then soldered all three together.
  • You need to solder an additional wire to the Black (GND) wire on the head connector and run to GND on the Arduino.
  • You need to cut the White (IR) wire and run both ends to the Arduino
  • The wire coming from the head itself needs to go to 2 on the Arduino.
  • The rest of the wire (from the head connector) needs to go to 3 on the Arduino board.
  • So I could see that everything was working I wired a diode and resistor from pin 10 to ground. A light comes on when the wedge is activated.

That is it. Four wires and basically you can command the RoboSapien V1.0 to do anything it normally can do and more.

:: The Software ::

The heavy lifting is done by the RSReadCommand subroutine. This is the interrupt handler for when pin 2 rises. When it rises we wait 1 and 1/4 bit times and then check to see if the pin is high or low. We shift that bit into the RSCommand.

RSSendCommand simply sends the entire command to the Microcontroller in the RoboSapien.

In the loop function when two RSStop commands are seen from the IR the wedge is activated and the RoboSapien microcontroller receives a number of commands in quick succession. They basically make him put his arms out and walk straight.

If two RSStop bytes are received again normal remote control is restored. Wedge mode is a little sticky because the rapid succession of command after receiving the first stop have to take place before the second RSStop will be noticed.

  1.  
  2. int IRIn = 2;            // We will use an interrupt
  3. int IROut= 3;            // Where the echoed command will be sent from
  4.  
  5. // Some but not all RS commands are defined
  6. #define RSTurnRight       0x80
  7. #define RSRightArmUp      0x81
  8. #define RSRightArmOut     0x82
  9. #define RSTiltBodyRight   0x83
  10. #define RSRightArmDown    0x84
  11. #define RSRightArmIn      0x85
  12. #define RSWalkForward     0x86
  13. #define RSWalkBackward    0x87
  14. #define RSTurnLeft        0x88
  15. #define RSLeftArmUp       0x89
  16. #define RSLeftArmOut      0x8A
  17. #define RSTiltBodyLeft    0x8B
  18. #define RSLeftArmDown     0x8C
  19. #define RSLeftArmIn       0x8D
  20. #define RSStop            0x8E
  21. #define RSWakeUp          0xB1
  22. #define RSBurp            0xC2
  23. #define RSRightHandStrike 0xC0
  24. #define RSNoOp            0xEF
  25. boolean RSEcho=true;      // Should Arduino Echo RS commands
  26. boolean RSUsed=true;      // Has the last command been used
  27. volatile int RSBit=9;     // Total bits of data
  28. volatile int RSCommand;   // Single byte command from IR
  29. int bitTime=516;          // Bit time (Theoretically 833 but 516)
  30.                           // works for transmission and is faster
  31. int last;                 // Previous command from IR
  32.  
  33. void setup()                    
  34. {
  35.   pinMode(IRIn, INPUT);    
  36.   pinMode(IROut, OUTPUT);
  37.   pinMode(10,OUTPUT);
  38.   digitalWrite(IROut,HIGH);
  39.   attachInterrupt(0,RSReadCommand,RISING);
  40.   last=RSNoOp;
  41. }
  42.  
  43. // Receive a bit at a time.
  44. void RSReadCommand() {
  45.   delayMicroseconds(833+208);  // about 1 1/4 bit times
  46.   int bit=digitalRead(IRIn);
  47.   if (RSBit==9) { // Must be start of new command
  48.     RSCommand=0;
  49.     RSBit=0;
  50.     RSUsed=true;
  51.   }
  52.   if (RSBit<8) {
  53.     RSCommand<<=1;
  54.     RSCommand|=bit;
  55.   }
  56.   RSBit++;
  57.   if (RSBit==9) RSUsed=false;
  58. }
  59.  
  60. // send the whole 8 bits
  61. void RSSendCommand(int command) {
  62.   digitalWrite(IROut,LOW);
  63.   delayMicroseconds(8*bitTime);
  64.   for (int i=0;i<8;i++) {
  65.     digitalWrite(IROut,HIGH);  
  66.     delayMicroseconds(bitTime);
  67.     if ((command & 128) !=0) delayMicroseconds(3*bitTime);
  68.     digitalWrite(IROut,LOW);
  69.     delayMicroseconds(bitTime);
  70.     command <<= 1;
  71.   }
  72.   digitalWrite(IROut,HIGH);
  73.   delay(250); // Give a 1/4 sec before next
  74. }
  75.  
  76. void loop()
  77. {
  78.   if (!RSUsed) {
  79.     if (RSCommand==RSStop && last==RSStop) RSEcho=!RSEcho;
  80.     last=RSCommand;
  81.     if (!RSEcho){
  82.       digitalWrite(10,HIGH);  // Turn on LED let us know
  83.                               //  we have control our wedge
  84.       RSSendCommand(RSRightArmOut);
  85.       RSSendCommand(RSTiltBodyRight);
  86.       RSSendCommand(RSRightArmDown);
  87.  
  88.       RSSendCommand(RSLeftArmOut);
  89.       RSSendCommand(RSTiltBodyLeft);
  90.       RSSendCommand(RSLeftArmDown);
  91.  
  92.       RSSendCommand(RSWalkForward);
  93.  
  94.     } else {
  95.       digitalWrite(10,LOW);   // No longer in control
  96.       RSSendCommand(RSCommand);
  97.     }
  98.     RSUsed=true;
  99.   }
  100. }
  101.  

One thing I noticed about my RoboSapien is that the left and right seemed to be confused. Or maybe WowWee assumed you were in front of the robot and I tend to stand in the back. So you could use this Stop-Stop wedge to flip right and left and then it would seem natural when following the robot.

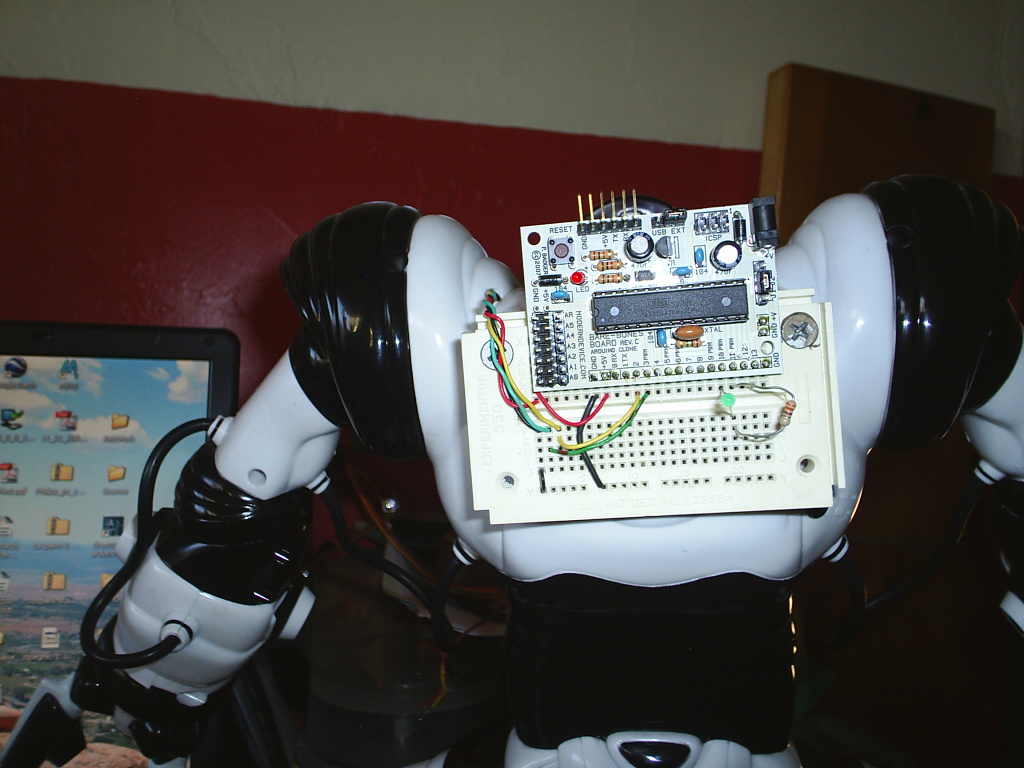
The new Arduino backpack for the RoboSapien V1.0

:: What is next ::

All this is a lead up to an upgrade on a new RoboQuad. But this basic platform (even with breadboard) will allow me to experiment with different ways of sensing the environment and then have the RoboSapien autonomously navigate a house. I plan to try navigating to the brightest/darkest, noisiest/quitest, or warmest/coldest place with a single RoboSapien remote key press (after the two stop presses).

Will add diagrams soon. (Ok. Not so soon.)

Karl http://www.coloradomesa.edu/~kcastlet


See also

RoboSapienServer.

http://blog.makezine.com/projects/tweetosapien-hack-a-robosapien-with-arduino-to-react-to-tweets/