:: RoboSapienServer ::

When I first got an Arduino, I was very intrigued by two separate projects: Karl Castleton's RoboSapienIR and the basic WebServer that came with the Ethernet library. I decided to combine the two in order to make a web enabled robot. RoboSpaienServer is the result.
You can find a quick video tour here.
Basic Hardware & Tools
On the arduino side, you will need:
- An arduino (obviously). Personally, I have an Arduino Mega, but you can use whatever configuration you prefer.
- A compatible Ethernet shield. Since the Mega will not take the default shield without wiring modifications, I instead bought an Ethernet shield from NKC Electronics
- A prototyping board and two resistors: one at 1 Kohm and another at 1.5K.
For the robot, I purchased a RoboSapien v1 toy robot on eBay.
To modify it for this project I used:
- An old extension cord for a phone cable that had both male and female ends to it (an RJ14 to be exact). However, any connector (USB, etc) would have done, as long as it has four wires and you have male and female ends.
- To enable use of the robot when not connected to the arduino, I also cannibalized an extra male connector that I could short out. This will be used to make a "stub plug."
- Two header pin pairs, each 1 x 2 pins. While you can use straight wire instead, these hook up more easily into the protype board (above).
- Some sort of insulation for the cut wires. While electrical tape or shrink wrap could be used, I recommend "liquid insulation," a rubber paint you can find in the electrical section of most hardware stores.
The tools required for this project are solder, a soldering iron, and lots of patience.
RoboSapien Wiring & Modifications
The basic principle of RoboSapienIR is that you replace the existing RoboSapien infrared remote with the Arduino, sending electical impulses in lieu of the IR impulses from the remote. This is done by tapping into the connector between the motherboard and the robot's head where the IR sensor resides. There's a detailed schematic below, but this section will take you step by step through the process.
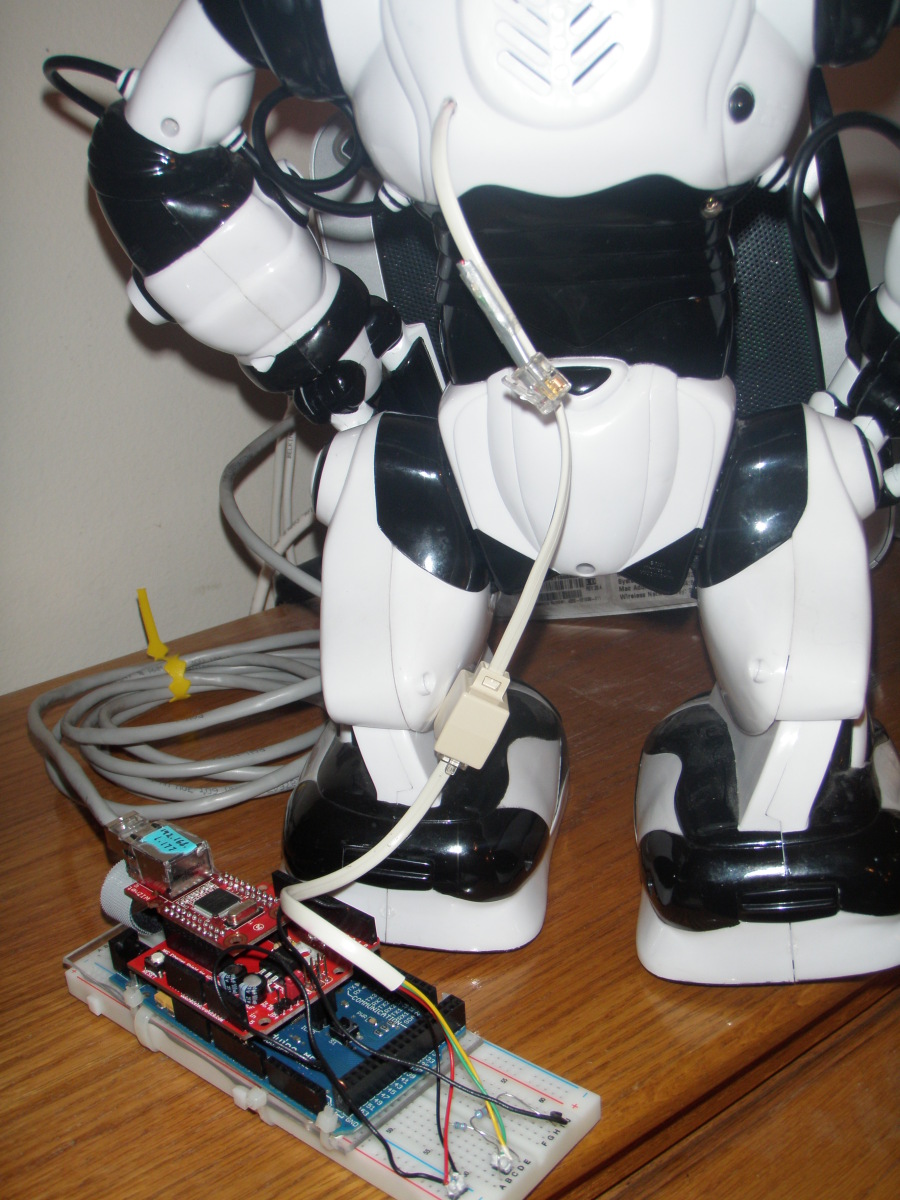
I began by taking my RJ14 cable and cutting it, making sure I had at least six inches on each end. I then removed the robot's back shell and used a soldering iron to melt a hole in the left side, symetrical with the power switch on the right. You can then thread the cable with the female connector through the hole in the plastic casing. The two photos below demonstrate what these modifications look like when the project is done (the gray wire taped to the cable on the right photo is the "stub plug" to allow operation without the arduino).
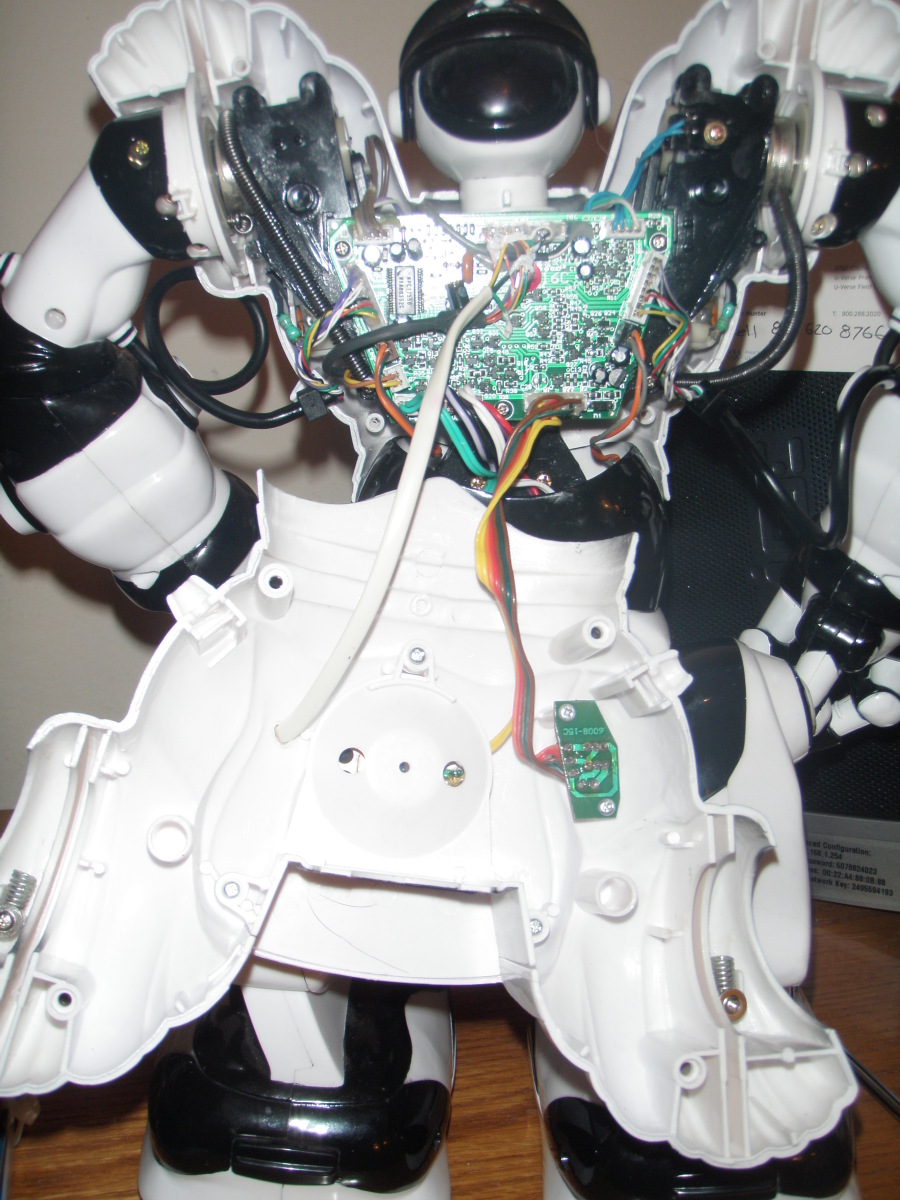
There are three wires of interest in the connector from the head to the motherboard: a 3.3V power (red), a ground (black), and the infrared signal (white). With the cable threaded through the hole in the backshell (you can't insert it afterwards!), I connected the red and black wires to the same colored wires in my cable by burning away the insulation with a soldering iron and then soldering my cable's wires directly to the undamaged wires. However, I have since discovered at this site that you could instead pull out the motherboard, flip it over, and solder directly to solder pads. If you have an opportunity to do this, I'd recommend it as the wires on the connectors are relatively fragile and easy to break.
To connect to the IR signal, cut the white wire and strip some insulation from either end. I then soldered my new cable's green wire to the end running to the robot's head and the yellow wire to the end heading towards the motherboard. After that, I insulated all the exposed connections with rubber "liquid insulation" paint (the white stuff near the connector in the righthand photo above).
For the male end of the cable, I soldered the red and black pins to a 1 x 2 pin header and the yellow and green wires to another 1 x 2 header. For the "stub plug," I took the spare male connector and soldered together the green and yellow wires. To test your wiring, put the "stub plug" into the female connector off the back of the robot and power up the robot. This should restore the wiring to its original state and allow you to use the remote to command the robot. If this works, insulate all exposed wires and button up the robot by replacing the backplate.
Note that the red power wire and the green wire back to the robot's IR sensor are unused in this project. I brought them out anyways for future projects.
Arduino Wiring
When I first tried the RoboSapienIR hack, I had a lot of difficulties.
I discovered here that while the arduino uses 5V for signals, the robosapien uses 3.3V. The subtlety is that
if your ground wiring is poor the hack will occasionally work! To make it work properly, you will need to construct a voltage divider to convert the 5V signal to 3.3V. Below is a schematic showing all the connections
(click to enlarge) on both ends of the cable.

In addition to the above, I also cut a piece of plexiglass to fit the bottom of my Mega, drilled holes to match those in the Mega, and secured the two together with zip ties. This insulates the arduino and allows me to secure it in turn to the protoype board with more zip ties. You can see in the lefthand photo above that this makes a much more compact arrangement than having the whole thing lying around.
Arduino Operation
You can now use the default RoboSapienIR sketch if you'd like. However, to make the web server work, download the source code below and cut and paste it into a new sketch. Be sure to modify the ip[] array (line 21) to reflect an IP address that will work on your local LAN.
- // RoboSapienServer.cpp
- // RobosapienServer - Web enable a RoboSapien
- // Kevin N. Haw
- // https://www.KevinHaw.com/RoboSapienServer.php
- // This project combines the default webserver example in the IDE distribution and Karl Castleton's(https://home.mesastate.edu/~kcastlet) RoboSapienIR (http://playground.arduino.cc/Main/RoboSapienIR).
- // Source code merged from those two sources.
- // Include files
- #include <Ethernet.h>
- #include <string.h>
- //////////////////////////////////////////////////////////////////
- // Begin Web Server specific variable deinitions
- //////////////////////////////////////////////////////////////////
- byte mac[] = { 0xDE, 0xAD, 0xBE, 0xEF, 0xFE, 0xED };
- // KNH, 02/09/2010 - Change IP address to use local subnet at home
- //byte ip[] = { 10, 0, 0, 177 };
- byte ip[] = { 192, 168, 1, 177 };
- // Server for web requests
- Server server(80);
- // Define field name in the submitted form
- #define SUBMIT_BUTTON_FIELDNAME "RSCmd"
- // String for HTTP request variables
- char pcHttpReqRsCmd[20] = {'\0'};
- volatile int viRobsapienUrlCmd = -1; // A robosapien command sent over the URL of a webpage HTTP request
- //////////////////////////////////////////////////////////////////
- // Begin Robosapien specific variable deinitions
- //////////////////////////////////////////////////////////////////
- // Some but not all RS commands are defined
- #define RSTurnRight 0x80
- #define RSRightArmUp 0x81
- #define RSRightArmOut 0x82
- #define RSTiltBodyRight 0x83
- #define RSRightArmDown 0x84
- #define RSRightArmIn 0x85
- #define RSWalkForward 0x86
- #define RSWalkBackward 0x87
- #define RSTurnLeft 0x88
- #define RSLeftArmUp 0x89
- #define RSLeftArmOut 0x8A
- #define RSTiltBodyLeft 0x8B
- #define RSLeftArmDown 0x8C
- #define RSLeftArmIn 0x8D
- #define RSStop 0x8E
- #define RSWakeUp 0xB1
- #define RSBurp 0xC2
- #define RSRightHandStrike 0xC0
- #define RSNoOp 0xEF
- // Subset of additional codes pulled from https://www.contrib.andrew.cmu.edu/~ebuehl/robosapien-lirc/ir_codes.htm
- #define RSRightHandSweep 0xC1
- #define RSRightHandStrike2 0xC3
- #define RSHigh5 0xC4
- #define RSFart 0xC7
- #define RSLeftHandStrike 0xC8
- #define RSLeftHandSweep 0xC9
- #define RSWhistle 0xCA
- #define RSRoar 0xCE
- int IRIn = 2; // We will use an interrupt
- int IROut= 3; // Where the echoed command will be sent from
- boolean RSEcho=true; // Should Arduino Echo RS commands
- boolean RSUsed=true; // Has the last command been used
- volatile int RSBit=9; // Total bits of data
- volatile int RSCommand; // Single byte command from IR
- int bitTime=516; // Bit time (Theoretically 833 but 516)
- // works for transmission and is faster
- int last; // Previous command from IR
- //////////////////////////////////////////////////////////////////
- // Begin Robosapien specific code
- //////////////////////////////////////////////////////////////////
- // Receive a bit at a time.
- // NOTE: Unused in the RoboServer aplication
- void RSReadCommand() {
- delayMicroseconds(833+208); // about 1 1/4 bit times
- int bit=digitalRead(IRIn);
- if (RSBit==9) { // Must be start of new command
- RSCommand=0;
- RSBit=0;
- RSUsed=true;
- }
- if (RSBit<8) {
- RSCommand<<=1;
- RSCommand|=bit;
- }
- RSBit++;
- if (RSBit==9) RSUsed=false;
- }
- // send the whole 8 bits
- void RSSendCommand(int command) {
- digitalWrite(IROut,LOW);
- delayMicroseconds(8*bitTime);
- for (int i=0;i<8;i++) {
- digitalWrite(IROut,HIGH);
- delayMicroseconds(bitTime);
- if ((command & 128) !=0) delayMicroseconds(3*bitTime);
- digitalWrite(IROut,LOW);
- delayMicroseconds(bitTime);
- command <<= 1;
- }
- digitalWrite(IROut,HIGH);
- delay(250); // Give a 1/4 sec before next
- }
- // Set up RoboSpapien functionality
- void RSSetup()
- {
- pinMode(IRIn, INPUT);
- pinMode(IROut, OUTPUT);
- pinMode(10,OUTPUT);
- digitalWrite(IROut,HIGH);
- attachInterrupt(0,RSReadCommand,RISING);
- last=RSNoOp;
- // Make robot burp to indicate setup is complete
- RSSendCommand(RSBurp);
- }
- // Loop for RoboSapien functionality
- // Write only functionality - send the command from the web page to the robot, ignoring any input from the remote
- void RSLoop()
- {
- // Has a new command come in from the server?
- if(viRobsapienUrlCmd != -1)
- {
- // New command - send it to robot
- Serial.print("Sending command to RoboSapien: ");
- Serial.println(viRobsapienUrlCmd, HEX);
- RSSendCommand(viRobsapienUrlCmd);
- // Now clear command
- viRobsapienUrlCmd = -1;
- }
- }
- //////////////////////////////////////////////////////////////////
- // Begin Webserver Specific Code
- //////////////////////////////////////////////////////////////////
- // Print ourt MIME and HTML header at top of webpage
- void HtmlHeader(Client client)
- {
- client.println("HTTP/1.1 200 OK");
- client.println("Content-Type: text/html");
- client.println();
- client.println("<HTML>\n<HEAD>");
- client.println(" <TITLE>Kevin's Arduino Webserver</TITLE>");//
- // client.println(" <META HTTP-EQUIV=\"refresh\" CONTENT=\"5\">");
- client.println("</HEAD><BODY bgcolor=\"#9bbad6\">");
- }
- // Print the footer at the bottom of the webpage
- void HtmlFooter(Client client)
- {
- client.println("</BODY></HTML>");
- }
- // Print a submit button with the indicated label wrapped in a form for the indicated hex command
- void SubmitButton(Client &client, char *pcLabel, int iCmd)
- {
- client.print("<form method=post action=\"/?");
- client.print(iCmd, HEX);
- client.print("\"><input type=submit value=\"");
- client.print(pcLabel);
- client.print("\" name=\"" SUBMIT_BUTTON_FIELDNAME "\">");
- client.println("</form>");
- }
- // Parse an HTTP request header one character at a time, seeking string variables
- void ParseHttpHeader(Client &client)
- {
- char c;
- // Skip through until we hit a question mark (first one)
- while((c = client.read()) != '?' && client.available())
- {
- // Debug - print data
- Serial.print(c);
- }
- // Are we here for a question mark or did we run out of data?
- if(client.available() > 2)
- {
- char pcUrlNum[3], *pc;
- // We have enough data for a hex number - read it
- for(int i=0; i < 2; i++)
- {
- // Read and dump data to debug port
- Serial.print(c = pcUrlNum[i] = client.read());
- }
- // Null terminate string
- pcUrlNum[2] = '\0';
- // Get hex number
- viRobsapienUrlCmd = strtol(pcUrlNum, &pc, 0x10);
- }
- // Skip through and discard all remaining data
- while(client.available())
- {
- // Debug - print data
- Serial.print(c = client.read());
- }
- }
- // Set up webserver functionality
- void WebServerSetup()
- {
- Ethernet.begin(mac, ip);
- server.begin();
- }
- // Web server loop
- void WebServerLoop()
- {
- Client client = server.available();
- boolean bPendingHttpResponse = false; // True when we've received a whole HTTP request and need to output the webpage
- char c; // For reading in HTTP request one character at a time
- if (client) {
- // Loop as long as there's a connection
- while (client.connected()) {
- // Do we have pending data (an HTTP request)?
- if (client.available()) {
- // Indicate we need to respond to the HTTP request as soon as we're done processing it
- bPendingHttpResponse = true;
- ParseHttpHeader(client);
- }
- else
- {
- // There's no data waiting to be read in on the client socket. Do we have a pending HTTP request?
- if(bPendingHttpResponse)
- {
- // Yes, we have a pending request. Clear the flag and then send the webpage to the client
- bPendingHttpResponse = false;
- // send a standard http response header and HTML header
- HtmlHeader(client);
- // Put out a text header
- client.println("<H1>Kevin's RoboSapien Webserver</H1>");
- client.println("<table border cellspacing=0 cellpadding=5><tr>");
- client.println("<td>");
- // Create buttons
- SubmitButton(client, "WakeUp", RSWakeUp);
- SubmitButton(client, "Roar", RSRoar);
- SubmitButton(client, "Whistle", RSWhistle);
- SubmitButton(client, "High5", RSHigh5);
- client.println("<br>");
- client.println("</td><td>");
- SubmitButton(client, "LeftArmUp", RSLeftArmUp);
- SubmitButton(client, "LeftArmIn", RSLeftArmIn);
- SubmitButton(client, "LeftArmOut", RSLeftArmOut);
- SubmitButton(client, "LeftArmDown", RSLeftArmDown);
- SubmitButton(client, "LeftArmSweep", RSLeftHandSweep);
- client.println("<br>");
- client.println("</td><td>");
- SubmitButton(client, "RightArmUp", RSRightArmUp);
- SubmitButton(client, "RightArmIn", RSRightArmIn);
- SubmitButton(client, "RightArmOut", RSRightArmOut);
- SubmitButton(client, "RightArmDown", RSRightArmDown);
- SubmitButton(client, "RightArmSweep", RSRightHandSweep);
- client.println("<br>");
- client.println("</td></tr></table>");
- client.print("<br><br><br>URL Hex no: ");
- client.print(viRobsapienUrlCmd, HEX);
- client.println("<br />");
- // send HTML footer
- HtmlFooter(client);
- // give the web browser time to receive the data
- delay(1);
- client.stop();
- }
- }
- } // End while(connected)
- }
- }
- //////////////////////////////////////////////////////////////////
- // Begin arduino entry points
- //////////////////////////////////////////////////////////////////
- void setup()
- {
- // open the serial port at 9600 bps:
- Serial.begin(9600);
- // Print greeting
- Serial.println("Kevin's RobSapien Server");
- RSSetup();
- WebServerSetup();
- }
- void loop()
- {
- RSLoop();
- WebServerLoop();
- }
Operation
Power up the robot. When you upload the sketch to your arduino, you should hear the robot "burp" when the code runs. This is the signal from the software indicating that it is now in control of the robot.
This will also occur every time you reset the board.
You should then be able to connect your Ethernet shield to the local LAN and log into the webserver. You may have to reset the board after you cable it up. Once you log in, you should see something like the screenshot below in your browser.

You can now press buttons to move the robot's arms, make him roar or high 5, etc. If the robot is inactive for a period of time, it will yawn and "go to sleep" to enter a power saving mode. Press the "Wake Up" button to get it going.
Modifications
The web server works by appending a question mark and a hexidecimal number to the back of the URL to send a command code to the robot (i.e. "?B1" to wake up). You can easily add more buttons or change the codes passed to the SubmitButton() call in lines 280 to 302 (I intentionally left out any movement commands because I didn't want the robot walking off the demo table I had set up for it).
You can modify the background color or make any modifications you might put on a normal webpage by playing with the HTML sent over the socket connection. Just make it reflect your own sense of aesthetics. Also, I learned from my demo at the Discovery Science Center that the buttons should be bigger if you want passersby to use the web page. You should also change the name of the webpage to remove the "Kevin's Webpage" titles at line 274 and 177. After all, it's your webserver now!
Additional mods to the actual robosapien operation are also available. You could modify the RSLoop() (lines 151-164) to read the IR sensor via the RSReadCommand() routine so that either the web server or the remote can be used to control the robot. You cold also program a long series of commands (e.g. move ten steps forward, then ten back) or add programming commands. Also, if you don't like the "burp" to signal the arduino has taken control, change it (line 144).
Finally, replacing the Ethernet shield with a WiFi module or leaving the server up and connected to the Internet so anyone can manipulate it (say, with a webcam trained on your robot) would be interesting directions to take this.
Final Thoughts
This was a pretty fun project for me and did not take all that much time to get running. In fact, it has taken me longer to document the whole thing in this writeup than it did to do in the first place.
If you have any questions or comments, please reach me via the "Contact" link at my website.
Thanks!
Links
Useful links for this project.
- RoboSapienServer - The equivilent page at my personal website.
- RoboSapienIR - The arduino/robosapien project by Karl Castleton that inspired this project.
- robosapien.tk - Lots of robosapien mods, including specific notes on power and connectors.
- Discovery Science Center - Where I demoed this for Engineering Week.